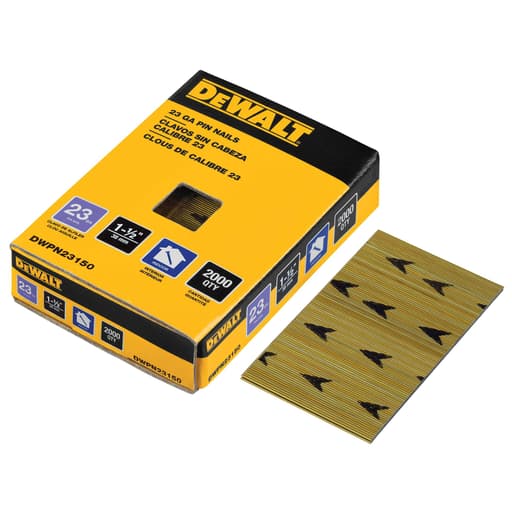
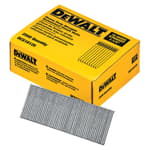
Features
- 23-gauge headless pins
- 1-1/2 in. length
- Chisel point for smooth installation
- 100 nails per stick; 2,000 nails per box
- Glue-collated (strip) loading
- Smooth shank (minimizes splitting)
- Bright/metallic finish
- Intended for interior trim where nail visibility should be minimal
Specifications
| Gauge | 23 gauge |
| Length | 1.5 in |
| Package Quantity | 2000 nails (100 per stick) |
| Collation Material | Glue |
| Shank Type | Smooth shank |
| Nail Head Style | Headless (no head) |
| Point Style | Chisel point |
| Finish | Bright / Metallic |
| Fastener Material | Metal |
| Nail Angle | Straight |
| Nail Penny Size (D) | 4d |
| Loading Type | Strip (glue-collated) |
| Product Weight | 0.5 lb (box) |
| Product Dimensions (H X W X D) | .745 in x 2.245 in x 3.225 in |
| Intended Use | Interior trim |
| Returnable | 90-Day |
| Upc / Gtin 13 | 0885911573306 |
| Store Sku | 1003836602 |
Headless 23-gauge pin nails, 1-1/2 in. long, intended for interior trim applications (for example: crown molding and miter returns). Chisel point for smooth installation and reduced splitting. Packaged 100 nails per stick and 2,000 nails per box. Designed for use with 2 in. capacity 23-gauge pin nailers.
DeWalt 1-1/2 in. x 23-Gauge Pin Nail Review
Why I reach for 23-gauge pins in trim work
On fine trim work, the best nail is the one you never see. That’s the whole point of 23-gauge headless pins: they hold miter returns, delicate panel molding, and bead details in place while the glue cures, leaving little to no mark to repair. I’ve been using these DeWalt 1-1/2 in. 23-gauge pins across a range of paint- and stain-grade interior jobs, and they’ve become an easy grab when I want clean results without the fuss of filling brad holes.
What these pins are (and aren’t) for
These are straight, glue-collated, headless pins with a smooth shank and chisel point. At 1-1/2 in. long, they’re in the upper range of what most 23-gauge pinners can drive. The headless profile is the draw: holes are tiny and easy to hide, especially on stain-grade work where even a pinprick of filler can telegraph. But headless also means limited mechanical holding power. Think of them as clamps for glue-ups and light tacking—not as a substitute for 18-gauge brads when you need real withdrawal strength.
For interior work where appearance matters—crown molding scarf joints, shoe molding returns, casing details, small applied moldings—these pins make a lot of sense. I wouldn’t use them outdoors or in damp areas, both because the bright steel finish isn’t corrosion-resistant and because tannin-rich woods (like oak) can react with bright steel in the presence of moisture.
Loading, packaging, and handling
The box holds 2,000 pins, arranged in strips of 100. The strips are neatly glued, consistent in thickness, and didn’t shed flakes that foul up a magazine. I kept a few strips in a tool pouch for a week of site work; they held together well without breaking into short, finicky segments. The compact box is easy to stash in a systainer or drawer, and the labeling is clear enough that I didn’t have to double-check lengths mid-task.
A small but appreciated detail: the strips sit flat and don’t warp when they’ve been in a hot van. Glue-collated fasteners can sometimes curl or fan out with heat; I didn’t see that here. Still, storing them in the box keeps them tidy and avoids stray pins ending up in the bottom of your case.
Driving performance
I ran these pins through two 23-gauge pinners—a corded shop pinner and a compact cordless—both rated for 1-1/2 in. fasteners. Feeding was consistent, and I didn’t encounter misfeeds or double-shots that can happen when the strip thickness varies. The pins seat cleanly, and the chisel point seemed to help in reducing surface blowout and wandering, particularly at slight angles.
In softwoods and poplar, I could sink the pins just below the surface without cratering. In hardwoods (oak and maple), the pins tracked straight the majority of the time. Whenever I did get deflection, it was usually when I pushed too close to an edge or hit a cathedral grain reversal. That’s typical for 23-gauge: keep a conservative edge distance, let the tool sit square to the work, and avoid driving through knots or wild grain.
On MDF, which can be prone to mushrooming around fasteners, the headless profile really shines. The pins vanish with almost no raised fibers, especially if you dial in the depth-of-drive. I found it easy to tack thin lattice or screen bead without visible marks, then come back for a quick pass of sandpaper.
Holding power in the real world
No surprises here—these are pins, not brads. Used with a bead of glue, they’re excellent at holding miter returns and small moldings while adhesive cures. On paint-grade crown, I use them to stitch scarf joints tight before following up with 15- or 18-gauge fasteners in the meat of the molding. On stain-grade casing, I’ll sometimes use a pair of pins right at the miter nose to keep things perfectly aligned while the glue sets. Hours later, those miters are still tight, and no filler is needed at the face.
If you expect them to hold baseboard or casing to a wall on their own, you’ll be disappointed. But used as intended—temporary clamps that virtually disappear—they’re spot on.
Surface invisibility and finishing
The best part of 23-gauge headless pins is how little there is to fix afterward. On paint-grade, a quick wipe of lightweight spackle is plenty, and often I don’t need any fill at all on shadowed moldings. On stain-grade, the hole is usually a non-issue. One note of caution: because the pins are effectively invisible, mark where you’re firing if you’ll be planing or scraping later. It’s easy to forget a pin is there and nick a blade. A pencil dot off to the side or a layout pattern helps.
The bright finish plays well under paint and clear coat. If you’re using water-based finishes on tannic woods and the piece may see occasional moisture, consider a test board. I didn’t see staining in normal interior conditions, but bright steel in oak plus water can create black halos over time.
Compatibility and capacity tips
The strips fit and fed fine in my pinners. But length compatibility is the gotcha with 1-1/2 in. pins. Some 23-gauge pinners—especially older or compact models—top out at 1-3/8 in. If your magazine or driver isn’t rated for 1-1/2 in., these simply won’t fit or won’t seat reliably. Check your tool’s spec plate or manual before buying; it saves a trip back to the store. If you’re on a shorter-capacity pinner, the same pins are commonly available in 1-1/4 in. lengths and below.
Also, make sure your nosepiece and depth adjustment are dialed for headless fasteners. A nose set up for micro-headed 23-gauge nails can behave differently. I had the best results with a slightly reduced air pressure on a compressor pinner and one notch lighter on the depth setting for the cordless unit.
Quality control and consistency
Across the box, straightness was good and diameters were consistent. I didn’t run into malformed tips or bent pins fresh out of the strip. The chisel points were cleanly formed and seemed to contribute to cleaner entry in hardwoods. Glue residue inside the magazine was minimal after a few hundred shots—there’s always a tiny bit with glue-collated strips, but a quick wipe at the end of the day kept things tidy.
Where they sit among other options
Against other 23-gauge pins I use from pro-focused brands, these DeWalt pins hold their own in consistency and feed reliability. Some alternatives offer stainless or galvanized options for damp environments; these are bright steel only. If you need a touch more holding power without jumping to 18-gauge, micro-headed 23-gauge nails are another route, at the expense of a slightly more noticeable hole. For purely invisible work on interior trim, headless pins like these are still my first choice.
Practical tips for best results
- Treat pins as helpers for glue-ups, not primary fasteners.
- Stay at least 3/8 in. from edges in hardwoods to avoid blowouts.
- Angle pairs of pins slightly and cross them for a bit of mechanical lock when needed.
- Mark firing lines if you’ll plane, scrape, or chisel the area later.
- Store the box closed; even tiny pins are great at finding their way into your shoes.
Recommendation
I recommend these 1-1/2 in. DeWalt 23-gauge pins for interior trim, delicate moldings, and miter work where an invisible fastener is the goal. They feed reliably, drive cleanly, and leave almost nothing to repair, which is exactly what I want from a headless pin. Just make sure your pinner is rated for 1-1/2 in. lengths and keep them to dry, interior applications. If you need corrosion resistance or your pinner maxes out at 1-3/8 in., look for a different finish or shorter length. Otherwise, these pins are a dependable, low-fuss staple in the kit.
Project Ideas
Business
Micro-Trim Upgrade Service
Offer fast, high-margin upgrades like applied wall panels, door paneling, and window casing build-outs. The 23-gauge pins make for near-invisible fasteners, reducing caulk/putty and turnaround time. Package offerings per room or per linear foot.
Mobile Picture Framing & Install
Provide on-site custom frames and art hanging for homeowners, galleries, and offices. Assemble frames with headless pins for clean corners, fit backing and hanging hardware, and offer same-day installation.
Cabinet Refacing Accents
Add applied moldings to flat cabinet doors to mimic shaker or mullion styles, and dress end panels with trim. The tiny pins hold while glue cures without telegraphing through paint, enabling quick kitchen refreshes.
Real Estate Punch-List Finish Carpentry
Specialize in fast fixes: shoe molding reattachment, crown/miter returns, wainscot touch-ups, and casing repairs before listings or closings. Minimal hole filling means clean results in tight timelines.
Custom Shadow Boxes & Memorabilia
Produce and sell bespoke shadow boxes for jerseys, medals, and keepsakes. Use pins to assemble thin frames and applied stops cleanly, standardize sizes for efficiency, and sell via local shops and online.
Creative
Mitered Keepsake Boxes with Veneer Inlays
Build small hardwood boxes with 45° mitered corners and decorative veneer inlay bands. Use the 23-gauge headless pins to tack glued miters and inlay strips without splitting or visible holes, then sand flush and finish with oil or lacquer.
Slimline Picture Frame Gallery
Create a collection of thin-profile frames for photos or art. The headless pins let you assemble delicate miters and attach backer strips cleanly, minimizing fill work. Mix species and stains for a cohesive gallery wall.
LED Cove Crown Shelf
Build a lightweight cove crown with a hidden LED channel. Pin thin crown, returns, and light valances to cleats and blocking—headless pins keep the look pristine and reduce touch-ups before paint.
Shadow Box Herbarium
Press and display leaves or flowers in shallow shadow boxes with glass or acrylic fronts. Use pins to assemble the frame and apply small bead molding as a glass stop, avoiding cracks and visible fasteners.
Applied Molding Accent Wall
Lay out box or grid patterns on a feature wall using small-profile trim. Pin and glue the molding to create crisp panels with minimal nail holes, then paint the wall and trim a uniform color for a high-end look.