
Features
- Compatible with most 23-gauge pin nailers
- Headless design to minimize visible nail heads
- Chisel point to reduce splitting of material
- Coated finish intended for interior use only
- Suitable for decorative and small molding applications
Specifications
| Fastener Type / Gauge | 23 Gauge pin nails |
| Finish | Coated |
| Head Type | Chisel point |
| Product Length (In) | 1-1/2 |
| Pack Quantity | 2,000 |

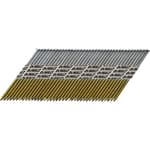
23-gauge pin nails for use with 23-gauge pin nailers. Intended for finish applications such as decorative and small moldings, miter returns, and kitchen moldings. Coated for interior use only. Headless design minimizes visible nail heads and the chisel point helps reduce splitting.
DeWalt 1-1/2 in 23GA Pin Nail, Chisel Point (2,000 PK) Review
Why I reach for 1-1/2 in 23-gauge pins
Small moldings, fragile miters, and prefinished trim demand fasteners that won’t telegraph through paint or split delicate stock. That’s where these DeWalt 23-gauge pins earn their keep. I’ve run them through a handful of finish tasks—miter returns on crown, beaded face frames, window stop, light appliqués, and thin profiled cap—and they hit a sweet spot: nearly invisible holes, strong enough temporary hold while glue cures, and minimal risk of splitting when you need to shoot close to an edge.
The 1-1/2 in length is on the long side for a micro-pinner. That extra reach is useful when you want more bite into a substrate—say, MDF cap into pine blocking, or a maple face-frame return over plywood. It’s also the length that separates good pins from fussy ones: any inconsistency in straightness, collation, or point geometry shows up as blowouts or deflection. These held up well in my testing.
Drive quality and consistency
I drove a few hundred pins across poplar, maple, red oak, and MDF using three different 23-gauge pinners (air and battery). Feed was reliable and the strips were uniform; I didn’t run into the “crumbly strip” problem that sometimes plagues budget pins. The adhesive collation stayed intact in the magazine, broke cleanly on firing, and didn’t leave gummy residue.
Penetration was consistent at 85–95 psi on pneumatics and default depth on a cordless unit. In hard maple, I bumped pressure to 100 psi to get perfectly flush heads without double-tapping. The pins are headless, so you’re not fighting a mushroomed head; that helps with clean set and near-invisible entry marks. I saw one slight surface bruise in soft pine when I got lazy with pressure settings—backing off 5–10 psi fixed it.
Chisel points and splitting near edges
The chisel point is a big part of the story here. It enters cleanly and reduces the wedge effect that can split thin stock. Shooting within 3/16 in of an end grain miter in poplar and oak, I didn’t get any splits, which is not always the case with sharper diamond points.
A tip that matters: chisel points tend to drift away from the long facet. If you’re pinning a narrow return and worried about the pin walking out the side, orient the tool so the long facet steers the pin into meat, not out of it. Alternating orientation can also help when you’re stacking two pins in a small profile.
Holding power and where these shine
They’re 23-gauge and headless—so mechanical holding power is modest, as expected. Where these pins excel is in tandem with glue. They act like temporary clamps without leaving big holes you’ll have to fill and sand. On miter returns and delicate moldings, I’ll lay a thin bead of glue, seat the piece, and shoot two or three pins at opposing angles. The parts stay put, there’s no visible head to fill, and I can keep moving.
For heavier trim (e.g., full-size base or casing), I still prefer 18-gauge brads or even finish nails. But for small quarter-round, cabinet crown returns, window stop, wainscot cap, and decorative appliqués, these 1-1/2 in pins are a sweet match—especially when you need that extra depth into a substrate behind drywall or into plywood cores.
Surface quality and visibility
The headless design is the main aesthetic win. On prefinished cabinet parts and white lacquered trim, the holes were barely noticeable from a couple feet away—often not noticeable at all after a light pass with a white eraser or a fingernail buff. On stained oak, pin marks all but disappeared along the grain; cross-grain, I could find them only at grazing light. If I needed to disguise a shot in a conspicuous area, a tiny dot of wax fill or a buff with tinted polish made them vanish.
I also appreciated that the coating didn’t leave any haloing or finish contamination. Some pins weep resin when they heat up, marking flat sheen paints; I didn’t see that here.
Compatibility: check your nailer’s length range
These pins are advertised as compatible with most 23-gauge pinners, and that matched my experience—with a caveat. Some popular micro-pinners top out at 1-3/8 in. If your tool’s maximum fastener length is 1-3/8, these 1-1/2 in pins simply won’t fit. That’s not a defect in the pins; it’s a mismatch. Before you buy, confirm your nailer’s range in the manual or on the magazine label. If your pinner takes 1-1/2 in pins, these feed fine. If it doesn’t, opt for the 1-1/4 or 1-3/8 in length instead.
I ran these without issue in two pro-grade pinners rated for 1-1/2 in pins. In a compact cordless model capped at 1-3/8, they physically wouldn’t load—which underscores the point: measure twice, buy once.
Interior-only coating and corrosion considerations
The coated finish helps with drive and friction hold, but it’s intended for interior use. I wouldn’t use these in exterior trim, bathrooms with persistent humidity, or anywhere moisture exposure is likely. For those scenarios, stainless or specifically rated galvanized pins are the safer choice. On interior painted and stained work, I didn’t observe any discoloration around pin holes—even on tannin-rich oak—after two weeks and two finish systems (waterborne poly and shellac-based primer plus acrylic enamel). Long-term, interior conditions shouldn’t pose a problem.
Packaging and handling
The 2,000-count pack is sensible for shop and site work. The strips are firm enough not to crumble in a pouch, and the plastic box snaps closed securely. I like to pre-stage a few strips in a shallow bin on the miter saw stand; these held their shape and didn’t shed glue flakes that can gunk up the magazine. It’s a small thing, but it reduces jams over time.
Reliability and jams
Across all the tasks, I experienced one minor jam, traceable to dust buildup in the magazine rather than the pins themselves. After a quick blowout with compressed air, feed returned to normal. Pins were straight, tips were cleanly formed, and I didn’t find any bent or doubled pins in the pack. That kind of consistency is what you want with 1-1/2 in length, where a slight bend shows up as a side exit.
Tips to get the most from these pins
- Dial in pressure on scrap. Start low and increase until pins set flush without dimpling the surface.
- Mind chisel orientation to manage drift, especially on thin edges and returns.
- Use glue. Consider the pins as third hands rather than structural fasteners.
- Back up the work when you can. A scrap backer reduces blowout on delicate pieces.
- Keep the magazine clean. Fine dust and adhesive crumbs are the usual culprits behind feed hiccups.
- Confirm length compatibility. Your pinner must be rated for 1-1/2 in pins.
The bottom line
If your 23-gauge pinner is rated for 1-1/2 in fasteners and you’re doing fine finish work, these DeWalt 23-gauge pins are a dependable choice. They drive cleanly, leave virtually invisible entry marks, and the chisel points help prevent splits when you’re working close to edges. The interior-only coating is appropriate for most trim and cabinet applications, and the overall consistency reduces the headaches that long micro-pins can cause.
Recommendation: I recommend these pins for interior finish carpentry, cabinetry, and trim where you need a longer 23-gauge fastener and your pinner supports 1-1/2 in lengths. They deliver reliable feed, clean surface results, and reduced splitting. If your pin nailer caps at 1-3/8 in or you need exterior-rated fasteners, look elsewhere or choose a shorter, corrosion-resistant alternative.
Project Ideas
Business
Miter Return and Trim Repair Service
Offer a mobile micro-service fixing broken miter returns, loose shoe molding, and chipped cabinet trims. Use headless pins for clean, fast interior repairs that need minimal filling and paint touch-ups.
Onsite Picture Framing and Install
Provide custom frame assembly, shadow box builds, and professional hanging at clients’ homes or galleries. Use 23-gauge pins to secure splines, rabbets, and glass/backer stops invisibly for a premium finish.
Kitchen and Bath Finish Trim Add-Ons
Partner with remodelers to install scribe molding, light rail, toe-kick skins, and small cabinet moldings. Headless pins minimize visible holes on painted or stained finishes and speed up interior-only punch lists.
Closet and Built-In Upgrades
Install thin face frames, edge trims, and decorative moldings on closet systems and built-ins. The 1-1/2 in pins provide strong, discreet fastening for small moldings that clients want to look seamless.
Retail Display and Boutique Signage Trim
Build and refresh in-store displays with delicate wood trims, label rails, and product riser details. Use headless pins for fast installs during off-hours, leaving clean surfaces with minimal finishing required.
Creative
Shadow Box and Specimen Frames
Build layered shadow boxes with delicate inner stops and tiny moldings. Use the headless 23-gauge pins as invisible clamps to hold trims and glass stops while glue sets, avoiding visible nail heads and reducing risk of splitting thin stock.
LED Cove and Valance Trims
Create slim hardwood coves, light rails, and diffuser channels for LED strips. The 1-1/2 in headless pins let you fasten small returns and miters cleanly so light lines stay crisp with no visible fastener marks.
Fabric-Wrapped Acoustic Wall Art
Make lightweight frames for acoustic panels and wrap them in fabric. Use pin nails to assemble frames and tack on decorative wood trim without telegraphing nail heads through fabric or splitting thin edging.
Marquetry and Veneer Edge Banding
Apply wood edge banding and delicate inlay frames around veneered panels. Use pins to temporarily fix banding while glue cures; the headless design leaves near-invisible holes and the chisel point helps prevent splitting in fragile grain.
Miniature Furniture and Dollhouse Trim
Craft miniature baseboards, casings, and crown for dollhouses and scale models. The 23-gauge, chisel-point pins hold tiny parts securely with minimal risk of splitting and nearly invisible fastening.