Features
- RESTORES OVERALL TOILET PERFORMANCE: All in one toilet repair kit replaces inefficient fill and flush valves, leaky flappers, and broken toilet handles to make your toilet run like new.
- UNIVERSAL DESIGN: 400A toilet fill valve adjusts easily from 9 – 14 inches, fits most 2-inch flush valve toilets, and is ideal for use in 1.6 to 3.5 gallons per flush toilets or larger
- HIGH PERFORMANCE FLAPPER: PerforMAX high performance 2-inch adjustable water-saving toilet flapper maximizes water usage with each flush
- EASY INSTALLATION: Easily installs in 10 minutes or less to get your toilet flushing like new again
Specifications
| Color | Easy Install |
| Size | 2 inches |
| Unit Count | 1 |
Related Tools
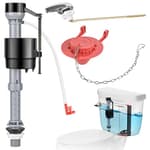
This all-in-one toilet repair kit replaces the fill and flush valves, flapper, and handle components for toilets with 2-inch flush valves. The fill valve adjusts from 9 to 14 inches and fits toilets using about 1.6 to 3.5 gallons per flush, and the adjustable 2-inch flapper helps control water usage. The kit is designed for straightforward installation, typically in 10 minutes or less.
Fluidmaster 400AKR Universal All in One Toilet Repair Kit for 2-Inch Flush Valves, Easy Install Review
Why I reached for the Fluidmaster 400AKR kit
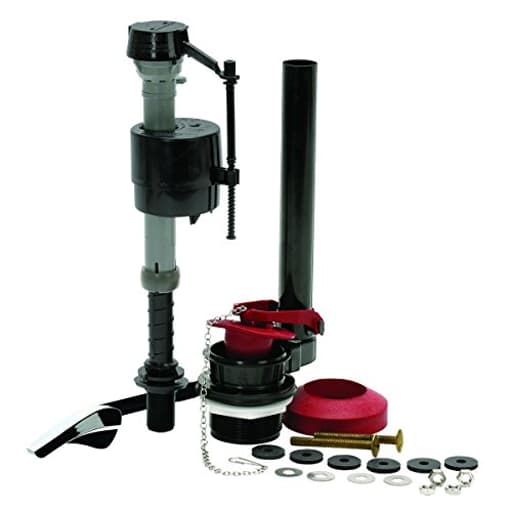
A toilet that hisses, trickles, or takes ages to refill is a small annoyance that adds up on the water bill. I keep a couple of go‑to solutions on hand for these fixes, and the Fluidmaster 400AKR kit has become one of them. It’s a universal 2‑inch repair kit that replaces the major wear items—fill valve, flush valve with flapper, tank‑to‑bowl gasket and bolts, and a handle. I installed it on an older, 1.6 GPF two‑piece toilet that had developed a persistent ghost flush and slow refill. The goal was simple: restore performance without piecing together parts from a bin.
Out of the box, the kit is straightforward: a 400A adjustable fill valve (9–14 inches), a PerforMAX 2‑inch adjustable flapper attached to a new flush valve seat/overflow assembly, a thick tank‑to‑bowl gasket, hardware, and a basic front‑mount handle. Everything you need to rebuild a 2‑inch gravity toilet, assuming standard North American fittings.
Installation: not hard, but plan for cleanup and rust
The claim is “10 minutes or less.” If you’re just swapping a fill valve, maybe. For a full rebuild with the flush valve, you have to take the tank off the bowl, and that’s where time goes—especially on an older toilet with corroded hardware.
My process and timing:
- Shut off water, flush and sponge out the tank, then disconnect the supply line (I recommend replacing it with a new braided 3/8 in. x 7/8 in. connector while you’re in there).
- Remove tank‑to‑bowl bolts: penetrating oil and a nut driver help; badly rusted bolts may need to be cut.
- Lift the tank, remove the old tank gasket, flush valve, and fill valve.
- Install the new flush valve and gasket, set the tank back on the bowl, loosely install new bolts, square the tank, then tighten evenly until the tank sits solidly without rocking. Avoid over‑tightening—porcelain cracks are forever.
- Install the new fill valve, set height, clip the refill tube to the overflow, and connect the water supply.
- Adjust the flapper and waterline, check for leaks, then install or reuse the handle.
Start to finish, including cleaning mineral buildup and wrestling with old bolts, this took me about 40 minutes. If your hardware isn’t corroded, you can realistically be done in 20–30.
A few installation tips that matter:
- Fill valve height matters. The 400A head should sit at least an inch above the top of the overflow tube. The valve adjusts with a simple twist; don’t force it.
- Don’t shove the refill tube down the overflow—clip it at the top. Shoving it below the waterline can siphon water and cause run‑on.
- Flapper chain slack should be about one link—too tight and it leaks, too loose and you get weak flushes.
- If your tank is unusually short, you may need to trim the overflow tube on the new flush valve to maintain proper clearances. The kit’s instructions cover the measurement; a fine‑tooth saw does the job.
Tuning: water use and flush feel
The PerforMAX flapper is the quiet star of the kit. It has an adjustable dial that controls how quickly the flapper closes, effectively tuning the flush volume. On my 1.6 GPF toilet, I set the dial mid‑range and got reliable, complete bowl clears without overspending water. If you’re chasing efficiency, you can dial it down; if you’re battling a sluggish bowl, dial it up a notch.
The 400A fill valve is a familiar design for a reason. It’s easy to set the waterline to the tank’s mark, and the refill ratio puts an appropriate amount of water back into the bowl. Refill speed was brisk without being noisy, and shutoff was crisp with no chattering. It doesn’t make the tank whisper‑quiet, but it’s well within “normal household background” noise.
Build quality and hardware
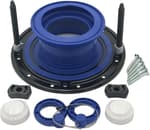
The main components are robust: the fill valve body is rigid plastic with a reliable float, and the flapper rubber feels substantial. The tank‑to‑bowl gasket is thick and seated well. The included bolts on my kit were brass with rubber and stainless washers; the nuts were plated steel. They sealed fine, but if you’re in a corrosive environment or just prefer to avoid future rust, swapping the nuts to brass is a cheap upgrade.
The included handle works—it’s a light plastic front‑mount with a bendable arm. On my toilet, I kept the original metal handle because it felt better and fit the side‑mount orientation. Consider the handle a convenient spare rather than an upgrade part.
Performance after the swap
My ghost flush disappeared immediately. The tank refilled to the mark quickly, and the bowl refill was balanced—no more partial siphon noises. The flush felt stronger than before, which I attribute to the fresh flapper seal and the ability to tune the closing time. I also appreciated that the waterline stayed put day after day; no creeping or intermittent run‑ons, which are classic signs of a tired fill valve.
Noise levels were moderate. The 400A isn’t the quietest valve on the market, but it’s far from loud. Water hammer wasn’t an issue in my case; if you have hammer, that’s a house‑plumbing problem, not a kit problem.
Compatibility caveats
This is for 2‑inch flush valve, gravity‑fed toilets using roughly 1.6 to 3.5 GPF. A few important limits:
- Not for 3‑inch flush valve toilets (many newer models use 3‑inch). Check before you buy.
- Not for pressure‑assisted or dual‑flush systems.
- The handle is front‑mount oriented; side or angle‑mount applications may require reusing your existing handle.
- Threading and dimensions are standard North American (7/8 in. ballcock shank, 3/8 in. supply). If your plumbing uses different standards, this won’t be a drop‑in.
What I liked
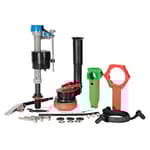
- Complete solution: Fill valve, flush valve, flapper, gasket, and bolts in one box, so you don’t chase parts mid‑project.
- Adjustability: The fill valve height range covers most tanks; the flapper dial lets you tune performance and water use.
- Clear diagrams: The included instructions give you the right order of operations and callouts that matter, especially for new installers.
- Value: Priced about what you’d pay for a standalone premium fill valve, but you also get a new flush valve and hardware.
Where it falls short
- Handle quality: The included lever works but feels flimsy compared to a metal lever, and side‑mount users will likely reuse their existing handle.
- Hardware details: The supplied nuts are not brass; long‑term corrosion could be a factor in damp environments. It’s not a dealbreaker, but it’s worth noting.
- “10 minute” expectation: A full rebuild generally takes longer, especially on older, corroded tanks. That’s not a flaw of the kit, just optimistic marketing.
Who it’s for
- Homeowners with a standard 2‑inch, two‑piece toilet who want to stop leaks, restore flush strength, and reduce water waste with one kit.
- Landlords and maintenance techs who need a reliable, repeatable rebuild on aging fixtures.
- DIYers comfortable with basic hand tools who would rather rebuild than replace.
If you have a 3‑inch system, a pressure‑assist toilet, or want a silent‑fill premium valve, this isn’t the right match.
Bottom line
The Fluidmaster 400AKR kit did what I wanted: it stopped a chronic leak, improved the flush, and let me tune water use—all with parts that fit and adjustments that are easy to understand. The components that matter (fill valve, flapper, gaskets) are solid, and the included hardware makes for a complete rebuild without extra store runs. While the plastic handle is an afterthought and the nuts could be higher grade, those are small blemishes on an otherwise well‑rounded, high‑value kit.
Recommendation: I recommend this kit for standard 2‑inch, gravity‑fed toilets that need a full refresh. It’s a cost‑effective, practical way to replace the wear parts in one go, and the adjustability helps you dial in both performance and water savings. Replace your supply line while you’re at it, take your time tightening the tank evenly, and you’ll end up with a toilet that feels new for a fraction of the cost.
Project Ideas
Business
Mobile Toilet Repair Service
Offer on-demand, same‑day toilet repair calls using this all-in-one kit to handle the majority of common problems quickly. Market to landlords, Airbnb hosts, and busy homeowners; advertise fast turnaround and a flat-rate 'fix it now' fee that includes parts (the kit) and labor.
DIY Repair Workshops
Host short, hands‑on classes showing homeowners how to replace fill and flush valves and stop leaks using the kit. Run workshops at community centers, hardware stores, or online via livestream; sell the kit as a bundled take-home item and provide printed troubleshooting guides.
Maintenance Subscription for Hosts & Realtors
Create a subscription service for property managers and short-term rental hosts: scheduled inspections, preventive part swaps using the universal kit, and discounted emergency visits. Position it as a small monthly fee that reduces costly emergency replacements and bad guest reviews.
Content & Affiliate Kit Reviews
Build a content channel (TikTok/YouTube/Reels) focused on quick plumbing fixes and product comparisons using this kit. Produce short before/after clips, step-by-step installation guides, and monetize with affiliate links, sponsored posts, or by selling branded printed how‑to cards and tool organizers.
Creative
Plumbing Parts Table Lamp
Use the fill-valve body as the lamp column and the metal handle as an industrial-style switch or decorative arm. Attach a small LED puck behind the flapper (rubber makes a soft diffuser) or mount a custom shade over the flapper for a bathroom-themed bedside or accent lamp.
Desktop Zen Fountain
Build a small recirculating water feature: the kit's flapper and valve pieces can be repurposed as adjustable spillways and decorative covers. Combine with a tiny submersible pump and a shallow tray of stones to make a low-noise desktop fountain for office or meditation space.
Steampunk Coat/Key Rack
Mount the heavier plastic fill-valve housings and handles on a wooden backboard as industrial-looking hooks and shelves. Add brass accents, labels (e.g., 'Keys', 'Umbrellas') and a small shelf using the kit's components for a conversation-piece entryway organizer.
Rubber-Flapper Stamps & Textile Prints
Use the perforMAX flapper as a stamp for fabric printing — cut shapes into the rubber, dip in fabric ink, and print patterns on tea towels, aprons, or tote bags. The flapper's flexibility gives an interesting distressed/organic texture.