Features
- 【Universal Compatibility】Compatible with most toilet models and brands, this toilet fill valve replacement kit features a US standard G15/16" inlet. Its height is easily adjustable from 8 to 13 inches, ensuring a perfect fit for various tank sizes
- 【Upgrade Your Toilet’s Performance】 Fix slow filling, noisy, leaking, or continuously running toilets with this high-performance flush valve replacement kit. Enjoy a quieter bathroom experience with rapid and efficient tank refilling, improving both water efficiency and flushing power
- 【Water-Saving Toilet Tank Parts】 Customize your flush with adjustable tank and bowl water level controls. The fill valve ensures precise water delivery, optimizing performance while conserving water and lowering your water bill
- 【Effectively Prevents Leaks】 The V-shaped silicone seal on the fill valve ensures a secure, watertight fit. The durable, leak-proof flapper is made from premium, corrosion-resistant rubber, combining strength with flexibility for long-lasting performance. Its superior sealing capability effectively eliminates water leakage issues
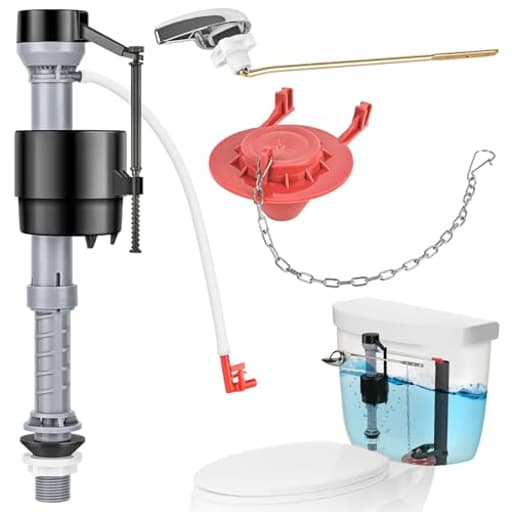
- 【Easy to Install】 The float valve replacement kit is quick and hassle-free to install. The package includes 1 fill valve, 1 2-inch flapper, and 1 toilet handle lever. Simply remove the old parts and replace them with the new ones for an effortless DIY toilet upgrade
Specifications
| Color | Red |
| Size | 2.6 x 2.6 x 9 inches |
| Unit Count | 1 |
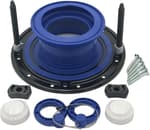
Related Tools

A universal toilet repair kit containing a height-adjustable (8–13 in) fill valve with a US-standard G 15/16" inlet, a 2-inch corrosion-resistant rubber flapper, and a replacement handle. The fill valve provides adjustable tank and bowl water levels, a V-shaped silicone seal to prevent leaks, and anti-siphon/quiet operation to control refill speed and conserve water.
TEVIORA Universal Toilet Flusher Replacement Kit, Water-Saving & Height Adjustable Fill Valve, 2-Inch Flapper, Toilet Handle Lever, Quiet & Anti-Siphon Toilet Repair Kit Inside Tank Review
A noisy, slow-filling toilet is the kind of nag that lingers in the background of a house. I used the Teviora toilet repair kit to refresh an aging tank and, in the process, tuned the flush, silenced the refill, and cut some water waste—all without pulling the toilet or hunting for mismatched parts.
What you get and how it’s built
The kit includes three pieces: a height-adjustable fill valve (8–13 inches), a 2-inch flapper made from corrosion-resistant rubber, and a replacement handle/lever assembly. The fill valve uses a US-standard G 15/16" inlet shank and has an anti-siphon design, so it won’t backflow. The standout detail is a V-shaped silicone seal under the valve cap—this is the portion that opens and closes during refills—and it’s clearly aimed at minimizing seepage and chatter. The flapper has a uniform, pliable sealing surface and a smooth hinge, and the chain hardware is straightforward. The handle is lightweight but adjustable, and the lever arm can be trimmed for fit if needed.
Overall, the parts feel better than a bargain-bin kit but not as overbuilt as premium professional components. For most household tanks, that’s a fine balance.
Installation: easy, with a few nuances
I set aside 30 minutes and used an adjustable wrench, a small bucket, and a towel. Here’s the quick sequence that worked well:
- Shut off the water, flush to empty, and sponge out the last bit of water in the tank.
- Disconnect the supply line and remove the old fill valve and flapper.
- Clean the flush valve seat (where the flapper seals). Mineral buildup here is the cause of many “ghost fills.”
- Pre-set the new fill valve height so the top cap sits at least an inch above the overflow tube. The telescoping action is smooth; twist to lock.
- Drop in the valve with its rubber shank washer inside the tank; snug the locknut from below. Hand-tight plus a quarter-turn is plenty—over-tightening can warp the gasket.
- Connect the refill tube to the overflow, aiming downwards but not below the waterline.
- Install the 2-inch flapper and adjust the chain with roughly 1–2 links of slack.
- Fit the handle. On some tanks, front-mount versus side-mount orientation can flip the action, so check the lever angle and trim or bend the arm slightly if needed.
I turned the water back on and watched for leaks around the shank and supply line. No drips. A quick dye test (a few drops of food coloring in the tank) confirmed the flapper seal after 10–15 minutes.
A note on the handle: the instructions are adequate but light on diagrams for non-standard orientations. If the handle feels “stiff” or the flapper won’t seat, check that the lever isn’t fouling the lid or rubbing the tank wall, and make sure the chain isn’t too tight.
Tuning performance and water use
Once installed, the valve starts to show its strengths. It fills quickly but quietly—there’s a soft “hiss” rather than the hollow gurgle you get from older ballcock-style valves. The anti-siphon design prevents slurping noises during shutoff.
Two adjustments matter most:
- Tank level: Set the water line about 1 inch below the top of the overflow tube for a strong flush without overfilling.
- Bowl refill: Fine-tune the small refill flow so the bowl tops out just as the tank closes the valve. Too much refill wastes water down the drain; too little leaves a weak next flush.
After dialing both in, my flush improved noticeably. Paper clears reliably without a second flush, and the valve shuts off crisply—no lingering trickle, no “bounce” reopen.
The flapper deserves credit too. A clean seat plus the flapper’s pliable lip gave me a repeatable seal. I did have one hiccup on a second toilet where the tank kept topping up. It turned out to be two issues: the chain was a link too tight (flapper not fully closing) and the seat had a ridge of mineral scale. Adding a bit of slack and scrubbing the seat with a Scotch-Brite pad solved it immediately. If you experience overnight level drop, do that dye test and clean the seat before blaming the flapper.
Noise, reliability, and day-to-day feel
Noise is a meaningful upgrade. Refill is restrained and consistent, and the shutoff doesn’t “chatter.” The V-shaped silicone seal under the cap seems to help the valve close decisively, which is where a lot of cheaper valves waver.
As for longevity, the materials are appropriate for chlorinated municipal water. If you’re on very hard water, clean the cap and the flapper seat once or twice a year. The cap snaps off for inspection, and the refill orifice is easy to clear. The handle mechanism is light-duty but smooth; in a household with heavy-handed users, you might prefer a metal lever, but for standard use it’s fine.
Compatibility and limitations
A few fit checks to make before you start:
- Flapper size is 2 inches. If your toilet uses a 3-inch flush valve (common on many newer high-efficiency models), this kit won’t fit.
- The fill valve height range (8–13 inches) covers most standard tanks. Extremely low-profile or very tall tanks may sit outside that range.
- The inlet shank is the US ballcock standard (G 15/16"), which mates with typical braided supply lines. If your supply line is old or crusted, replace it—it’s cheap insurance.
- Not intended for pressure-assist toilets or specialized proprietary systems.
The handle is broadly compatible but may require trimming or slight bending of the lever to avoid the lid. Take an extra minute here; a misaligned lever is the most common cause of a flapper not closing fully.
Practical tips to avoid leaks
- Seat prep matters. Even a thin ridge of scale can compromise the flapper seal. A quick scrub pays dividends.
- Don’t overtighten the tank shank nut. The inner rubber washer does the sealing; crushing it can distort the seal.
- Keep a little slack in the chain. If the flapper can’t fully relax, it will seep.
- Do a 15-minute dye test before you walk away, then one more check after a few hours.
Those steps take an extra five minutes and dramatically reduce the chance of a surprise floor or ceiling issue.
Value
Buying these three components as an all-in-one kit makes sense for most DIYers. You get a modern, quiet valve with useful adjustments, a solid flapper, and a handle to replace a gritty or corroded original. It’s a cleaner, more predictable result than mixing and matching parts, and far cheaper than chasing OEM assemblies—especially on older tanks.
Where it falls short
- The handle instructions could be clearer, especially for side-mounted or angled tanks. A better diagram would save trial and error.
- The lever arm is functional but not heavy-duty. If you want a premium metal handle, you’ll need to source it separately.
- The adjustment markings for bowl refill are subtle. A clearer indicator would help first-time installers.
None of these are dealbreakers, but they’re worth noting so you can plan accordingly.
Who will benefit most
- Homeowners tackling a noisy, slow, or constantly running toilet.
- Landlords refreshing multiple units where quick installs and consistent parts matter.
- Anyone wanting to tune bowl refill to reduce water waste without compromising flush performance.
If you have a 3-inch flapper toilet, a pressure-assist tank, or a designer system with proprietary parts, this isn’t the right kit.
Recommendation
I recommend the Teviora toilet repair kit. It installs quickly, is quiet in operation, and gives you the right adjustments to balance strong flushing with water savings. The flapper seals reliably when the seat is clean and the chain is set correctly, and the anti-siphon valve shuts off decisively without chatter. While the handle is basic and the instructions could be more detailed, the core components—fill valve and flapper—deliver consistent, leak-free performance at a good value. If your toilet uses a standard 2-inch flapper and typical tank geometry, this kit is an easy, cost-effective refresh that should restore performance and trim water use with minimal fuss.
Project Ideas
Business
Mobile 'Toilet Tune-Up' service
Launch a local on-call service for quick toilet repairs focused on replacing fill valves, flappers, and handles to stop running toilets and save water. Target landlords, Airbnb hosts, and property managers with fixed-price visits and a satisfaction guarantee. Emphasize fast installs, water-bill savings, and eco-friendly parts.
DIY kit + how-to video product
Package the universal refill kit as a premium DIY solution sold online (Amazon, your own store) with step-by-step installation videos, troubleshooting guides, and a link to virtual consults. Offer bundles for 1–10 unit packs aimed at homeowners and small landlords; include marketing copy on water savings and noise reduction to boost conversions.
Branded self-watering planter line
Design a line of stylish indoor planters that integrate the fill valve and flapper as a discreet reservoir regulator. Market them to urban gardeners and offices as low-maintenance, water-efficient planters. Use the kit’s red part as a visual brand cue; sell via Shopify, Etsy, and plant boutiques with how-to care cards.
Upcycled home-decor products
Create and sell upcycled decor (small fountains, sculptural pieces, novelty lamps) made from new kits combined with reclaimed ceramics or glass. Position the products as eco-friendly art; sell on Etsy, at craft fairs, or wholesale to boutique home stores. Offer custom pieces for interior designers who want conversation starters with sustainability stories.
Subscription maintenance for rentals
Offer a subscription program for multi-unit landlords/property managers: scheduled inspections and proactive replacement of fill valves/flappers to prevent leaks and reduce water waste. Provide monthly/quarterly service visits, replacement parts included, and periodic water-usage reports showing savings—sell the ROI on avoided damage and lower utility bills.
Creative
Mini tabletop fountain
Build a recirculating tabletop water feature using the adjustable fill valve as the regulated refill and pump-simulated heart. Use a shallow decorative bowl or reclaimed toilet tank as the basin, route a small submersible pump for circulation, and mount the red handle lever as a decorative spout or accent. The fill valve's anti-siphon feature prevents backflow and the adjustable height lets you fine-tune water level and flow for a quiet indoor fountain.
Self-watering planter/reservoir
Turn the kit into a low-cost self-watering planter: use the fill valve to maintain a hidden water reservoir beneath the soil and the flapper as an overflow/seal. Set the valve to a stable water level so plants draw moisture by capillary action. Ideal for herb windowsills or vacation plant care—promote water conservation and tidy appearance.
Kinetic water clock / demo sculpture
Create a water-clock or slow kinetic sculpture that measures intervals by fill-and-release cycles. The adjustable fill valve controls refill speed; use the flapper or handle lever as a timed release mechanism. This is great for maker fairs, gallery pieces, or a functional art object that demonstrates fluid dynamics and time in a compact, red-accented design.
Percussion / sound-art instrument
Repurpose the 2-inch rubber flapper as a tuned membrane or dampener in a small percussion instrument. The handle lever and valve parts can act as levers and resonant surfaces, producing percussive and metallic tones when struck or bowed. Combine with wood or metal frames to build a unique experimental instrument for installations or performances.
Educational STEM kit
Assemble a classroom kit that teaches hydraulics, siphoning, water conservation, and simple mechanisms. The universal fill valve is perfect for hands-on lessons: students can adjust tank/bowl levels, observe anti-siphon behavior, troubleshoot leaks, and learn how small changes save water. Include diagrams and experiments for grades 6–12.