Features
- The Everything Kit includes everything you need to fix your toilet in one trip and one purchase
Specifications
| Color | Multicolor |
| Size | No Size |
| Unit Count | 1 |
Related Tools
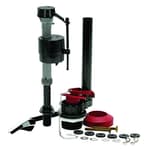

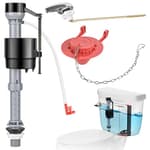
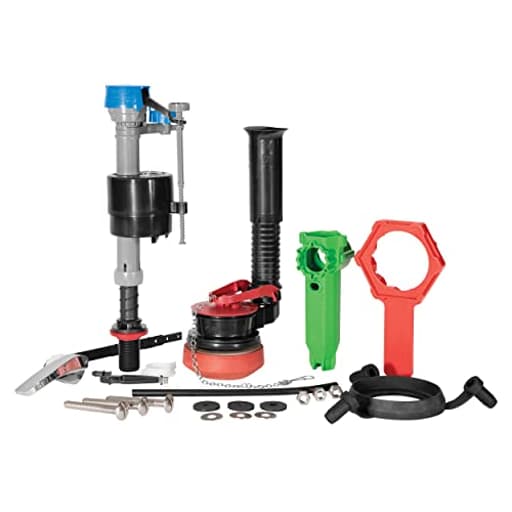
A 2-inch toilet repair kit containing parts commonly required to repair or replace internal toilet components for restoring proper flushing and filling. Supplied as a single-unit kit in multicolor packaging to allow completing repairs in one visit.
Fluidmaster K-400H-021-P8 PerforMAX 2-Inch Everything Toilet Repair Kit, Multicolor Review
Why I reached for this kit
A toilet that won’t stop running has a special way of hijacking your day. I had an older two-piece toilet that developed the classic “phantom fill” and a slow seep into the bowl. Rather than play whack-a-mole replacing one suspect part at a time, I decided to rebuild the tank in one shot. The PerforMAX kit appealed because it promised a complete refresh—fill valve, flush valve, flapper, tank-to-bowl gasket, bolts, handle, refill tube, and even simple tools to get it done.
What’s actually in the box
This is a true “everything” kit for a 2-inch toilet. In my box:
- Adjustable fill valve with a refill dial for bowl tuning
- 2-inch flush valve body with overflow tube
- Adjustable flapper
- Tank-to-bowl gasket
- New bolts, nuts, and washers
- Refill tube and clip
- A plastic tank wrench and a helper cup for draining/cleanup
- A basic plastic tank lever
The included tools aren’t fancy, but they’re thoughtfully chosen. The red plastic wrench fits the large locknuts and helps you avoid chewing up plastic threads. The small catch cup is a simple touch that keeps your floor dry as you empty the final inch of tank water. You’ll still want a towel or sponge, and if your existing hardware is corroded, an adjustable wrench or socket and some penetrating oil can save the day.
Installation experience
I rebuilt the tank in about an hour, not rushing. If you’re only replacing the fill valve and flapper, count on 20–30 minutes. Full flush-valve replacement requires removing the tank from the bowl, which is where many DIYers hesitate. A few notes from my install:
- Shut off water, flush, and hold the handle to drain as much as possible. Use the included cup (or a sponge) to remove the rest.
- Disconnect the supply line and tank bolts, then lift the tank carefully. A towel across the bowl gives you a forgiving work surface.
- Replace the flush valve and tank-to-bowl gasket. When reassembling, snug the bolts evenly, alternating side to side. You’re sealing rubber; over-tightening is how porcelain cracks.
- Set the fill valve height to align with your tank’s waterline mark, then connect the refill tube and clip to the overflow.
- Adjust the flapper setting and the fill valve’s bowl-refill dial.
Everything fit as expected. The gaskets compressed evenly, the bolts seated cleanly, and the fill valve shank sealed without fuss. I reused my existing metal handle because I prefer the feel; the included plastic lever will work, but it’s the flimsiest component in the kit.
Tuning and performance
Two adjustments matter most after a rebuild:
- Flapper timing: The adjustable flapper lets you match your flush to the tank design. Start mid-range and test. If the flush seems too quick or light, open it up a notch; if it’s wasting water, dial it back.
- Bowl refill: The little dial on the fill valve that controls refill flow to the overflow is the unsung hero here. It lets you balance the tank and bowl so both finish filling together. Too much refill and you waste water down the overflow; too little and you’ll get a weak second flush. With a couple of test flushes, I had both levels synchronized perfectly.
Once tuned, the flush was crisp and reliable, and the running stopped entirely. The toilet filled faster than before—noticeably so compared to the old ballcock-style valve—and the refilling noise was a subdued hiss rather than a roar. I found the valve quiet enough for a nighttime bathroom adjacent to a bedroom.
Build quality and longevity
Fluidmaster’s plastic components have a good track record in my experience. The seals are pliable and uniform, threads are clean, and adjustments hold. The fill valve is the standout: it’s compact, easily height-adjustable, and the diaphragm design is serviceable if it ever weeps down the line. The flapper hinge is flexible yet stout. The only part I’d call “just OK” is the included tank lever, which is functional but lightweight.
Hardware-wise, the bolt kit did its job—no leaks, no fuss. If your toilet sees heavily chlorinated water, expect rubber bits (flapper and seals) to be your wear items over the years. Fortunately, those are the easiest parts to swap and are inexpensive.
What the kit gets right
- Completeness: For a 2-inch, two-piece toilet, this truly is a one-box rebuild. Not having to source a gasket or chase a missing washer mid-project is a relief.
- Adjustability: Between the flapper timing and the bowl refill dial, you can dial in performance and reduce water waste.
- Install aids: The plastic wrench and cup are small touches that make a real difference, especially if you’re installing in a tight space without a full toolbox.
- Clear guidance: The printed instructions are straightforward, and the QR to video walkthroughs is a bonus for visual learners.
Where it can frustrate
- Stubborn old hardware: If your tank bolts or supply line nuts are corroded, the included plastic wrench won’t provide enough persuasion. Have a real wrench and a can of penetrating oil on hand.
- The lever: It works, but it feels like an afterthought. If you prefer a solid metal handle, plan to reuse your existing one or buy a separate upgrade.
- Not universal: This is a 2-inch kit. Many modern high-efficiency toilets use a 3-inch flush valve, and UK/European cisterns often use different sizes and side-entry fills. Check your toilet’s spec before buying.
Compatibility notes
- Size: This is for 2-inch flush valves. If your flapper opening measures roughly 3 inches across or your model spec calls for a 3-inch valve, choose the appropriate kit instead.
- Toilet type: Ideal for two-piece toilets. It can work with some one-piece tanks, but access can be trickier and sometimes proprietary parts are involved.
- Region: This kit aligns with North American standards. UK and European toilets commonly use different valve sizes and fittings.
Tips for a smoother install
- Photograph your tank before teardown. It’s a handy reference for hose routing and lever chain length.
- Replace the supply line while you’re in there, especially if it’s old or rigid. A braided stainless hose with a new cone washer is cheap insurance.
- Tighten tank bolts evenly, alternating sides. Stop as soon as the gasket compresses and the tank stabilizes; don’t chase “just a little more.”
- Set the chain with a bit of slack. Too tight and the flapper won’t seal; too loose and you’ll have a weak flush.
- After the first day of use, recheck for weeps at the supply connection and tank bolts. A quarter-turn may be all that’s needed if a gasket settles.
Who it’s for
- DIYers who’d rather fix a running or weak-flushing toilet in one session than replace parts piecemeal
- Owners of older two-piece toilets that need a full refresh—fill, flush, and seals
- Property managers who want a standardized, repeatable repair that reduces call-backs
If you only need a single part—say, a fill valve—you could buy that alone for less. But if your toilet’s a decade-plus old, replacing everything inside the tank at once often saves time and eliminates future nuisance leaks.
Recommendation
I recommend the PerforMAX kit for anyone in North America with a 2-inch, two-piece toilet who wants a reliable, soup-to-nuts rebuild. It installs cleanly, provides thoughtful adjustability for both performance and water savings, and includes just enough tooling to make a first-time repair approachable. The plastic lever is the lone weak spot, but it’s optional—reuse a metal handle if you prefer. Verify your flush valve size before buying, and have a real wrench on hand for stubborn old nuts. Do that, and you’ll likely fix the problem in one visit and gain years of quiet, dependable operation.
Project Ideas
Business
One-Trip Mobile Repair Service
Position a local mobile service around the promise 'Fixed in one trip' by standardizing on this 'everything' 2-inch kit as the baseline inventory for techs. Market to busy homeowners and property managers, offer flat-rate troubleshooting + repair, and upsell preventive checks. Low inventory complexity and predictable parts cost make pricing and scheduling simpler.
Emergency Kits for Landlords & Airbnb Hosts
Package the kit into branded 'Emergency Toilet Repair' bundles sold in bulk to landlords, property managers, and short-term rental hosts. Include a one-page quick-guide, QR-code video link, and optional sticker with your maintenance contact. Sell online (shop, Amazon) or wholesale to local hardware stores; offer reorder subscriptions for regular customers.
Hands-On DIY Repair Workshops
Host paid community workshops teaching owners how to diagnose and fix common toilet issues using the kit. Charge per attendee, provide a kit for each participant (or sell the kit as part of the ticket), and offer takeaway quick-reference cards. Workshops build local brand trust and generate cross-sell opportunities (on-call repairs, follow-up parts).
Instructional Content + Affiliate/E-commerce Sales
Create short how-to videos and step-by-step guides demonstrating typical repairs using the kit, then publish on YouTube and your website. Monetize via ad revenue, affiliate links, or direct e-commerce. Use content to drive sales of bundled kits, branded manuals, or follow-up parts, and capture leads for paid on-site services.
Creative
Mini Planters from Fill-Valves
Clean and shorten the plastic fill-valve housings and use them as quirky mini planters for succulents or air plants. Seal any internal channels with waterproof silicone, add drainage holes if desired, and mount on reclaimed wood or hang with leather cord. The multicolor packaging can be cut into decorative labels or backing for a gift-ready presentation.
Wind Chime & Mobile from Flappers and Chains
Use the flapper, chain segments, bolts, and small plastic parts to assemble a weatherproof wind chime or indoor mobile. Paint parts with metallic or patina finishes, assemble at varied lengths for a balanced look, and add beads or reclaimed metal washers for extra sound and visual interest. Great for outdoor patios or bathroom-themed decor.
Rubber-Gasket Resin Coasters
Use the kit's rubber gaskets as molds or embedded accents in epoxy resin coasters. Press gaskets into silicone molds, pour colored or clear resin around them, then sand and polish edges. The resulting coasters have tactile contrast and a story — 'upcycled plumbing parts' — which appeals to makers and eco-minded customers.
Cutaway Toilet Internals Teaching Model
Build a small demonstration model showing toilet internals using the kit parts mounted inside a transparent acrylic box. Label the flapper, fill valve, float, and overflow so students or workshop attendees can see how the system works. Useful for maker spaces, school STEM lessons, or craft shows where you explain repurposing and basic plumbing mechanics.