Features
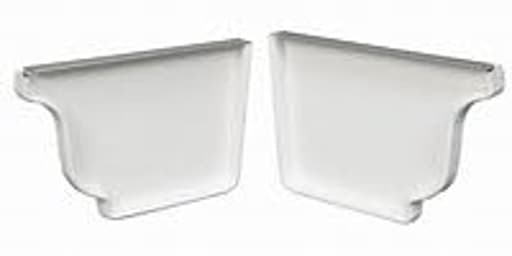
- 6 Inch Gutter End Caps For Aluminum K-Style Gutters
- Easy installation on non plastic 6 inch K style gutters
- 6" is Measured From Front to Back (not the depth)
- Includes 1 left and 1 right cap
- Painted white, repaintable aluminum
Specifications
| Color | White |

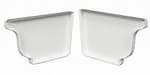
Pair of painted white aluminum end caps for 6-inch K-style rain gutters, supplied as one left and one right cap. They fit non-plastic 6" K-style gutters (6" measured front to back), install easily and are repaintable.
Generic 6" Inch White K-Style Aluminum Rain Gutter End Caps Review
What these end caps are and who they’re for
I installed these 6-inch K-style aluminum end caps on a section of aluminum gutter where the original caps had started to weep at the seams. If you run 6-inch K-style aluminum gutters (common on larger homes or areas with high rainfall) and need to cap a run cleanly at the left and right ends, this simple pair does the job without fuss. They’re painted white out of the box, include one left and one right cap, and they’re intended for non-plastic (aluminum) K-style profiles. They’re also repaintable if you need to color-match trim.
A quick sizing note: “6-inch” in gutter language refers to the width across the top from front bead to back, not the height or depth. Measure that span before you order. If your existing gutters are 5-inch K-style, these will not fit.
Fit and compatibility
On my standard 0.027–0.032 aluminum K-style gutters, the profile match was solid. The bead radius and back wall lined up closely enough that I didn’t have to fight the metal to get a snug fit. As with all aftermarket caps, tolerances can vary a bit depending on the coil stock your gutters were formed from, but I found these to be true-to-size for a mainstream 6-inch K profile.
They’re not intended for vinyl/plastic gutters, box gutters, or half-round systems. If you have copper gutters, you should use copper caps to avoid galvanic corrosion; mixing aluminum caps with copper runs is asking for trouble. For steel gutters, I’d still recommend staying with like metals unless you isolate the materials carefully.
Build quality and finish
The aluminum gauge is what I’d call standard for residential gutter accessories—stiff enough to crimp securely, thin enough to hand-form without specialty tools. The white paint has a modest sheen and arrived without runs. It’s a service finish meant to match common white fascia and gutter coil; not a showpiece, but uniform and clean.
Edges were reasonably smooth, though I always assume aluminum edges are sharp until proven otherwise. A few passes with a deburring tool takes seconds and is worth doing. As for repainting, the finish took scuff-sanding well and bonded nicely with a direct-to-metal acrylic enamel after a light wipe with denatured alcohol.
Installation experience
Installation took me about 20 minutes per side with hand tools. Here’s the basic sequence I used:
- Square the gutter end and remove burrs. A clean, straight cut gives the cap more material to grip and seal against.
- Dry-fit the cap. Make sure left/right is correct—stand facing the gutter as water would flow and orient accordingly. The front bead shape should nest cleanly.
- Lightly pre-form the cap lip if needed. I used a hand seamer to give the front and back flanges a touch more bite.
- Run a generous bead of high-quality gutter sealant inside the cap. I avoid household silicone on metal gutters; a butyl or tripolymer sealant (gutter/metal roof grade) stays flexible and adheres better.
- Press the cap onto the gutter and crimp the rear and front lips with a hand seamer or end-cap crimper. I tap the front bead gently with a rubber mallet to seat it.
- Wipe squeeze-out on the inside; leave a small fillet at the seam. On the exterior, I remove any excess for a clean look.
- Optional: Add a single aluminum rivet on the back wall if you expect a lot of thermal movement. Seal over the rivet head.
Tools used: aviation snips (for cleanup), deburring tool, hand seamer, rubber mallet, rivet gun (optional), nitrile gloves, and a tube of tripolymer gutter sealant. I let the sealant cure per the manufacturer (24 hours dry weather is ideal) before the first rain.
Performance in weather
I hose-tested each end for several minutes and then watched the first two storms. No drips, no weeping at the corners, and the caps stayed put without any fasteners beyond the crimp. Because 6-inch gutters carry more volume, poor end seals tend to reveal themselves quickly; these held steady. The key, in my experience, is using the right sealant and getting a consistent bead inside the cap before crimping.
Thermal expansion can stress joints over time. The combination of a snug mechanical crimp and a flexible sealant is what prevents hairline leaks a year or two down the line. I’ll recheck after the first freeze-thaw cycle, but the initial result is tight.
Repaintability and aesthetics
Out of the box, the white matched my factory-finished white gutter coil closely enough that I left it as-is on one elevation. On another section, I painted the cap to match a darker fascia color. The process was straightforward:
- Scuff with 220-grit.
- Clean with a solvent wipe (no residue).
- Prime any exposed bare metal if you sand through the paint.
- Finish with an exterior-grade DTM acrylic or enamel.
The crisp cap outline looks clean against the K-style profile, and the bead alignment doesn’t call attention to itself. It’s a small detail, but mismatched caps can look sloppy—these didn’t.
What could be better
- Instructions: None included. If you’ve never installed end caps, you’ll need to know that sealant and a mechanical crimp are expected. It’s not difficult, just not documented.
- Labeling left vs. right: Mine were obvious, but a sticker or stamp would help avoid the occasional head-scratch.
- Paint thickness: Adequate for typical use, though prone to light scuffing during installation. Not a problem if you’re repainting or careful with tools.
None of these are deal-breakers, and all are common to generic aluminum gutter accessories, but they’re worth noting.
Tips for best results
- Measure correctly. 6 inches is front-to-back across the mouth. If you measure depth or height, you can order the wrong size.
- Dry-fit before sealant. If the fit is a touch loose, pre-crimp with a hand seamer for a tighter grip.
- Use the right sealant. Butyl or tripolymer gutter sealant adheres to painted aluminum and stays flexible. Avoid general-purpose silicone.
- Mind thermal movement. On long runs, consider a single rivet in the back wall of the cap for extra insurance, then seal the rivet.
- Don’t mix metals. Stick with aluminum on aluminum. Use copper on copper.
- Protect the finish. Painter’s tape on the bead can keep tools from marring the paint while you crimp.
Value and alternatives
These are straightforward, no-frills aluminum caps. If you need higher-end finishes (baked-on custom colors, copper, or heavier gauge), you’ll be looking at specialty suppliers or a gutter pro. For standard residential aluminum systems, these strike a good balance of fit, ease of install, and cost. Compared with some big-box options I’ve tried, the profile match here was better, and the install was less fussy.
Pros and cons
Pros:
- True-to-size fit for standard 6-inch K-style aluminum gutters
- Simple, reliable install with common hand tools
- Painted white finish that’s easy to repaint
- Includes left and right caps in one set
- Aluminum won’t rust and is light enough to form easily
Cons:
- No instructions; assumes basic gutter know-how
- Not for vinyl/plastic or copper gutters
- Paint can scuff during installation if you’re not careful
Bottom line
These 6-inch K-style aluminum end caps are exactly what I want from a small, utilitarian component: they match the profile, crimp on cleanly, take sealant well, and stay put without drama. After installation and a couple of real-world rain tests, they’ve been leak-free and visually unobtrusive. They’re not fancy, but they do the one job they need to do—and do it well.
Recommendation: I recommend these end caps for anyone working with standard 6-inch aluminum K-style gutters who wants a straightforward, reliable solution. They install easily with basic tools, seal up tight with the right sealant, and the painted finish is serviceable or ready for a color change. If you have vinyl or copper gutters, look elsewhere, but for aluminum systems, these are a dependable, cost-effective choice.
Project Ideas
Business
Replacement cap kits (painted & custom)
Sell one-left/one-right cap replacement kits online and to local suppliers. Offer the standard white option plus custom-painted finishes to match common gutter colors (bronze, black, brown). Add an option for color-matching from a customer photo for a premium fee. Bundle with screws and a simple instruction card. Channels: ecommerce store, Amazon, local roofing suppliers. Pricing: $15–$40 per kit depending on custom paint; target healthy margins by painting in-house or using batch runs.
DIY gutter repair & upgrade bundles
Create DIY bundles for homeowners that include end caps, exterior-grade sealant, screws, gloves, and a short how-to video. Market as a quick weekend fix for leaky or missing end caps. Sell through big-box store marketplaces, local hardware shops, and social ads targeting homeowners. Consider subscription re-order for seasonal maintenance (inspection/reminder email).
Decorative/branding end caps for builders
Offer OEM or custom-embossed end caps to home builders, architects, and landscaping firms—e.g., caps stamped with a logo or a decorative motif for higher-end projects. Provide finishes in powder coat or specialty paint. Sell in volume with B2B terms, and offer samples and CAD/drawing support. This can command premium pricing and strengthen relationships with trade customers.
Upcycled craft kits for makers & retailers
Curate and sell craft kits that repurpose gutter sections and end caps into planters, wall shelves, or lights (include caps as finished ends). Package kits attractively for Etsy, craft fairs, and boutique hardware stores. Add instructions, mounting hardware, and paint swatches. Price kits so craft hobbyists see value: typically $30–$120 depending on complexity and included extras.
Contractor supply & dropship program
Set up a B2B supply program: bulk packs of end caps, quick-ship fulfillment, volume discounts, and simple online ordering for roofing and gutter contractors. Add value with branded packaging, quick-ship guarantees, and technical sheets showing fit/compatibility. Upsell by offering pre-painted runs matching popular gutter colors and seasonal promotions tied to roofing/gutter maintenance cycles.
Creative
Mini trough herb planters
Cut short sections (12–24") of 6" K-style gutter and cap the ends with the left/right end caps to create shallow, linear planters for herbs or succulents. Drill a few drainage holes, line with landscape fabric, add potting mix and plants. The painted aluminum caps give a clean finished look; repaint them to match your decor or create a contrasting accent. Mount several on a fence or wall for a vertical herb garden.
Modern industrial shelf edging
Use a length of 6" K-style gutter as a front-facing lip for a floating shelf. Fit end caps on both ends for a polished profile and paint the caps to coordinate with the shelf. Secure the gutter section to a plywood shelf top with countersunk screws from underneath, then mount the shelf with hidden cleats. The result is a durable, distinctive edge that hides wiring or creates a shallow display trough.
Outdoor LED wall sconce
Make simple, weather-resistant wall lights by mounting a short gutter section horizontally with an end cap on one side to hide wiring. Fit an LED strip or a waterproof puck light inside the trough; the K-style profile directs light down and out, producing a soft wash. Repaint caps to match trim and use silicone sealant where the fixture meets the wall for weatherproofing.
House number / mailbox accent plaque
Create a modern address plaque by mounting a short gutter segment vertically or horizontally, capping the ends, and attaching metal or acrylic house numbers to the face. The caps finish the ends neatly and can be painted in accent colors (metallics look great). Add a small slot for incoming mail or use as a decorative panel on gate posts.
Children’s bath/pond toy boats
Use the curved profile and end caps to fashion simple toy boats or floating planters. Attach the left and right caps as bow and stern, seal seams with marine adhesive, and optionally add a small mast from dowel rod. Because the caps are aluminum and repaintable, you can decorate them in bright, durable colors for play or outdoor water features.