Features
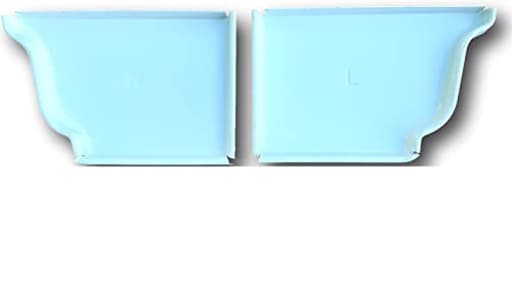
- 6 Inch Gutter End Caps For Aluminum K-Style Gutters
- Low Gloss White Often Reffered to as 30 Degrees White by Gutter Manufacturers
- 5" is Measured From Front to Back (not the depth)
- K-TEC GUTTER SUPPLIES is a US Company That Keeps Inventory in Amazon Warehouses Ready to Ship
Specifications
| Color | White |
| Size | 6 inch |

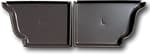
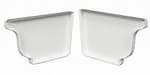
Pair of left and right 6-inch aluminum K-style gutter end caps designed to seal and finish the open ends of 6-inch K-style gutters. Low-gloss white finish (often called 30-degree white) with a 5-inch front-to-back measurement; fits standard 6-inch K-style aluminum gutter profiles.
K-TEC GUTTER SUPPLY K-TEC 6 Inch White K-Style Aluminum Rain Gutter End Caps Review
Why I Picked These End Caps
I recently reworked a section of 6-inch K-style aluminum gutter that had been cut back during a fascia repair, and I needed clean, reliable terminations at both ends. I reached for a pair of K-TEC 6-inch K-style end caps in low-gloss white. On paper, they tick the right boxes: aluminum construction, a finish that matches common coil-coated “30-degree white,” and a true fit for standard 6-inch K-style profiles. In practice, they did exactly what I needed—finished the run neatly and sealed up without drama.
Build and Finish
These are stamped aluminum caps—lightweight, easy to manipulate, and rust-proof. The finish is low-gloss white, which is what most gutter systems and trim paints aim for today. It blends well with typical fascia and soffit systems. The paint on my pair was even, without thin spots at the edges, and it tolerated a little handling during installation without scratching. If you’re upgrading a glossy system, expect a slight sheen mismatch; otherwise, the color match should be close on most modern aluminum gutter runs.
The 5-inch front-to-back measurement is worth calling out. That dimension refers to the horizontal footprint (nose to back), not the “depth” or height of the face. If you measure your gutter across the opening, not down the face, you’ll be on the right track for determining compatibility. These are sized for 6-inch K-style gutters—don’t expect a snug fit on 5-inch runs.
Fit and Compatibility
I test-fit these on two different 6-inch aluminum K-style profiles in my shop before heading to the site. The curvature and lip alignment matched both common ogee profiles I tried. On the house, they seated squarely with no visible gaps along the vertical seam or at the bottom. You get a left and a right cap in the pair. Quick tip: “left” and “right” orientation is determined when you’re looking at the front of the gutter from the outside, not from the roof. Dry-fit before sealing to avoid a gooey swap.
Do note: these are intended for aluminum gutters. They will physically fit some steel profiles but mixing metals can introduce galvanic corrosion in the long term if you don’t isolate them. They’re not intended for vinyl or copper systems.
Installation Experience
Installing these is straightforward if you’ve worked with K-style gutters. Here’s what I used and what worked best for a leak-free result:
Tools and materials I used:
- Gutter sealant (polyurethane or tri-polymer, gutter-rated)
- Hand seamer or end-cap crimper
- A pair of clamps
- Drill with 1/8-inch bit and a couple of aluminum pop rivets (optional)
- Mineral spirits and rags for cleanup
- Painter’s tape (optional, to keep the face clean)
Steps that gave me a clean install:
1. Dry-fit first. Check that the cap sits flush along the front lip, back edge, and bottom. If the gutter end is out of square, true it up with a hand seamer.
2. Wipe the mating surfaces clean. Any oxidation or debris will undermine your seal.
3. Run a continuous bead of gutter sealant inside the cap’s lip and along the gutter’s cut edge—especially the bottom radius.
4. Press the cap on and clamp it lightly to keep it from creeping while you work the edges.
5. Crimp the top and bottom corners with a hand seamer or dedicated end-cap crimper. Don’t over-crimp; aluminum deforms easily.
6. Optional but recommended on longer runs: drill two small holes on the backside flange and set aluminum pop rivets. Rivets keep things locked during thermal movement.
7. Tool the squeeze-out sealant along the seam for a smooth fillet, then wipe any excess.
After installation, I ran a hose test. No weeping at the corners, no capillary creep along the seam. After actual rainfall, the seams stayed dry.
Performance on the House
Sealing is the entire point of an end cap, so I pay attention to three things: leak resistance, thermal movement, and finish longevity.
- Leak resistance: With a proper bead of sealant and light crimping, these sealed on the first try. The bottom radius is usually the trouble spot; here it filled neatly without a void.
- Thermal movement: Aluminum expands and contracts. The light crimp plus two rivets on the backside kept the cap aligned but not so rigid that the seam was stressed. No hairline cracking of sealant after temperature swings.
- Finish: The low-gloss coating handled caulk cleanup and didn’t chalk under direct sun during my observation period. If you’re in a coastal environment, rinse salt periodically like you would any aluminum trim.
What Stood Out
- True-to-size fit: I didn’t have to fight the profile. That’s not always the case with off-brand caps.
- Clean edges: The stamp leaves enough material at the corners to crimp without tearing.
- Finish match: The “30-degree white” blended with existing coil stock on the fascia and the gutters I installed last year from a big-box supplier.
Where They Could Be Better
- Sealant not included: This isn’t unusual, but if you’re a DIYer expecting a turnkey kit, plan ahead and buy a tube of gutter-rated sealant. Regular silicone doesn’t cut it outdoors on aluminum seams.
- Easy to over-crimp: The aluminum is light enough that an aggressive squeeze can deform the face. Go easy with the seamer.
- Color nuance: It’s low-gloss white, but “white” isn’t universal. If your system is a bright gloss or a custom enamel, you may want to paint these to match.
Tips for a Trouble-Free Install
- Square the gutter end: A slight banana cut at the end of a run will guarantee a leak no matter how good the cap is.
- Use the right sealant: A high-quality tri-polymer or polyurethane gutter sealant adheres better to coated aluminum and remains flexible.
- Backside rivets: They’re nearly invisible and add a lot of stability over time.
- Tape the face: If you’re particular about a pristine finish, a strip of painter’s tape on the face keeps smudges off the visible surface during sealant work.
- Hose test every time: Don’t wait for the first storm to discover a pinhole. A five-minute test can save you a callback.
Alternatives to Consider
- Pre-sealed caps: Some manufacturers offer caps with pre-applied butyl. They install faster, but you lose control over bead size and placement, and the sealant can age on the shelf.
- Vinyl snap-on caps: Quick for temporary fixes, but they don’t match the look or durability of aluminum on a 6-inch system.
- Field-fabricated miters: If you’re capping an odd profile, sheet-metal workers can hand-brake a custom end, but it’s overkill for standard K-style.
For standard 6-inch K-style aluminum gutters, these K-TEC end caps strike the right balance of fit, finish, and simplicity.
Longevity and Maintenance
There isn’t much to maintain once they’re in. Inspect caps annually when you clean your gutters:
- Look for sealant shrinkage at the bottom radius.
- Check for any impact dents from ladders or branches.
- Rinse debris from the seam to prevent organic buildup.
If you ever need to repaint, scuff lightly with a non-woven pad, clean thoroughly, and use a paint compatible with coated aluminum.
Final Recommendation
I recommend these K-TEC end caps for anyone finishing or repairing a 6-inch K-style aluminum gutter run. They fit true, the low-gloss white finish blends with most modern systems, and installation is straightforward with basic tools and a bead of the right sealant. The only caveat is to bring your own sealant and a light touch with the crimper. If you need reliable, clean terminations without resorting to custom work, these caps do the job exactly as they should.
Project Ideas
Business
Upcycled home-decor product line
Design a branded line of small home goods (planter panels, wall sconces, desk organizers) that use K-style end caps as the signature element. Source caps in bulk, add value with mounting hardware and finishes, photograph styled sets, and sell on Etsy, Shopify, or at craft markets.
DIY kit sales (retail and wholesale)
Create step-by-step DIY kits that include end caps, fasteners, pre-cut wood backers, drainage plugs, and instructions to build a planter strip or sconce. Price kits for hobbyists and offer wholesale bundles to makerspaces, garden centers, and boutique hardware stores.
Workshops & pop-up classes
Host paid workshops teaching attendees to make vertical planter walls, lamp clusters, or desk organizers using gutter end caps. Charge per seat and sell related kits at the event—good recurring revenue and marketing for online product sales.
Contractor add-on service (small-space green walls)
Partner with landscapers, property managers, or home stagers to install lightweight gutter-cap planter panels on balconies and small apartments. Offer design, installation, and maintenance packages—sell both product and recurring plant-care services.
Bulk-branded corporate gifts
Offer custom-branded desk organizer sets or wall-planter panels to companies as eco-friendly corporate gifts or employee welcome kits. Add logos, custom colors or packaging; margins are higher on B2B orders and you can leverage repeat corporate sales.
Creative
Succulent pocket planters
Mount a row of 6" K-style end caps to a reclaimed wood board (opening facing up) to create a modern vertical succulent wall. Drill a small drainage hole in each cap, add soil and plants, and paint or distress the board for different styles. Great for small balconies or kitchen windowsills.
LED wall sconce shades
Convert end caps into minimalist light shades by recessing an LED puck or strip inside the cap, adding a frosted diffuser to the opening, and mounting to a wall. The low-gloss white finish gives a clean, industrial look; use multiple staggered caps for an artful lighting cluster.
Desk organizer pods
Attach caps (opening out) to a metal strip or wooden base to form a modular desk organizer for pens, paperclips, and chargers. Add magnets to the back so individual pods are removable and reconfigurable. Offer different finishes or labels for office/gift sets.
Insect hotel micro-chambers
Use end caps as small chambers in a larger insect hotel structure—seal the back, fill with bundled bamboo, straw, or drilled blocks, then face the openings out. The caps create weather-resistant pockets and a neat, repeating visual motif.
Mini tabletop planter candle holders
Turn an end cap into a modern candle holder by inserting a glass votive or silicone insert; or make a combined planter/candle center piece by nesting a small succulent beside a tea light. Paint or patina the exterior for seasonal décor.