Features
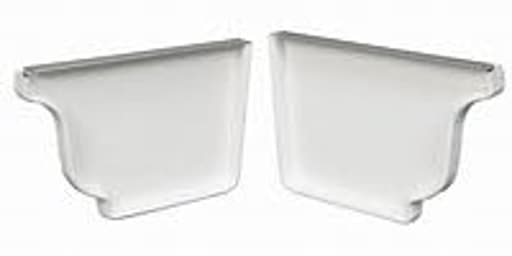
- 5 Inch Gutter End Caps For Aluminum K-Style Gutters
- Easy installation on non plastic 5 inch K style gutters
- 5" is Measured From Front to Back (not the depth)
- Includes 1 left and 1 right cap
- Painted white, repaintable aluminum

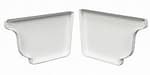
A pair of painted white aluminum end caps for 5-inch K-style rain gutters, supplied as one left and one right cap. They fit non-plastic 5" K-style gutters (5" measured front-to-back), are repaintable, and install easily.
Generic 5" Inch White K-Style Aluminum Rain Gutter End Caps Review
A small part that makes a big difference at the end of a gutter run
I recently replaced a few open gutter ends on a 5-inch K-style system and used a pair of white aluminum end caps to finish the job. These are the simple, friction-fit caps you tap onto the open ends of a gutter run to stop water from dumping where it shouldn’t. It’s a straightforward component, but there’s plenty that can go wrong—loose fits, thin metal that deforms during install, paint that flakes, or a mismatch on sizing. In this case, the end caps did exactly what I wanted with very little fuss.
Build and finish
The caps are painted white aluminum, left and right handed, shaped to match the standard 5-inch K-style profile. The metal isn’t overly thick, but it’s not flimsy either; I’d call it appropriate for typical residential aluminum gutters. The paint out of the box was even and clean with no drips or thin spots on the samples I had. Edges were reasonably smooth; I still wore gloves during install and found only one minor burr that didn’t affect anything.
Because they’re aluminum, corrosion isn’t a concern in the way it would be with steel, and the painted finish should slow oxidation and chalking. If you need to color match to trim or a gutter system that isn’t white, the surface is repaintable. A light scuff with a fine abrasive pad, a good cleaning, and an exterior metal paint will take well. If you want a more belt-and-suspenders approach, a bonding or etching primer designed for aluminum will give you a very durable finish.
Compatibility and fit
Sizing on K-style gutters can confuse folks, so here’s the critical note: the “5-inch” is measured from front to back, not top to bottom. On my run, that dimension (front lip to back flange) matched exactly, and the caps followed the profile like they were made for it.
These are intended for non-plastic 5-inch K-style gutters—specifically aluminum. They won’t fit a 6-inch profile, and they’re not the right choice for vinyl or box gutters. If you’re working on a mixed-metal system (e.g., copper gutters meeting aluminum components), be careful about dissimilar metal contact. It’s not a common scenario in typical residential retrofits, but if it applies, isolate the metals with a compatible sealant and a small barrier tape to limit galvanic corrosion.
The fit on my gutter ends was snug without being stubborn. I could dry-fit each cap by hand, then finish with a few taps of a rubber mallet on a wood block, which spread the force and kept the face from marring. Once seated, the profile aligned at the corners and lip without gaps.
Installation experience
Installation was quick—about 10 minutes per cap including prep and sealant. Here’s the process I followed:
- Clean the gutter end thoroughly. I scraped out old sealant and oxidation with a plastic scraper, then wiped the joint area with mineral spirits and let it dry.
- Dry-fit the cap to check alignment and seating depth.
- Apply a continuous bead of gutter sealant inside the cap where it will interface with the gutter profile. A high-quality tripolymer or butyl gutter sealant works best; silicone can be finicky on aluminum and paint over poorly.
- Press the cap on by hand, then use a rubber mallet against a scrap of wood to tap it home. Work around the perimeter so it seats evenly.
- Wipe any squeeze-out and add a small finishing bead along the interior seam.
- If you have a hand crimper, a couple of discreet crimps on the back flange can give extra security. With a snug fit and a proper sealant bead, I found crimping optional.
- Water test with a garden hose after the sealant’s initial set. Make adjustments before full cure if needed.
I didn’t need to trim or reshape anything. The paint stood up to the mallet taps without scuffing. Once installed, the caps felt solid with no telltale wiggle that sometimes shows up with cheaper stamped end caps.
Performance in weather
After a few heavy fall rains, the caps have held without leaks. The interior bead of sealant is doing its job; there’s no dampness on the fascia at the end runs. Because the fit was good, I didn’t need a heavy, messy sealant line at the exterior; visually, the ends look clean and factory-finished from the ground. The painted white matches common white aluminum gutters closely. Depending on how sun-faded your existing gutters are, you might notice a slight difference, but it’s nothing that stands out unless you’re a foot away.
Thermal expansion can shift poorly fitted end caps over time. I haven’t seen any creeping or loosening, and the seating depth gives me confidence it’ll stay put through freeze-thaw cycles. The aluminum construction also means no rust spots developing at the corners, which I’ve dealt with on older steel caps.
What could be better
- Pair-only packaging: I only needed one cap for a repair, but the set includes both left and right. For many jobs, a pair is perfect; for small fixes, it’d be nice to buy singles. If you’re planning future work, you can keep the extra in your spares bin, but it’s still more than you may need.
- No included instructions or sealant: It’s a straightforward install, yet a brief instruction card with a recommended sealant type and a simple diagram would help DIYers avoid common mistakes. Including a small tube of compatible sealant would be even better, though not expected at this price point.
- Sharpness at edges: Mine weren’t dangerous, but like most stamped aluminum parts, the edges are crisp. Gloves are a must.
None of these are deal-breakers; they’re more about convenience and expectations than functional shortcomings.
Tips for best results
- Measure correctly: Confirm the 5-inch dimension from front to back on your gutter profile, not the overall height.
- Prep matters: Clean metal and a continuous bead of high-quality gutter sealant deliver a leak-free joint.
- Tap, don’t hammer: Use a wood block and rubber mallet to avoid denting the face.
- Paint the right way: If you plan to repaint, scuff-sand lightly, clean with a degreaser, and use an exterior acrylic latex formulated for metal or a compatible bonding primer plus topcoat. Avoid painting in direct sun or on a hot surface.
Who it’s for
- Homeowners tackling DIY gutter maintenance or replacing damaged caps on 5-inch aluminum K-style systems.
- Pros who want a basic, reliable cap that installs quickly and looks clean on completion.
- Anyone repainting or color-matching gutters; the factory white is fine, but the aluminum takes paint well if you prep it.
It’s not for vinyl gutter systems, specialty profiles, or 6-inch gutters. If you’re in those categories, look for model-specific caps or universal slip-on caps designed for your material.
Value
Given the fit, finish, and ease of install, the set strikes me as competitively priced. You’re not paying for a brand name or extra hardware you don’t need, and the result is indistinguishable from OEM gutter ends once installed. For routine repairs or finishing new runs, it’s a cost-effective solution that saves a call to the gutter truck for what is essentially a simple cap.
Bottom line
I found these 5-inch K-style aluminum end caps to be a straightforward, dependable fix for open gutter runs. They fit properly, install with basic hand tools, and deliver a clean, watertight finish when paired with the right sealant. The repaintable surface is a nice touch for matching trim, and the aluminum construction keeps rust out of the equation.
Recommendation: I recommend these for anyone working on standard 5-inch aluminum K-style gutters who wants an easy, reliable end cap without overthinking it. The only notable caveat is the pair-only packaging—if you truly need just one, you’ll end up with a spare. Otherwise, the combination of snug fit, clean finish, and no-drama installation makes them an easy choice for both quick repairs and new installs.
Project Ideas
Business
Seasonal Decorative End Cap Kits
Create and sell DIY kits that transform gutter end caps into seasonal decor (holiday luminaries, Halloween planters, spring seed displays). Include painted caps, fasteners, stencils, instructions, and optional LED lights. Market on Etsy, local craft fairs, and to landscapers who want quick seasonal updates for clients.
Custom-Branded Gutter Accent Service
Offer a service for contractors and homeowner associations to supply prepainted, logo- or house-numbered end caps as a premium finishing touch for gutter installations. Provide color-matching, powder-coating options, and quick-install batches so installers can upsell an aesthetic upgrade during new builds or roof replacements.
Upcycled Home Goods Product Line
Turn end caps into a line of small home goods (planters, key trays, candle holders) and sell them as upcycled aluminum products. Emphasize sustainability and durability. Sell through Shopify, local boutiques, and farmer’s markets; offer customized paint finishes or bundled sets for bridal or corporate gifts.
Workshop & Kit Workshops for Neighborhoods
Host in-person or online workshops teaching homeowners to repurpose gutter end caps into decor (planters, chimes, signage). Charge per participant and sell take-home kits (end caps plus paints and hardware). Partner with hardware stores or community centers to reach DIY-curious customers and funnel kit sales.
Seasonal Rental/Swap Program for Property Managers
Create a subscription or rental program for property managers and event planners who want temporary decorative accents for exteriors. Provide themed end cap covers or freshly painted caps that are swapped seasonally (patriotic, autumn, holiday). Offer installation guidance or a quick-fit mounting kit to make turnover fast and low-labor.
Creative
Mini Wall Planter Pair
Use each left/right end cap as a shallow decorative planter for succulents or herbs. Add a small drainage hole and a felt liner or coco coir, paint or stencil seasonal designs, and mount them side-by-side on a vertical board or fence. The K-style curve gives a modern half-pipe look — great for clustered living-wall installations or staggered outdoor displays.
Modern Candle or Tea-Light Holder
Turn an end cap into a contemporary candle tray. Sand the interior, apply heat-resistant paint or a hammered metal finish, and inset short votive holders or a strip of LED candles. Use the pair as matching mantel or table accents; the curved lip contains wax drips and reflects light attractively.
Outdoor Mail/Key Catcher
Mount an end cap near your door as a compact mailbox extender or key tray. The painted aluminum is weather-resistant; add a cork or rubber mat inside to protect keys and mail. Decorate or paint house numbers on the outer face for a functional, low-profile entry accessory.
Wind Chime / Bell Base
Use the end cap as the top/anchor for a wind chime. Drill a central hole for a hanging eye, attach chains or cords to the lip for multiple chime lengths, and hang metal tubes, bottle caps, or cut pieces of gutter for tone. The curved shape acts as a resonator and gives a clean, coastal look.
Upcycled Shelf Bracket Accents
Incorporate an end cap as a decorative bracket face for small floating shelves. Attach to a wooden cleat or L-bracket so the visible front is the sculpted K-style profile. Repaint to match the shelf or contrast with metallic accents for a custom industrial look.