Features
- 【Secure Solar Panel Mounting Rail】 The solar panel roof mounting brackets kit features high-strength aluminum alloy solar panel mounting rails and durable panel clamps for robust support outdoors. The EPDM rubber pads and stainless steel screws ensure waterproofing, corrosion resistance, and withstanding harsh weather conditions.
- 【Necessary Mounting Hardware】Features adjustable clamps that can accommodate different solar panel thicknesses between 1.18” to 1.38”, the Z end clamps and T middle clamps ensure a tight and secure fit. Also, the 304 stainless steel screws improve the overall stability, making it a perfect fit for off-grid solar panel systems.
- 【Ease of Installation】 The pre-drilled holes and self-tapping 410 stainless steel screws make setup quick and straightforward. The rubber pads securely adhere to the rails, improving friction and stability during installation, providing an effortless solution for DIY solar power projects.
- 【Versatile Applications】 The solar panel brackets kit is suitable for various applications, including RVs, boats, cabins, flat roofs, tin roofs, sheet roofs, and ground-mounted setups. The adjustable design allows it to be used on horizontal or trapezoidal roof surfaces, offering versatility for diverse installations.
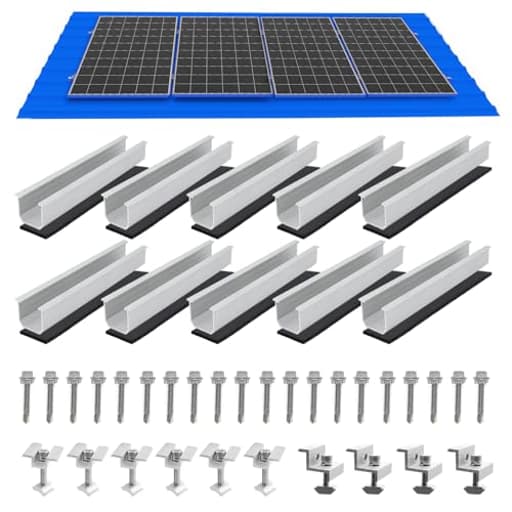
- 【Complete Combo Set】The solar mounting brackets kit includes everything you need for a 4-panel in a row assembly: 4.72-inch mounting rail*10, rubber pad*10, middle panel clamps*6, end panel clamps*4, stainless steel screw*20. This all-in-one set is designed for easy installation and reliable performance for your solar setup.
Specifications
| Color | Silver |
| Size | 4pc-panel |
| Unit Count | 1 |
Related Tools
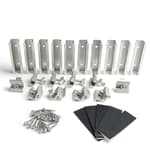
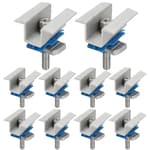
A roof-mount kit that provides aluminum-alloy rails, EPDM rubber pads, adjustable Z end and T middle clamps and stainless-steel fasteners to secure solar panels 1.18–1.38 in thick on tin, flat or sheet rooftops or similar mounting surfaces. The complete set includes ten 4.72 in rails, six middle clamps, four end clamps, ten rubber pads and twenty stainless screws for a four-panel in-row assembly, and features pre-drilled rails and self-tapping screws for installation.
MCOOH Solar Panel Mounting Brackets, Roof Mount Kit, Rails and Clamps Included for Thickness 1.18”-1.38”, 4pcs in A Row Assembly on Tin, Flat and Sheet Rooftop, Aluminum Alloy Review
Why I reached for this rail kit
Small off‑grid arrays on sheds, barns, and RV roofs don’t need a full-blown racking system, but they do need something sturdier and cleaner than a handful of Z‑brackets. I tried the MCOOH roof mount kit for a four‑panel row on a ribbed metal shed roof and on a simple 2x4 wooden subframe to see if these short “mini‑rails” could offer a more rigid, watertight, and tidy install without the cost or complexity of long-strut racking.
What’s in the box and how it’s meant to work
This is a mini‑rail approach rather than full-length rails. You get ten small aluminum rail segments (about 4.7 inches each), a set of T‑style middle clamps and Z‑style end clamps, EPDM rubber pads that adhere to the bottom of each rail segment, and stainless fasteners. The hardware is set up to mount four framed modules in a single row across two rail runs (top and bottom), with the panels clamped side by side. The clamp range fits common 30–35 mm frames (roughly 1.18–1.38 inches), which covers most 100–200 W panels and many mid‑size modules.
The concept is straightforward: each mini‑rail sits on a roof rib or a wood purlin, the EPDM pad adds friction and a bit of sealing, and the self‑tapping screws secure the rail to the surface. Panels then attach to the rails via the end and middle clamps. It’s a small, modular take on what full‑length strut and clamps do.
Build quality and hardware choices
The aluminum rails are stout for their size with clean cuts and consistent extrusion. The clamps slide and bite without slop, and the anodized finish holds up fine to handling. The included screws are stainless self‑tappers; they cut and hold well in thin steel and, with pre‑drilling, also seat in wood. Mixing stainless and aluminum is always a corrosion consideration, but here the EPDM pad isolates the rail from the roof surface, and in non‑coastal environments I expect excellent longevity. In harsher marine settings, I’d add an anti‑corrosion paste where stainless meets aluminum and monitor annually.
The rubber pads are better than an afterthought—they’re tacky enough to hold the rail segments in position while you line things up and start the fasteners. That alone reduces the awkwardness of one‑handed placement on a roof.
Installation on a ribbed metal roof
On a ribbed steel shed roof, layout was easy: I snapped two chalk lines for the upper and lower rail runs, then positioned the mini‑rails on the ribs under those lines. The pre‑drilled rail holes lined up well with typical rib widths. The self‑tapping screws bit cleanly with a nut‑driver—no pilot holes needed in 26–29 ga sheet. I still shot a tiny dab of sealant under each screw head as a belt‑and‑suspenders approach, but the EPDM pad under the rail provides the primary seal and a cushion that spreads the load.
Clamping the panels is the nicest part. Middle clamps slot into the rail channels, and the end clamps capture the outer frames. The clamps pull the panels tight and allow a narrower inter‑panel gap than Z‑brackets, which reduces wind lift points and looks more professional. The result is a noticeably more rigid assembly because the panels are captured in a continuous clamping line rather than sitting on four isolated feet.
From first rail segment to final torque check, the four‑panel row took me an easy afternoon, working alone. The rails and clamps are forgiving of minor misalignment, and the small size of each rail segment makes it simple to fine‑tune your layout around roof ribs or frame obstructions.
Installation on wood
I also fastened two rail runs to 2x4s. With light pilot holes, the stainless screws set securely and had good bite. The short rail length means you’re not wrestling a 10‑foot extrusion; you’re placing small blocks exactly where you need support under the panel frames. The end result is much stiffer than Z‑brackets on wood because the clamps tie the modules together and the rails resist racking.
One note: the included self‑tappers aren’t optimized for thick wood or for spanning roof sheathing to rafters. On lumber, they work best when you can drive into solid stock without a stack of layers. If you’re building a dedicated wooden rack, they’re fine. If you’re penetrating a roof deck into rafters, consider swapping to appropriate lag screws and washers.
Asphalt shingles and code considerations
This kit is not a turnkey solution for a shingle roof. You can physically attach the rails with longer lag screws, but for code‑compliant, leak‑proof shingle installs you’ll want flashed mounts designed for asphalt roofing and bolts tied into rafters, not just self‑tappers into sheathing. I did a test fit on a small auxiliary roof and immediately reached for flashed stand‑offs and longer hardware. The mini‑rails still serve as the clamping base, but the penetration hardware must be upgraded for shingles. Plan on that if a house roof is your target.
Rigidity, wind, and load behavior
With four 100–200 W framed modules, the assembled row feels significantly more monolithic than a Z‑bracket approach. The continuous clamping line reduces torsional flex, and the panels share loads. In moderate wind events the system stayed quiet and solid, with no panel chatter. That said, this is not an engineered, snow/wind‑rated rail system with published span tables. On high‑snow or high‑wind sites, you’ll either tighten the rail spacing, add more attachment points, or step up to a rated racking solution. For typical small off‑grid applications on outbuildings, it’s a solid balance of simplicity and strength.
Electrical bonding
With the clamps tightened, I measured continuity across panel frames, which is useful for grounding. However, the kit does not advertise listed bonding hardware, so if your jurisdiction requires specific bonding clips or grounding lugs with a listing, plan accordingly. For a shed, barn, or RV system, a single ground conductor from a dedicated lug on one frame is straightforward.
Adjustability and compatibility
- Panel thickness: The clamp range (about 30–35 mm) covers most small to mid‑size framed modules. If your panels have thicker 40 mm frames, these clamps may not reach.
- Surfaces: The EPDM‑backed rails are ideal on trapezoidal/tin/metal roofs and work well on wood. For fiberglass or thin aluminum skins (boats/RVs), add backing plates underneath to spread loads.
- Geometry: This kit is designed for one row of panels. There’s no tilt adjust built‑in; it’s a fixed‑pitch solution that follows the roof surface.
What I liked
- Clean, compact design: Mini‑rails are easy to place exactly where you need support, and the finished array looks tidy with tight panel spacing.
- Faster, easier install: Pre‑drilled rails, self‑tapping screws, and grippy EPDM pads reduce the usual dance of holding, leveling, and marking.
- Sturdier than Z‑brackets: The clamps create a continuous assembly that better resists racking and panel flutter.
- Materials that make sense outdoors: Aluminum rails, stainless hardware, and EPDM pads are the right call for weather exposure.
Where it comes up short
- Not shingle‑ready: No flashing is included, and the stock screws aren’t appropriate for shingle roofs. Budget for flashed mounts and proper lag bolts if that’s your application.
- Limited clamp range: If your modules are outside the 1.18–1.38 inch thickness band, you’re out of luck.
- Short rails mean more penetrations: Mini‑rails distribute load well, but you’ll make more small penetrations versus two long rails. On metal roofs this isn’t a problem; on some substrates it’s additional sealing work.
- Basic documentation: The setup is intuitive, but spacing and torque guidance could be clearer. I’d love a simple table for clamp spacing and recommended torque.
Practical tips from the install
- Dry‑fit everything. Mark the panel edges and clamp positions before committing to the first screw.
- Use a dab of anti‑seize on stainless threads to prevent galling, especially in hot weather.
- On metal roofs, a small amount of butyl under each screw head adds extra peace of mind even with the EPDM pad beneath the rail.
- If you’re straddling irregular ribs, add an extra rail segment or two to increase the number of attachment points under the frames.
- Torque clamps evenly and check that the middle clamps are centered between panel frames for even pressure.
The bottom line
I recommend the MCOOH roof mount kit for small, four‑panel rows on metal roofs, wood frames, and similar sturdy surfaces where you want a clean, rigid mount without committing to full‑length rails. It installs quickly, feels notably stiffer than Z‑brackets, and the materials are appropriate for long‑term outdoor use. If your use case is an asphalt shingle roof or you need listed bonding/flashings for a permitted residential install, this kit isn’t a complete solution out of the box—plan to supplement with proper flashed mounts, lags, and any required bonding hardware. For sheds, barns, well houses, and mobile applications, though, it hits a sweet spot of simplicity, sturdiness, and neat panel spacing that’s hard to beat at this scale.
Project Ideas
Business
Mobile Solar Installation Service
Offer a niche installation service for RVs, tiny homes, boats, and pop-up vendors using portable, low-impact roof kits like this one. Focus on customers who want non-penetrating installs or removable systems. Package options: basic 1–2 panel installs, 4-panel row installs using this kit, and seasonal setup/takedown. Charge for site visits, installation, and optional maintenance/inspection contracts.
Prebuilt Portable Power Kits
Assemble and sell ready-to-go portable solar kits that include this mounting hardware plus a matched 12V panel, charge controller, battery pack, and cables. Market tiers (camping, vanlife, vendor booth) with clear instructions and quick-attach mounting. Offer add-ons like quick-release connectors and a wheeled carrying case. Use the all-in-one nature of the kit to simplify inventory and reduce assembly time.
Workshop / Class: DIY Solar Mounting
Run hands-on workshops teaching small groups how to mount panels on tin/flat roofs and build portable sleds. Use this kit as the standard classroom hardware. Charge per attendee and upsell kits for take-home. Partner with makerspaces, RV clubs, and marine groups; use workshops to generate leads for installation services and kit sales.
Seasonal Market Power Rentals
Rent out modular solar canopy systems (built from these kits) to market vendors, food trucks, and event producers. Provide full-service delivery, setup, and teardown for weekend events. A rental model reduces upfront cost for customers and creates recurring revenue; include insurance and optional on-site tech support as premium services.
Tiny-Home & ADU Retrofit Packages
Create a productized retrofit package aimed at tiny-home builders and ADU (accessory dwelling unit) owners: a 4-panel in-row mounting kit configured for common tiny-home roof types, with optional wiring and micro-inverter or battery integration. Offer site assessment, custom clamp adjustments for nonstandard panel thicknesses, and a simple warranty/inspection plan. Position as a fast, low-cost way to add partial off-grid capability.
Creative
Pop-up Market Solar Canopy
Use the rails as the frame for a lightweight canopy that holds 1–4 solar panels to power a weekend market stall. Mount panels in a row on the pre-drilled rails, use rubber pads to protect the canopy material, and clamp assemblies to secure panels. Add quick-release bolts (using the included self-tapping screws and a small hinge at one end) so the canopy folds flat for transport. Ideal for charging phones, powering a card reader, or running LED lights at events.
Rooftop Herb & Trellis Rack
Repurpose the aluminum rails and clamps into a rooftop herb rack and trellis combo for flat/tin roofs. Use rails as horizontal supports for planter boxes and attach vertical trellis wires or bamboo canes to the clamps. The EPDM pads prevent water pooling and protect roof surfaces. The adjustable clamps let you vary spacing for different plants and can anchor shade cloth or a modest drip-irrigation line powered by a small solar pump.
Solar-Powered Outdoor Shower
Build an outdoor shower system for cabins or campsites: mount a small solar panel array on a ground or roof rack made from the rails to power a DC water pump and solar shower heater. The stainless screws and corrosion-resistant rails are suitable for damp environments; rubber pads protect mounting surfaces. Use Z end clamps to secure a waterproof box with charge controller and battery beneath the shower platform.
DIY Portable RV/Boat Panel Mount
Create a removable mounting sled that clamps to an RV or boat deck without drilling permanent holes. Use the pre-drilled rails as the panel base and attach adjustable T and Z clamps to fit different panel thicknesses. Add non-slip EPDM pads and quick-release pins for easy on/off use. This yields a portable solar module you can stow when docking or driving.
Outdoor Workshop Power Rail
Turn the mounting kit into a multifunctional power rail for a backyard workshop: mount panels to a low rail above a workbench to power battery chargers and lights. Use the rails themselves as a mounting backbone to hang tools, an LED strip, or a small inverter box. The corrosion-resistant hardware makes it suitable for semi-outdoor use, and pre-drilled rails speed assembly.