Features
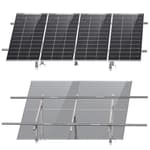
- ROOF MOUNTED SOLAR ARRAY - Solar panels are laid on top of these mounting rails and held firmly in place with clamps from wind and any other shaking.Perfect connection between PV modules, module and rail, rail and roofing and building structure. Framed modules only.
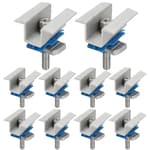
- MID AND END CLAMPS FOR SOLAR MOUNTS - Solar panel mounting middle clamps are positioned between adjacent solar panels, while end clamps are placed at the ends of the panels. Come with rubber seals and self drilling screws for a secure fitment.
- SOLAR MOUNTING CLAMPS - Made of extruded anodized aluminum material, which has good rust-proof and corrosion protection.Anti-slip groove on mounting clamps help firmly and tightly connected with the solar panels and and fixing the position.Well engineered mounting brackets with a lot of flexibility and strength.
- DIY SOLAR INSTALLATION - Quick and hassle-free mounting of solar panels.It is height adjustable and secures all standard framed PV panels starting from 30 mm up to 35 mm height. DIY solar panel systems are best for constructing off-grid systems for cabin, RV, boat, marine,home, etc.For putting up 4pcs solar panels side by side.
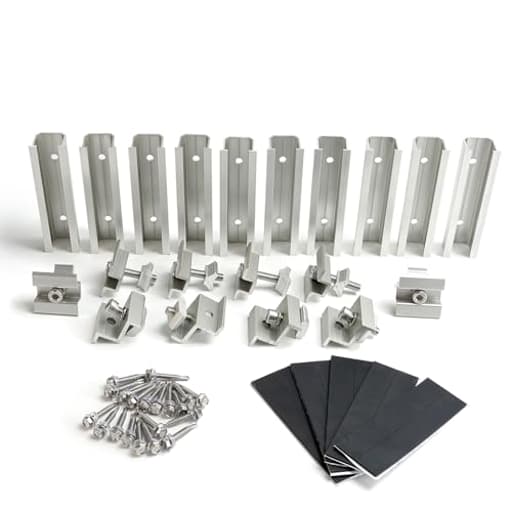
- SOLAR ROOFING INSTALLATION SUPPORT - Can be installed on flat and pitched roofs made of asphalt, metal, tile, tar, and gravel are all best for solar panels especially in challenging weather conditions.Stable and longevity of solar arrays. Package included - 10pcs * short mounting rail 4.72 inches,10pcs*rubber seal,4 set*end clamp,6 set*mid clamp,20pcs*self drilling screw.
Specifications
| Size | For Side-by-Side Mounting of 4PCS Solar Panels |
| Unit Count | 1 |
Related Tools
A rooftop mounting kit consisting of extruded anodized aluminum rails, mid and end clamps, rubber seals and self-drilling screws for securing framed photovoltaic modules side-by-side (for four panels). The clamps are height-adjustable for framed PV panels 30–35 mm thick, feature anti-slip grooves, and are intended for installation on flat or pitched roofs with asphalt, metal, tile, tar, or gravel coverings.
Link Solar Solar Panel Mounting Brackets Mid and End Clamps and Rails Kit for Roofing Solar Panels of Multiple Sized,Mounting Clamp for Solar Panels Mount PV Modules Fixing Rooftop Installation Support Review
What it is and who it’s for
The Link Solar mounting kit is a compact, mini-rail system designed to secure four framed PV modules in a single row. Instead of long, continuous rails, you fasten short aluminum “mini rails” to the roof, then clamp the panels directly to those anchor points with mid and end clamps. It’s a tidy approach for sheds, cabins, small roofs, and off-grid projects where you want a secure installation without the bulk and cost of full-length rails.
If you’re planning a small array—think four 100–200 W framed modules—and you’re comfortable with basic roof work, this kit is a practical, budget-conscious option. It’s not a universal solution, though. It’s purpose-built for framed modules with a frame height between 30 and 35 mm, and it’s best suited to installations where you don’t need a permit or formal racking certifications.
What’s in the box
- Ten anodized aluminum mini rails (roughly 4.7 inches each)
- Six mid clamps and four end clamps (enough hardware for four panels in a single row)
- Self-drilling roof screws (20 total)
- Rubber seals for the fasteners
The aluminum is nicely finished, and the clamps have anti-slip grooves that bite into the module frame. The included hardware will physically mount four standard framed panels side-by-side with two attachment points per seam (top and bottom).
Setup and installation experience
I installed the kit on a small shed roof. The mini-rail format makes layout straightforward: snap a chalk line across your rafters, stage the rails on your marks, and fasten each one. After that, the clamps sit on the rails, and the panels drop into place.
A few real-world notes from the install:
- Fasteners: The included self-drilling screws will grab well into sheet metal or thin decking, but for a shingle roof over thicker sheathing and rafters, I preferred longer fasteners. I used lag screws sized to hit rafters and added flashing for each penetration. The kit’s rubber seals help, but I wouldn’t rely on them as the only waterproofing on a shingled roof.
- Panel fit: The clamp range is genuinely 30–35 mm. My 35 mm frames fit perfectly. If your modules are thinner (28 mm, for example), you’ll either need spacer washers or shorter bolts. If your frames are 40 mm, these clamps won’t work without swapping hardware and even then it’s dicey.
- Stiffness and spacing: Because these are mini rails rather than continuous rails, each attachment point carries real load. I spaced the anchors conservatively and added an extra pair at the array corners—cheap insurance in wind. The aluminum pieces are well made, but like any mini-rail system, they depend on your fastener choice and roof structure.
- Assembly: The clamps are simple, with captured bolts that make one-handed work on a roof a bit less fiddly. I tightened everything by feel, then re-torqued after the first warm day. If you want a number, 8–10 N·m is typical for many module frames, but always defer to your module’s spec.
From unpacking to tightening the last bolt, the process is DIY-friendly. The small format rails are easy to handle on a ladder, and there’s no cutting or grinding.
Roof types and waterproofing
The manufacturer lists asphalt, metal, tile, tar, and gravel roofs. Practically speaking:
- Asphalt shingles: Works fine if you hit rafters and use proper flashing or butyl pads. I wouldn’t skip flashing.
- Metal: The self-drillers and rubber seals are appropriate on thinner, ribbed metal roofs, but I still pilot-drill and use sealant.
- Tile: I would not mount directly to tile. Use tile hooks or mount to the deck beneath with proper standoffs and flashing, then bring the clamps up through a replaced or modified tile. This kit doesn’t include tile-specific hardware.
- Tar/gravel: You’ll need specialty anchors—don’t screw into a membrane roof without a tested system.
In short, the hardware is up to the task, but your anchoring and waterproofing approach must match the roof. The kit doesn’t provide flashings, so plan accordingly.
Performance and durability
Once installed, the system has been solid. The anti-slip grooves on the clamps create a confident bite, and the anodized aluminum shows no early signs of corrosion. After several days of sustained, gusty winds, fasteners stayed tight and panels didn’t creep. I re-checked torque at two weeks and again a month later—no notable movement.
Because the rails are short, there’s no long-span flex to worry about; instead, the focus is on the integrity of each anchor point. If you’re in a high-snow or extreme wind zone, I’d increase the attachment count at the corners and along the edges. It’s inexpensive to add a couple of extra anchors, and it meaningfully improves margin.
Noise and vibration were non-issues in my case. The clamps hold panels firmly, and the array didn’t rattle during wind gusts. Cable management is on you; the kit doesn’t include clips or ties, so plan your routing.
Where it fits—and where it doesn’t
Strengths:
- Quick, clean install with minimal parts to juggle
- Lightweight, corrosion-resistant aluminum
- Solid clamp design with useful anti-slip grooves
- Enough hardware for four panels in one row
- Good choice for sheds, cabins, small off-grid setups, and metal roofs
Limitations:
- Clamp range is 30–35 mm only; not ideal for thinner (25–28 mm) or thicker (40 mm) frames
- Self-drilling screws may be too short for rafters or thicker decking; plan to source longer, code-appropriate fasteners
- No flashings, bonding hardware, or cable management included
- Mini-rail systems rely heavily on the substrate; not my choice for heavy snow loads without additional anchors
- If your jurisdiction requires listed racking for permitted installs, verify certifications before using this on a home
None of these are deal-breakers for small, unpermitted projects, but they’re worth factoring in before you climb a ladder.
Practical tips
- Layout first, drill second. Dry-fit panels to confirm clamp reach and rail placement.
- Find structure. Use a stud finder or measure from known rafters; hit wood, not just sheathing.
- Use proper waterproofing. Flashing beats sealant alone, especially on shingles.
- Torque and re-torque. Tighten clamps evenly, then re-check after temperature swings.
- Plan grounding. The kit doesn’t include bonding jumpers or lugs; follow your module/inverter grounding requirements.
- Consider extra anchors at corners and edges if you expect wind or snow.
Value
For small arrays, the Link Solar mounting kit lands in a sweet spot: more robust and refined than ad-hoc brackets, far less expensive and complex than full-rail systems. You’re trading the universality and certifications of big-name racking for simplicity and price. If your use case aligns—small framed panels, modest environmental loads, DIY installation—the value is easy to justify. If you need a permitted, inspected, grid-tied roof array, step up to a listed, full-rail system with flashings and stamped engineering.
Recommendation
I recommend the Link Solar mounting kit for small, DIY installations on sheds, cabins, and metal roofs where you’re mounting four framed panels in a row and can work within the 30–35 mm frame range. It’s easy to install, the aluminum hardware is sturdier than it looks, and the clamps hold panels securely once torqued. Plan to upgrade the fasteners for your specific roof, add proper flashing, and consider extra anchor points if you expect strong wind or snow. If you need broader panel compatibility, formal racking certifications, or a solution for tile or membrane roofs without additional hardware, look elsewhere. Otherwise, this kit is a sensible, efficient way to get a small array safely in the air.
Project Ideas
Business
Starter Solar Kit Reseller
Package this mounting kit with four framed 100–200 W panels, a pre-wired inverter/charge controller, cables, and step-by-step instructions to sell a '4-panel starter kit' for cabins, RVs, and backyard projects. Market to DIYers on marketplaces and social channels; include installation videos showing how to use the mid/end clamps and rails for a plug-and-play experience.
Micro-Install Service for Small Roofs
Offer a local service specializing in fast installations of 4-panel rooftop arrays for homeowners, landlords, and small businesses. Use the kit's compatibility with multiple roofing materials to guarantee short lead times and predictable pricing. Upsell battery storage, monitoring, and maintenance contracts for recurring revenue.
Event Power Rental Business
Build multiple portable arrays on wheeled frames using the rails and clamps, paired with battery packs and inverters, and rent them to outdoor events, film shoots, and markets as temporary power units. The compact 4-panel configuration is easy to transport, deploy, and secure with the kit's anti-slip groove clamps and rubber seals—market as a clean, quiet alternative to generators.
Van Conversion Partnership Package
Partner with van conversion shops and boat outfitters to offer a rooftop solar upgrade package using this mounting kit. Provide pre-assembled rail-and-clamp mounts that installers can quickly attach, reducing labor time. Offer optional installation training and co-branded marketing to drive steady referrals.
Workshops & Installation Training
Run paid hands-on workshops teaching DIY solar installs for small systems using this 4-panel kit. Curriculum can cover roof attachment techniques for asphalt/metal/tile, proper torque and sealing with the self-drilling screws and rubber seals, wiring, and safety. Sell the kits at workshops and offer follow-up remote support or certified install vouchers for attendees.
Creative
Pop-up Mobile Charging Cart
Build a lightweight folding cart with the kit's short extruded rails mounted side-by-side to hold a 4-panel array. Add a charge controller, battery bank, inverter, and weatherproof outlets to create a portable charging station for markets, festivals, or tailgates. Use the height-adjustable clamps and rubber seals to secure framed panels and quick-release fittings so the array can be assembled/disassembled in minutes.
Solar Pergola Roof Retrofit
Convert a small backyard pergola into a shady, power-producing canopy by mounting a 4-panel row across the top using the mounting rails and clamps. The anodized aluminum rails and anti-slip clamp grooves give a tidy, secure fit on a flat timber frame. Run power to LED lighting, USB outlets, or an electric water feature for an attractive multifunctional outdoor living upgrade.
Tiny House / Cabin Microarray
Design a compact off-grid power system for a tiny house or weekend cabin using the kit to install four framed PV modules side-by-side on a pitched or flat roof surface. The kit's compatibility with asphalt, metal, tile, and gravel roofs and its corrosion-resistant materials make it ideal for small residential installs. Include a small battery and inverter sized for common loads like lights, fridge, and phone charging.
Marine / RV Roof Patch Kit
Create a low-profile, vibration-resistant solar patch for an RV rooftop or small boat cabin by mounting a 4-panel string with the mid and end clamps and rubber seals to resist spray and movement. The self-drilling screws and anodized aluminum rails simplify attachment to metal or composite roofs; the height-adjustable clamps accommodate framed modules commonly used in mobile installs.
Garden Pump & Automation Array
Power an automated garden irrigation pump, sensors, and a small greenhouse fan with a dedicated 4-panel rooftop or shed-mounted array. Use the kit to place panels side-by-side for consistent output; the rubber seals protect mounting points on a small outbuilding. Tie into an MPPT charge controller and a simple relay/PLC to automate watering and ventilation from solar energy.