Features
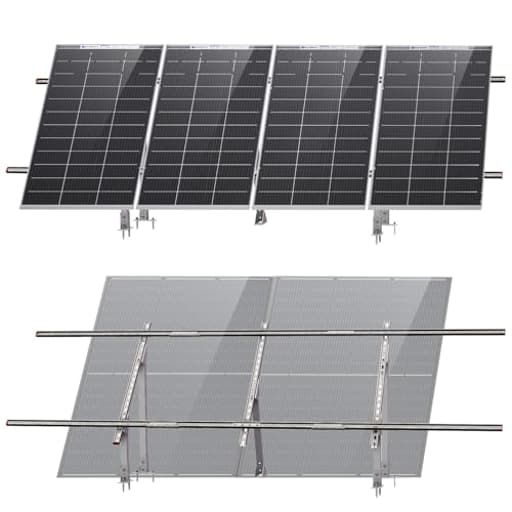
- [Strong Adaptability] ECO-WORTHY Mounting Bracket is 118"Lx39"W In. the front and rear pillars are 5.9 in higher, the front column is 13.78 in, and the rear column is 28.53 in,Which can better support large Solar Panels.Suitable for home, farms, cabin and off-grid
- [Upgraded stability] When install the bracket, the distance between parallel vertical columns should be 59 in, and an upgraded support rod should be installed in the middle,It can bear 160lbs, solving the sagging or collapse problem in the middle of the solar panel
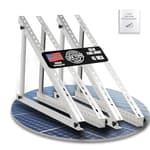
- [ 30% Efficiency Improvement ] ECO-WORTHY mounting system features adjustable hole positions. It can be set between 30 and 60 degrees, which allows the solar panel to absorb the sun's rays efficiently and make the best use of the sun's resources
- [ Beginner-Friendly Installation ] Our upgraded mounting system includes a detailed step-by-step manual, and a full installation video is available on our product page. Whether you're a DIY beginner or a pro, setting up your solar panel bracket is easy
- [ 15 years Durability ] Upgraded Galvanized Steel construction, endure harsh weather conditions,up to 15 years. You can put battery, controller, inverter at backside of the mounting system. It can save lots of room and use solar power system easier
Specifications
| Color | sliver |
| Size | 1-4pcs Bracket System |
| Unit Count | 1 |
Related Tools
Adjustable ground-mount solar panel bracket kit designed to hold multiple panels—typical configurations accommodate up to four 200W panels, three 300W panels, or two 400W panels—for installation on open ground, cabins, farms, or backyard sheds. The galvanized-steel frame measures 118" long by 39" wide with front and rear columns of approximately 13.78" and 28.53", offers a 30–60° adjustable tilt, includes a central support rod rated to support 160 lbs to prevent sagging, and provides space behind the array for mounting batteries, charge controllers, or inverters; components and an installation manual/video are included.
ECO-WORTHY Upgraded Solar Ground Mount Adjustable Multi-Pieces Solar Panel Mounting Brackets Kit System for 4pcs 200W/3pcs 300W/2pcs 400W Solar Panels for Ground,Open Space, Cabins and Backyard Sheds Review
Why I chose this ground mount
I needed a simple, budget‑friendly way to put a small array on open ground behind a shed without pouring a continuous concrete pad or building a custom rack from scratch. The Eco‑Worthy ground mount hit the right balance: galvanized steel, adjustable tilt (30–60°), and a footprint sized for either four smaller panels or a couple of larger modules. I ended up running two 400W modules on one frame and later tested a row of four 100W panels to see how flexible the layout really is.
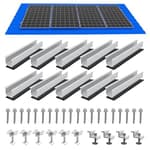
What’s in the kit and build quality
Out of the box, the steel parts are cleanly galvanized with consistent coating and no sharp burrs on my set. The frame comes together into a roughly 118" long by 39" deep rack with a low front column (~13.8") and a taller rear column (~28.5"). That geometry gives you a decent tilt range without the rails getting too high to handle safely.
Two notes on hardware:
- The central support rod (rated 160 lbs) is the unsung hero. Installed at mid‑span, it prevents sag or bounce when the wind pushes on larger panels. It’s essential for long runs.
- The small plastic end caps that cover open tube ends are more cosmetic than structural. Mine were a loose fit. A dab of exterior‑grade adhesive keeps them from wandering off in wind.
Overall, the steel feels appropriately stout for a light ground rack. It’s not utility‑scale hardware—but with good anchoring it’s more than up to small off‑grid duties.
Assembly and installation tips
I built the first frame solo in about two hours, then shaved that to under 90 minutes on the second unit after I learned a few tricks. You can do it with basic hand tools; an extra set of hands helps when squaring the verticals and lifting heavy modules.
Practical tips from my install:
- Dry‑fit, then square: Loosely assemble the legs and rails, square the frame, then tighten. If the vertical columns aren’t set at the specified 59" spacing, the central support rod won’t line up cleanly.
- Keep the mid‑support in mind: Install the center support before you hang panels, especially if you’re running only one or two modules initially. It keeps the rails flat and speeds alignment.
- Lay out anchors early: Plan your ballast or anchors first so you’re not moving a finished rack around. I used deck blocks with stainless hardware on one system and ground screws on another. Both methods worked; ground screws are quicker and more storm‑resilient.
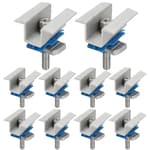
My kits included enough fasteners and clamps for the advertised configurations. I did supplement with a handful of stainless bolts and washers to match the rest of my hardware, mostly for consistency and future corrosion resistance.
Tilt and real‑world performance
The 30–60° adjustment is straightforward: multiple hole positions on the rear struts set the tilt. I set 35° for my latitude and saw a modest bump in daily yield versus a flatter angle—exactly what you’d expect when you’re closer to an optimal tilt.
One practical caveat: once modules are on, seasonal tilt changes aren’t something you’ll do in five minutes. End fasteners become harder to access with large modules installed. If you plan to adjust by season, leave space to get a wrench on those bolts, or set a compromise angle and forget it. For my use, “set and forget” was fine.
Capacity and fit: what actually works
On paper, the frame supports:
- Four 200W panels
- Three 300W panels
- Two 400W panels
In practice, it depends on your module dimensions and frame clamp zones. Standard 60/120‑cell modules at around 39" wide fit the depth of the rack. Length is the gating factor. Two modern 400W modules fit comfortably. For three mid‑power modules, check the total length across their clamp zones against the 118" rail; some modern 300W‑class panels are simply too long to fit three across. Four 100–150W modules with narrower frames fit easily; I even fit five 100W units by adding extra clamps and slight overhang, but that’s outside the stock layout and requires careful clamp placement within manufacturer specs.
Bottom line: measure your panels (width, length, and allowable clamp areas) before you commit to a specific configuration.
Stability, anchoring, and wind
A ground rack is only as good as its foundation. The frame itself is relatively light, which is a plus for handling but a risk in wind if left unanchored. I’ve seen the difference firsthand:
- Unballasted: the rack can creep or tip in strong gusts.
- Ballasted/anchored: rock solid. With four deck blocks per frame and additional mechanical ties, the structure shrugged off 40–50 mph winds.
If you’re in a high‑wind or heavy‑snow area, use ground screws or pour small footings and through‑bolt the feet. The frame’s central support rod spreads load, but anchoring is what makes the system safe.
Wiring, BOS placement, and ergonomics
I appreciated the space behind the array. There’s room to mount a small weatherproof enclosure for a combiner, a charge controller, or even a micro‑inverter, and still maintain airflow. A few pointers:
- Keep electronics shaded and off the ground. I mounted a NEMA box to a back rail standoff to avoid trapping heat.
- Add cable clips or UV‑rated zip ties to manage leads along the strut channel, and leave drip loops.
- If you plan to place batteries nearby, keep proper clearances and a separate vented enclosure; the rack isn’t a battery cabinet.
Durability and upkeep
The galvanized finish has held up well for me so far. I hit fasteners with a light anti‑seize during assembly and retorqued after the first storm. If you’re coastal, consider upgrading to all‑stainless hardware for clamps and bolts. Beyond that, the frame is low‑maintenance: periodic checks for bolt tightness, a glance at the feet for settling, and you’re done.
What I’d change
- Easier tilt adjustments: A design that exposes the adjustment points without removing end modules would make seasonal tilt changes practical.
- End‑cap retention: Either tighter caps or a mechanical clip would keep the plastic covers in place out of the box.
- Clearer fit guidance: A simple dimensional diagram showing maximum rail‑to‑rail clamp spacing and cumulative module lengths would help buyers avoid surprises with longer 300W‑class panels.
Who it’s for
- DIYers building a small off‑grid or backup system on open ground.
- Cabins, farms, and backyard installs where roof mounting isn’t feasible.
- Anyone who wants a steel frame with tilt and doesn’t want to cut and assemble their own strut system from scratch.
Who should look elsewhere:
- Users planning frequent seasonal tilt changes and expecting tool‑free adjustments.
- Sites with extreme wind/snow where a heavier, engineered racking system with certified load ratings is required by local code.
Value and alternatives
Could you build something similar from commodity strut and angle? Sure—but by the time you spec, cut, deburr, and source clamps, you’ll likely spend more time and not necessarily save money. This kit lands in a good value spot, especially if you’re comfortable with basic tools and can anchor it properly.
Final recommendation
I recommend the Eco‑Worthy ground mount for small arrays where you want a straightforward, adjustable steel rack without fabricating your own. It assembles quickly, the central support keeps long runs from sagging, and the tilt range helps you squeeze more production from a fixed ground site. Just be mindful of panel dimensions when planning your layout, anchor it well, and set your tilt once rather than expecting to change it regularly. If those constraints fit your project, it’s a reliable, cost‑effective way to get panels on the ground and producing.
Project Ideas
Business
Backyard Solar Installation Service
Offer a turnkey local service installing these bracket systems for homeowners with sheds, cabins or small yards. Package tiers: basic (2×400W), mid (3×300W) and full (4×200W) with batteries and inverter. Advantages to market: galvanized durability (15 years), adjustable tilt for efficiency gains, concealed battery space. Revenue from installation fees, panel/battery markup and aftercare/maintenance plans.
Glamping & Tiny‑Cabin Power Packages
Target glamping operators, tiny cabin rentals and off‑grid Airbnb hosts with bundled kits: mount + solar panels + battery + remote monitoring. Sell installation, seasonal tilt adjustments and a maintenance subscription. Emphasize the kit’s adaptability (30–60°), strong center support for added accessories, and easy DIY video/manual for on‑site staff training.
Event & Film Rental Arrays
Rent portable ground‑mount solar arrays for short‑term events, film shoots and remote work sites. The bracket’s quick‑install design and centralized battery storage make setup fast and tidy. Charge by day/week with add‑on services: delivery, installation, on‑site tech support and fuel backup. Market to event producers, location managers and outdoor festivals seeking quiet, emissions‑free power.
DIY Workshop + Kit Retail
Run weekend hands‑on workshops teaching people to build and install the bracket system as part of a small off‑grid kit (panels, battery, inverter, mounting kit). Revenue streams: ticket sales, kit sales (premium and budget bundles), and follow‑up consulting or remote support. Use the manufacturer’s manual/video to streamline training and upsell optional accessories (security anchors, monitoring hardware).
Solar Kiosk Franchise for Markets & Parks
Develop a standardized solar kiosk product using the bracket as the backbone and lease or franchise units to market vendors, parks or campus operators. Offer branded signage panels, mobile charging bays and ad space on the kiosk. Income from rental/lease fees, ad revenue, maintenance contracts and seasonal relocation services; leverage the frame’s durability and battery storage space for low‑maintenance deployments.
Creative
Micro Off‑Grid Porch Power
Use the bracket as a compact ground‑mount behind a porch or small cabin to run lights, an EV bike charger, a fridge or Wi‑Fi. The 30–60° adjustable tilt lets you optimize production seasonally; the 118"x39" frame can hold up to multiple panels (200–400W configs) and the rear space is perfect for hiding a battery, charge controller and inverter. Durable galvanized steel and the center support (160 lb) make this a weather‑proof, long‑lasting addition to a weekend cabin or tiny home.
Solar Greenhouse Roof
Convert the bracket frame into an adjustable solar roof for a small greenhouse or cold‑frame. Mount panels to one side for power, then attach clear polycarbonate on the opposite or lower sections to shelter plants. Adjustable tilt controls sun for both electricity and plant light, and the heavy‑duty galvanized frame withstands humidity. Store batteries and controllers behind the array for a tidy, fully off‑grid greenhouse setup.
Workshop Awning & Power Hub
Create a combined shade awning and power source for an outdoor workshop or maker space. The bracket supports solar panels up high to act as shade while powering tool chargers, lights and bench equipment. The included center support prevents sagging under tool mounts; keep batteries/inverters behind the frame so cords are short and safe. Beginner‑friendly install makes this an easy weekend build.
Solar Pergola / Patio Canopy
Use the mounting system as the structural core of a small pergola or patio canopy. Anchor the frame, tilt panels for optimal summer sun blocking or winter capture, and integrate the battery/inverter behind the array to feed outdoor lighting, speakers and fans. The 15‑year galvanized steel lifespan and adjustable tilt make it a durable, multipurpose outdoor upgrade.
Mobile Event Charging & Signage Station
Build a portable charging kiosk for markets, fairs or pop‑up events. The bracket holds the panels and provides a rear cavity for batteries and controllers; mount a removable signboard to the front or side. Use the adjustable tilt to maximize sun during event hours and the center support to secure extra equipment (light bars, PA gear). Great for community events, craft fairs or vendor villages.