Features
- KOHLER GENUINE PART
- 3" canister with a 2" outlet harnesses the natural force of gravity and optimizes flush performance
- Compatible with KOHLER Cimarron tank model numbers K-4418 and K-4369
- Look inside the back wall of the toilet tank to identify tank model number
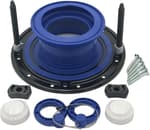
- Complete assembly with tank-to-bowl gasket
Specifications
| Color | No Finish |
| Size | Pack of 1 |
| Unit Count | 1 |
Related Tools
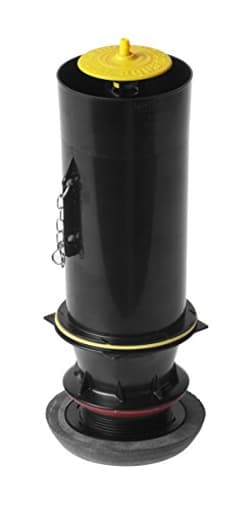
A 3-inch canister flush valve assembly with a 2-inch outlet that uses gravity to facilitate water flow during flushing. Supplied as a complete assembly including a tank-to-bowl gasket for installation and intended as a direct replacement for compatible toilet tanks.
KOHLER GENUINE PART 1188998 2" Toilet Canister Flush Valve Kit Review
Why I reached for this kit
A slow ghost flush and a constantly hissing tank were my clues that the seal in my Kohler toilet had given up. Rather than swap only the seal, I opted to install the Kohler canister valve kit—a complete assembly with a new tank-to-bowl gasket—so I could reset the flush system and stop chasing intermittent leaks. I installed it on a Cimarron tank and used it for several weeks before writing this up.
What it is
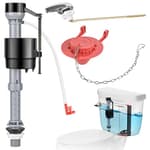
This kit is Kohler’s OEM canister-style flush valve assembly: a 3-inch canister with a 2-inch outlet that relies on gravity for full, quick water delivery. It’s designed as a direct replacement for certain Kohler tanks (notably Cimarron K-4418 and K-4369), and ships as a complete unit with the central canister, mounting hardware, and the large tank-to-bowl donut gasket.
The canister design lifts straight up when you press the handle, opening a full 360-degree path for water. Compared with traditional flappers, that can translate to a more consistent flush and fewer issues with the seal warping or snagging on the seat.
Installation experience
This is a straightforward job if you’re comfortable removing a toilet tank. Expect about 45 minutes if your bolts cooperate; a bit more if you need to wrestle with a stubborn retaining nut.
What I used:
- Adjustable wrench (for supply line)
- Large slip-joint pliers or a strap/oil-filter wrench (for the big plastic retaining nut)
- Flat screwdriver
- Sponge/towels and a small bucket
Steps I followed:
1. Shut off water, flush the tank, and sponge out the remaining water.
2. Disconnect the supply line and remove the two tank-to-bowl nuts.
3. Lift the tank to a flat surface. This is the cleanest way to access the flush valve.
4. Using large pliers, loosen the big plastic nut underneath the tank that holds the old valve. This can be tight—steady pressure helps. A strap wrench is gentler on the plastic.
5. Clean the porcelain seat where the new valve will sit; any grit here can cause micro-leaks.
6. Drop in the new canister valve, orienting the overflow and chain toward the handle side.
7. Tighten the retaining nut until it’s snug. Don’t overtighten—you’re compressing a gasket against porcelain.
8. Install the new tank-to-bowl gasket (the thick donut) on the valve outlet.
9. Place the tank back on the bowl, align, and snug the tank bolts evenly so the tank sits level without rocking.
10. Reconnect the water supply, adjust the chain so there’s minimal slack, and test for leaks. Fine-tune the water level to the mark inside the tank.
The kit doesn’t include a wrench or any special tool for the big nut—plan to have large pliers or a strap wrench on hand. The instructions are clear enough, but a quick glance at a video tutorial can help if you’ve never removed a tank before.
Fit and compatibility
On my Cimarron tank, this was a direct swap with no shimming or fussing. The donut gasket compressed evenly and sealed on the first fill. As with all Kohler replacements, confirming your tank model number is key. Look inside the back wall of the tank (stamped in the porcelain). If you’re unsure, flipping the tank lid sometimes reveals part references on the underside. This kit targets Cimarron K-4418 and K-4369; if your toilet uses a different outlet size or a different architecture, you’ll want to verify before ordering.
One practical note: Kohler’s canister systems come in both 2-inch and 3-inch outlet variants. This kit is the 2-inch outlet version—make sure that matches your tank’s throat.
Build quality and design
The canister assembly feels robust and well finished. The guide surfaces are smooth and the travel is consistent, which matters for a clean lift and drop every time you flush. The sealing surfaces were free of mold lines or burrs, and the seat mated nicely to the porcelain. The included tank-to-bowl gasket is thick, resilient, and compresses predictably; it handled minor imperfections in my bowl’s casting without drips.
Canister-style valves have a couple of practical advantages over flappers:
- The seal isn’t hinging off a pivot, so it’s less prone to racking or half-seating.
- The 360-degree opening gives a strong initial rush of water, which can help clear the bowl with less trapway drama.
The trade-off is that when the central seal ages, replacing just that donut seal is cheaper—but if your valve body or seat has worn, a full assembly like this resolves everything in one go.
Performance after install
Two things improved immediately: the hiss disappeared and the flush became more decisive. The toilet now clears on a single press without holding the handle, and the tank refills without triggering any ghost cycles. The canister drops crisply and seals without a wobble, so there’s no slow seep that would otherwise keep the fill valve whispering along. Over several weeks of daily use in a high-traffic bathroom, the seal has remained tight and the tank-to-bowl joint bone dry.
Noise-wise, the flush profile is the familiar Kohler canister sound—more of a quick whoosh than a drawn-out roar. Nothing about the kit introduced additional noise.
Usability details that matter
- Chain adjustment is easy. Leave just a touch of slack; too tight and the canister won’t seat, too loose and you’ll get a mushy handle feel.
- The overflow height came preset correctly for my tank. If yours differs, verify you’re meeting the waterline mark inside the tank after filling.
- The large retaining nut can be stubborn on older installs. A strap wrench gives you leverage without chewing the plastic.
- Tighten tank bolts evenly and stop as soon as the tank meets the bowl with no wobble. Overtightening is how porcelain cracks.
What’s in the box (and what isn’t)
Included:
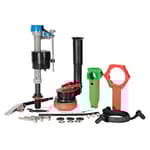
- Complete canister flush valve assembly
- Tank-to-bowl donut gasket
Not included:
- Tank bolts, washers, or nuts
- Tools for removal/installation
- Supply line gasket
That’s a reasonable kit scope, but a simple plastic spanner for the retaining nut would make the experience friendlier for first-timers.
Who this is for
- Owners of compatible Kohler tanks (especially Cimarron models) with:
- Constantly running water
- Intermittent ghost flushes
- Aged or warped valve seats
- DIYers comfortable with removing a toilet tank for a clean, one-and-done fix
- Anyone who prefers OEM fit and flush characteristics over piecing together aftermarket parts
If you’re only battling a hardened canister seal and your valve body is pristine, you can replace just the seal. But if your toilet is a decade old or more, the full assembly plus new tank-to-bowl gasket is a smart refresh.
Value
As an OEM kit, it’s not the cheapest path to stopping a leak, but it offers reliable fit and consistent performance. The time you save by not troubleshooting mismatched aftermarket parts—and the peace of mind from a dry, silent tank—made it worthwhile for me. The inclusion of the tank-to-bowl gasket is a nice touch and eliminates a common source of weeping at the bowl joint.
The bottom line
The Kohler canister valve kit solved my leak, restored a strong, consistent flush, and installed without surprises. It’s purpose-built for specific Kohler tanks and does exactly what it should: deliver a full-open gravity flush and seal tight on the drop. I’d have liked a basic spanner in the box to help with the big retaining nut, but that’s a minor gripe.
Recommendation: I recommend this kit if you have a compatible Kohler tank and want an OEM, comprehensive fix rather than tinkering with piecemeal parts. It installs cleanly, performs reliably, and includes the critical tank-to-bowl gasket for a complete refresh. Verify your tank model number first, gather the right pliers or a strap wrench, and you’ll be back to a quiet, efficient flush in under an hour.
Project Ideas
Business
OEM repair kit + how-to video product
Package the genuine Kohler canister flush valve with the tank-to-bowl gasket, a short parts checklist, and a branded step-by-step installation video targeted to owners of compatible Kohler Cimarron tanks (K-4418, K-4369). Sell the kits online with clear model-lookup guidance, positioning them as the easy fix for common canister failures. Upsell options: priority shipping, on-call tech support, and a kit that includes basic tools and replacement bolts.
Refurbished OEM parts storefront
Source surplus or gently used genuine Kohler canister assemblies, inspect and refurbish (replace gaskets, clean and test), then resell as 'certified refurbished' units online or to independent plumbers. Offer a compatibility lookup tool and a short warranty. This lowers cost for consumers while capturing demand from repair-focused buyers who prefer OEM parts over generics.
Upcycled home-decor line
Create a product line of upcycled home goods—industrial lamps, small fountains, clocks and hardware-accented shelves—built around the canister as a signature element. Market via Etsy, Instagram and local boutiques emphasizing authentic OEM parts, limited runs, and custom finishes. Offer bulk B2B packages for cafés and bars wanting an industrial look, and include a story card explaining the part’s origin and transformation.
Hands-on DIY workshop + kit
Run maker-space workshops teaching participants to turn a canister flush valve into a lamp, fountain, or clock. Charge for class + materials and sell take-home kits that include the genuine canister, gasket, electrical fittings or small pump, hardware and printed instructions. Workshops build community, create repeat customers for kits, and generate social media content for promotion.
Creative
Mini gravity-fed tabletop fountain
Use the 3" canister as the central water chamber and the 2" outlet as a controlled spout to build a compact tabletop fountain. Mount the canister vertically in a shallow tray, seal with the supplied tank-to-bowl gasket at the base to prevent leaks, and route a small submersible pump (or gravity-feed reservoir above the canister) so water flows through the 2" outlet into cascades or a pebble bowl. The canister’s internal geometry and outlet produce a steady, pleasing stream—great for desk décor or a small indoor water feature.
Industrial pendant lamp
Turn the canister into an industrial-style pendant light. Use the canister body as a cylindrical shade/housing for an LED bulb; feed the cord through the 2" outlet and use the gasket as a decorative trim ring where the canopy meets the canister. The KOHLER casting has a utilitarian, mechanical look that polishes well or accepts patina/paint for an upcycled lighting piece suitable for kitchens, bars, or workshops.
Resonant sculpture / percussive instrument
Repurpose the hollow canister as a resonating chamber in a kinetic sculpture or hand percussion instrument. Mount the canister on a frame and attach mallet-struck surfaces or tensioned membranes to the outlet area; the cylinder’s shape and metal/no-finish surface produce unique tones and resonances. The gasket can be used as a tunable damper or as an isolating mounting pad to alter sustain and timbre.
Steampunk clock or automata housing
Use the 3" canister as a compact gearbox or clock housing for a small wall/desk clock or automaton. Fit a small quartz movement or micro mechanical gears inside the canister; the 2" outlet works as an access port for winding/adjustment or to route shafts. The supplied gasket makes for an instant bezel detail—finish with brass accents, exposed gears and industrial fasteners for an upcycled steampunk piece.