Features
- Say Goodbye to Uneven Gaps – Tired of wobbly or misaligned deck boards? Our deck spacer tool keeps every plank evenly spaced, ensuring a flawless look and reducing the risk of water pooling or wood damage
- 4 Sizes in 1 Set – Why buy multiple tools when one set can do it all? With 1/16", 1/8", 3/16", and 1/4" thickness options, these deck board spacers eliminate guesswork and measurement errors during installation
- Built to Last – Crafted from high-quality ABS material, these deck board spacers are lightweight yet tough enough to withstand repeated use across multiple decking projects without bending or breaking
- Boost Your Efficiency – Want to finish your deck faster with less effort? Each spacer is clearly labeled for easy size identification, while the bright color makes it quick to spot in your tool kit, saving time on every project
- Universal Fit for Any Deck – Whether you’re working with pressure treated lumber, composite decking, PVC, or hardwood boards, this deck board spacing tool is designed to keep your installation professional and long-lasting
Specifications
| Unit Count | 8 |
Related Tools
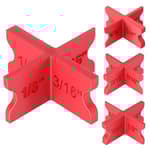
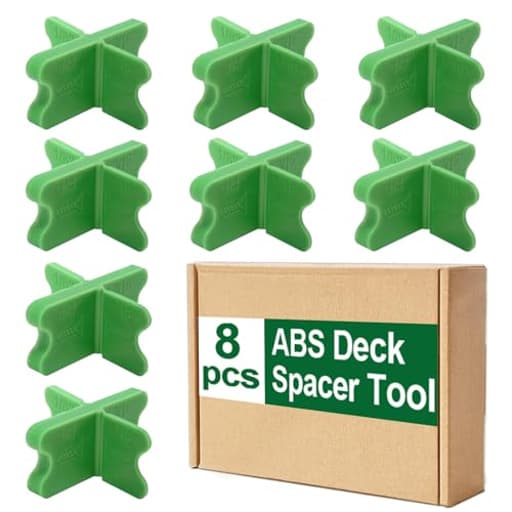
This 8-piece deck spacer set includes four thickness options — 1/16", 1/8", 3/16", and 1/4" — to set consistent gaps between deck boards during installation of composite, pressure‑treated, PVC, or hardwood decking. Made from ABS plastic, the lightweight spacers are labeled by size and brightly colored for visibility, helping maintain uniform spacing and reduce misalignment or water pooling.
Dnairtly 8 Pcs Deck Spacers Tool Set, 4 Thickness Options (1/16", 1/8", 3/16", 1/4") Deck Board Spacers for Composite Decking, Pressure Treated Lumber, PVC & Hardwood Boards Review
Why these spacers earned a spot in my deck kit
I started a recent deck refresh with a simple goal: straight lines, uniform gaps, and no head-scratching over measurements. The Dnairtly deck spacers were the small, unassuming accessory that made the job more predictable. They won’t transform bad framing into a perfect deck, but they deliver repeatable spacing and cleaner screw lines with almost no learning curve.
What you get and how they’re built
Each spacer is a four-in-one tool with 1/16", 1/8", 3/16", and 1/4" prongs molded into a single ABS body. The plastic is rigid and tough enough to resist flexing under typical board pressure, and the bright color makes them easy to spot when you drop one between joists. Large, molded size labels are visible at a glance, which kept me from fumbling with a tape measure to confirm the thickness.
The set includes eight spacers. In practice, that was enough to work across four joists at a time—two spacers per joist—so I could set a board, fasten, pull the spacers, and move on without constantly leapfrogging a smaller pile of shims.
There’s also a thoughtful detail that’s easy to overlook: screw reference slots. They don’t “lock” anything in place, but they give a repeatable visual target so screw heads line up downboard. On long runs, that small nudge toward consistency cleans up the overall look.
Setup and workflow: simple, with a couple of caveats
I tested these spacers on composite and on pressure-treated southern yellow pine. My workflow looked like this:
- Choose the gap for the material (1/4" for wet PT lumber, 3/16" or 1/8" for most composites—always confirm your decking manufacturer’s spec).
- Drop two spacers at each joist along the run.
- Snug the board by hand or with light clamp pressure until it kisses the spacers—don’t crush them.
- Use the screw reference slots to align fasteners.
- Drive the screws, then wiggle and pull the spacers straight out and move down the line.
The key is to resist the urge to force a bowed board to the spacer with gorilla torque. If you clamp a stubborn board so hard that the spacer is acting as a fulcrum, you can trap or damage it. A deck board bending tool or a gentle pry with a board jack is the better approach for correcting crown or twist before you set your gaps.
Accuracy and consistency
Spacing consistency is where these earn their keep. The prongs are square and true, and I had no trouble maintaining dead-even reveals from start to finish. After a few rows, I was relying on the labels and muscle memory alone. The edges are crisp, so the contact with the board faces is positive and repeatable. There was no telltale “wiggle” that you sometimes get with softer rubber spacers.
One quirk of any four-in-one spacer is orientation. It’s entirely possible to pick up the tool, insert the wrong prong, and end up with the gap you didn’t intend. The labels help, but when I got into a rhythm I still forced myself to glance down and check the size before setting each row. If you’re spacing a whole deck at the same dimension, consider staging only the spacers that match your chosen gap to prevent mix-ups.
Durability
ABS is a smart choice here. These spacers shrugged off normal jobsite abuse—drops, foot traffic, and being tossed in and out of a tool bag. They don’t absorb water, and they clean up with a rag. I wouldn’t expect them to survive being crushed between two boards under clamp pressure or being pried against with a steel bar, but used as intended, they feel like a multi-project tool rather than a single-use consumable.
Heat is worth a mention. On hot, direct-sun days, any plastic can soften marginally. I didn’t see warping or deformation, but I also didn’t leave them parked under a black composite board at noon for an hour. If you’re working in high summer, keep them moving and out of prolonged pinch points.
Speed and workflow benefits
The eight-pack is the sweet spot. With two spacers per joist, I could establish a full-width checkpoint for each row, align screws, and keep pace without constantly backtracking. The bright color saved me time: I dropped one into the joist bay more than once, spotted it instantly, and fished it out without crawling around.
The screw slots turned out to be more than a gimmick. On a long run, being able to “sight” your screws off the spacer keeps spacing and fastener rows consistent, which pays off in a cleaner finished look—especially if your boards don’t hide fasteners.
Where they fall short
- Orientation mishaps: The four-in-one design is efficient, but it makes it easier to grab the wrong side if you’re zoning out. Bigger, color-coded ends for each thickness would help prevent mistakes.
- Not a clamping tool: These are spacers, not compression stops. If you try to muscle a bowed board against them, you risk trapping or damaging them.
- Limited size range: The big four (1/16, 1/8, 3/16, 1/4) cover most decking, but if you regularly work with exotic hardwoods or follow a specific manufacturer that recommends 5/32" or 7/32", you’ll need a secondary option.
Comparison with other approaches
- Rubber/T-spacers: Softer materials can be gentler and sometimes easier to pull, but they wear faster and can deform under pressure. These ABS spacers held their shape better and produced more consistent gaps.
- Wedge shims: Wedges are great for coaxing a tight board into place, but they can introduce variability if you’re not careful. Fixed-thickness prongs remove that guesswork.
- Full systems (hidden fastener kits and proprietary spacers): Professional systems like CAMO or proprietary hidden fasteners include built-in spacing and much faster alignment for big jobs, but they’re far more expensive and tie you to a specific fastening method. These spacers are inexpensive, tool-agnostic, and play nicely with both face screws and many hidden fastener systems when you want an extra check on spacing.
Tips for best results
- Match spacing to material and conditions: Pressure-treated boards that are wet from the yard need larger gaps (often 1/4"). Composites typically use tighter gaps (often 3/16" or 1/8"). Always check your manufacturer’s requirements.
- Pre-correct problematic boards: Tame crowns and twist before you set the spacers. A deck board straightener or a simple clamp-and-block approach makes the spacers’ job easier.
- Keep them moving: Set the row, fasten, and pull the spacers promptly. Don’t leave them pinched while you break for lunch on a hot day.
- Stage the size you’re using: If your entire deck uses, say, 3/16", pull only that size into your pouch to avoid accidental mix-ups.
- Use the screw slots: Take the extra second to align your screws using the spacer’s guide. The finished look is worth it.
The bottom line
The Dnairtly spacers do exactly what I want a deck spacer to do: deliver repeatable, clean gaps with minimal fuss. The ABS build is plenty durable for real-world use, the size markings are unambiguous, the bright color is practical, and the eight-pack keeps momentum going across a typical span. The screw alignment slots are a welcome bonus that helps elevate the finished appearance.
They’re not a cure-all for poor framing, and they’re not designed to take clamp loads. You need to pay attention to orientation, and the four included sizes won’t satisfy every niche spec. But for most composite, PVC, hardwood, and pressure-treated projects, these cover the standard spacing needs with reliable consistency.
Recommendation: I recommend these for DIYers and pros who want an inexpensive, durable, and efficient way to standardize deck board gaps without committing to a proprietary system. They speed up layout, keep gaps uniform, and help you maintain clean screw lines—provided you use them as spacers, not clamps, and double-check the prong size before each row.
Project Ideas
Business
Micro‑Service: Deck Gap Tune‑Up
Offer a low-cost neighborhood service that inspects and re‑spaces deck boards, replacing warped boards and resetting consistent gaps. Use the spacer set to quickly demonstrate fixed gap options to homeowners and complete minor corrections on-site—an easy upsell to full repairs.
Branded Spacer Kits for DIYers
Create a premium, branded spacer kit (include all four sizes, a small ruler, quick guide, and a durable case) and sell via Etsy/Amazon. Market to homeowners and small contractors who want a reliable, visible, labeled spacer set—bundle with short how‑to PDFs or video links.
Workshops & Pop‑Up Classes
Run hands‑on weekend workshops teaching deck basics: board selection, spacing, fastening, and finishing. Provide each attendee a spacer set in their take‑home kit. Charge per person and sell follow‑up materials or custom spacer-branded merchandise.
Contractor Subscription Kit / Rental
Offer contractor-focused rental or subscription kits that include multiple spacer sets, specialty jigs, and consumables for high‑volume jobs. Contractors can rent kits for large projects rather than buy inventory; add courier delivery/return to differentiate.
Content + Affiliate Funnel
Produce short tutorial videos and before/after reels showing how proper spacing improves durability and aesthetics. Link to the spacer set and complementary products (screws, hidden fasteners, stains) as affiliates. Monetize via ads, sponsorships, and direct kit sales.
Creative
Slatted Planter Boxes
Build a set of outdoor slatted planter boxes where evenly spaced gaps provide drainage and a modern look. Use the 1/16"–1/4" spacers to pick a consistent gap size, speed up layout, and keep corners square. Finish with exterior stain or linings for year‑round use.
Modern Slatted Coffee Table
Make a coffee table top from parallel deck boards with uniform gaps between planks. Use spacers to set the gap for a light, airy aesthetic; optionally pour tinted epoxy between slats or install LED strips beneath for a backlit effect. The ABS spacers keep spacing exact during glue and screw-ups.
Patterned Privacy Screen / Trellis
Craft a freestanding privacy screen with alternating gap patterns (e.g., narrow then wide) by swapping spacer sizes as you assemble. The labeled, brightly colored spacers let you repeat patterns quickly for a striking yard feature that doubles as a climbing trellis.
Wood Slat Wall Art Panel
Create large-scale indoor wall art using thin slats with precise spacing to form stripes, gradients, or optical patterns. Use different spacer thicknesses to vary negative space, then paint or stain individual slats for contrast. Spacers make the modular repeatable and gallery-ready.
Vented Floating Shelves for Plants or Shoes
Build floating shelves made of spaced slats so plants get airflow and water drains, or so shoes dry faster. Use the spacers during assembly to ensure constant gaps and level alignment; mount with hidden brackets for a clean, functional display shelf.