Features
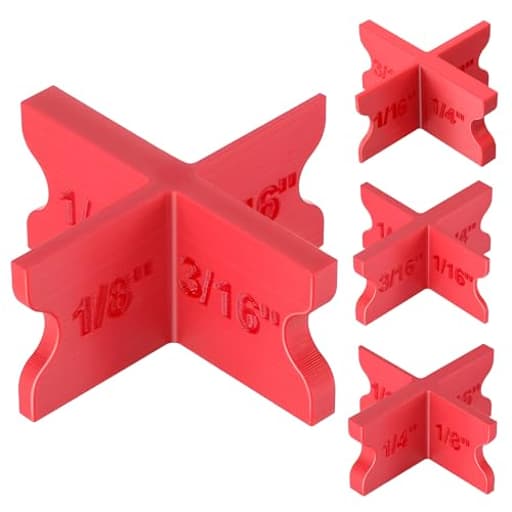
- 4 Precision Thickness Options: Contains 1/16", 1/8", 3/16", and 1/4" four thicknesses to ensure accurate deck spacing control, one single deck spacer to meet all needs. X shaped design calibrates horizontal and vertical directions simultaneously, completely eliminating manual measurement errors
- Advantages of Proper Deck Spacing: Employ deck board jig Spacer to ensure consistent alignment and uniform gaps between planks for the smooth installation of new boards. Maintaining adequate gaps between deck boards is essential to promote efficient drainage and debris removal while accommodating board expansion and contraction
- Durable and Reliable: Constructed from premium grade plastic, our deck board spacing tool is designed for longevity and engineered for enduring strength and resilience to create a long lasting and sturdy deck structure that lasts for multiple projects
- Thoughtful Detail Design: Each deck spacer panel is clearly labeled on both sides and comes with a screw hole auxiliary drill bit, effectively improving work efficiency. The bright-colored design makes it easy to quickly identify the size and find it easily in the tool kit
- Wide Compatibility: With its range of 4 size options, deck spacing tool is compatible with all decking, including pressure treated lumber, composite decking board, PVC decking, hardwood decking, plank, and so on
Specifications
| Color | Red |
| Unit Count | 4 |
Related Tools

Four-piece set of PC plastic deck spacers in thicknesses 1/16", 1/8", 3/16", and 1/4" to establish consistent gaps between deck boards; the X-shaped design sets horizontal and vertical spacing simultaneously. Each spacer is labeled on both sides, includes a screw hole for positioning or retention during installation, is high-visibility red, and is compatible with pressure-treated lumber, composite, PVC, and hardwood decking.
Saillong 4 Pack Deck Spacers with 4 Thicknesses 1/16", 1/8", 3/16", 1/4", Durable PC Plastic Deck Board Jig Spacers Clamp, Decking Spacing Tool for Pressure Treated Lumber, Composite PVC Board Review
Why these spacers earned a spot in my deck kit
I’ve used all sorts of makeshift shims to set deck-board gaps—finish nails, scrap plywood, even a few broken paint stirrers in a pinch. They work, but they’re inconsistent, slow, and hard to keep track of. The Saillong deck spacers solved all of that for me with a simple, bright-red X that’s faster to deploy and more accurate than any improvised solution I’ve tried.
This set includes four rigid plastic spacers—1/16", 1/8", 3/16", and 1/4"—each clearly labeled on both faces. The X shape is more than a styling choice: it presents consistent bearing surfaces in two directions, which keeps the gap true and square rather than wedging or tilting under pressure. I used them across pressure-treated lumber and composite boards during recent repairs and a picnic table build, and the consistency was noticeable in both the finished look and how smoothly fasteners drove without pinching or binding the boards.
What’s in the set
- Four spacers, one per size: 1/16", 1/8", 3/16", 1/4"
- High-visibility red plastic
- Through-hole on each spacer for temporarily pinning with a screw
- Size labels molded on both sides
If you’re building a full deck, one of each size won’t cover an entire run at once; you’ll be moving them as you go. For small projects, repairs, or fine-tuning around features like picture framing and borders, the four-size mix is handy. For a large, single-gap deck installation, you’ll likely want multiple identical spacers; more on that in the limitations section.
Accuracy and repeatability
The point of a spacer is not just “good enough,” it’s consistent. I checked each piece with calipers and found them to be very close to their stated thicknesses, within a couple thousandths in my sample. More importantly, they’re consistent across all bearing surfaces of each X, which means you don’t get one side of the joint tighter than the other if a spacer twists slightly during fastening.
Real-world proof showed up when I sighted down several 12-foot runs: the reveal stayed uniform end to end, even where boards had a bit of crown. The solidity of the X helps keep twist-prone boards from walking the spacer out as you drive screws—something I’ve fought with on simple flat shims.
On the deck: workflow and use
- Choose your gap based on material and climate. I generally use 1/8" for composite, 3/16" to 1/4" for wet pressure-treated lumber, and 1/16" for trim boards or picture framing where expansion is limited.
- Place two spacers per joist bay—one toward each edge of the board—before you start fastening. With bowed boards, I’ll add a third in the center.
- Drive one fastener to pin the board, then check that the spacers aren’t trapped or angled. The X gives you a nice pinch point to pull them if needed.
- For stubborn boards, clamp or use a deck wrench to bring the gap to size rather than levering against the spacer. That preserves the spacer and keeps your gap precise.
- Use the screw hole to anchor a spacer if you’re working alone on long runs. A single decking screw through the hole into the joist prevents the spacer from falling out while you wrangle a board.
These are just as useful off the deck: I used them setting slats on a picnic table, spacing battens on a fence gate, and even aligning cabinet slats in the shop. The red color makes them hard to lose in sawdust or grass.
Material and durability
The spacers feel like a rigid, glassy plastic—stiff enough that they don’t compress under clamping force, but not rubbery. That’s exactly what you want for accuracy. It also means they don’t love being twisted or used as levers. I managed to crack a leg on the 1/8" spacer when I tried to pry a swelled board into position with the spacer still in the joint. Lesson learned: use a board bender or clamps to bring the gap into range, then insert the spacer for final sizing.
Heat and sunlight didn’t bother them in my testing. Left on a hot deck for an afternoon, they stayed flat and true, with no softening. Edges have held up well after multiple projects, and the labels are molded rather than printed, so they remain legible after dirt and rain.
If you’re tough on gear or tackling a big project, treat these as semi-consumables and keep a second set on hand. The thinner sizes in particular can chip if abused, although they hold up fine with normal use.
Ergonomics and small touches
- The X profile gives you a natural grip to push in or pull out, even with gloves on or when boards are tight.
- The bright red color is more than cosmetic—these don’t vanish in grass, mulch, or sawdust.
- The screw hole is a clever addition. I used it most when solo: pin a spacer at the joist line, and it won’t fall into the void as you set a long board.
- With the size clearly labeled on both faces, I stopped second-guessing which spacer I had in hand. That seems trivial until you’re alternating between 1/8" and 3/16" around features.
Compatibility and edge cases
- Pressure-treated, composite, PVC, and hardwood all worked well. For grooved composite with hidden fasteners, place spacers away from clip locations so you’re not fighting hardware.
- On cupped or crowned boards, the X shape resists canting, but it’s still best practice to restrain the board with clamps or a deck wrench before final fastening.
- If your job requires a nonstandard gap (say 5/32"), this set won’t cover that exact size. For most residential work, the included four sizes hit the common targets.
Limitations and what I’d change
- Quantity per size: You get one of each thickness. For laying an entire field with, say, a 3/16" gap, I’d rather have 6–10 pieces of that one size. The current mix is excellent for versatility, less so for production pacing. I’d love to see bundled “single-size” packs sold alongside the variety set.
- Brittleness under misuse: The rigidity that keeps gaps precise also means the thinner legs can snap if you twist or lever against them. It’s manageable—just use the right tool to bring boards into alignment—but it’s worth noting.
- No lanyard or clip: A small tether hole or included carabiner would make it easier to keep the set together. I ended up dropping them into a small pouch to avoid losing one between joists.
Tips for best results
- Treat spacers as measuring tools, not prybars. Move the board to the spacer, not the spacer to the board.
- Place spacers near fastener locations to prevent tapering gaps as you drive screws.
- For long boards, stage multiple spacers and leapfrog them down the run to maintain speed and consistency.
- Mark your preferred gap on the joists ahead of time. Even with spacers, a quick pencil line helps you see if a board is creeping.
The bottom line
The Saillong deck spacers make gap setting faster, more accurate, and far more repeatable than nails or scrap shims. The X shape is genuinely useful, the sizes cover the common decking scenarios, and the bright, labeled design eliminates guesswork. They’re not indestructible—especially the thinner legs if you misuse them—but with normal technique they hold up well and keep your work looking intentional.
Recommendation: I recommend these spacers for DIYers and pros who want reliable, consistent deck-board gaps without fuss. They shine in small to medium projects and punch-list work, and they’re excellent general-purpose spacers around the shop. If you’re tackling a full deck with a single gap size, consider buying multiple sets or supplementing with additional spacers of your chosen thickness to keep your workflow moving.
Project Ideas
Business
DIY Deck Kit: Spacer + Hardware Bundle
Package the 4-pack spacers with a small hardware kit (best-practice screws, countersink bit, starter instructions and a short spacing guide) and sell as a turnkey DIY deck or repair kit online and at local retailers. Price tiers: basic (spacers + instructions), pro (adds screws & bit), premium (adds measuring jig and how-to video). Include suggested project templates to increase perceived value.
Hands-on Workshops & Video Courses
Run local weekend workshops teaching deck repair, building planter boxes, or installing privacy screens using the spacers. Record the classes and sell a focused online course (short modules: spacing basics, fastening, finishing) with downloadable plans and material lists. Upsell physical spacer kits to course buyers.
Contractor/Builder White-Label Supply
Offer bulk pricing and custom-branded spacers to small deck contractors, landscapers and home-improvement stores. Provide co-branded packaging and a simple installation card that contractors can hand to clients — positions you as a trade supplier and creates recurring B2B orders.
Jobsite Rental Packs & On-Demand Templates
Create rentable tool packs (spacers + clamps + bit) for small contractors or weekend warriors through a local pickup/drop-off model. Offer a paid service to generate project-specific spacing templates or cut-lists (based on measurements the customer provides) and deliver printouts or digital plans—fast, low-overhead revenue streams that leverage the spacer’s value.
Creative
Precision Deck Accent Inlay Panels
Use the four spacer thicknesses to lay out consistent reveal lines for contrasting wood or metal inlays between deck boards. Clamp boards with the X-shaped spacer to keep horizontal and vertical alignment, rout shallow channels for the inlay, glue and finish. Great for creating geometric patterns, borders or inlaid logos on a deck or patio tabletop.
Slatted Planter Boxes with Drainage Gaps
Build outdoor planter boxes or raised beds from pressure-treated or composite decking using the spacers to create uniform slats with drainage gaps. The labeled sizes let you choose exact airflow/drainage spacing; the screw hole can temporarily hold spacers in place while you fasten boards. Result: a clean, professional-looking planter that sheds water and prevents rot.
Louvered Privacy Screen / Trellis
Create a privacy screen or pergola trellis with evenly spaced louvers using the X-shaped spacer to set both slat spacing and alignment across panels. Use the 1/16"–1/4" options to experiment with openness level and light control; assemble modular panels for easy installation or seasonal storage.
Slatted Bench or Outdoor Table Top
Make a slatted bench seat or table top with perfectly consistent gaps for a modern look and quick water run-off. Use spacers between each plank during assembly, temporarily screw through the spacer hole to hold them while fastening. The result is furniture with repeatable, professional spacing—great as gifts or for cottage/cabin builds.