Features
- High-gloss finish
- Quick-dry
- Long-lasting
- For use on porcelain, ceramic, fiberglass, acrylic cast iron and steel surfaces
- Easy to use
- Part A is partially filled
Specifications
| Color | White |
| Size | 0.54 Fl Oz (Pack of 1) |
| Unit Count | 1 |
Related Tools
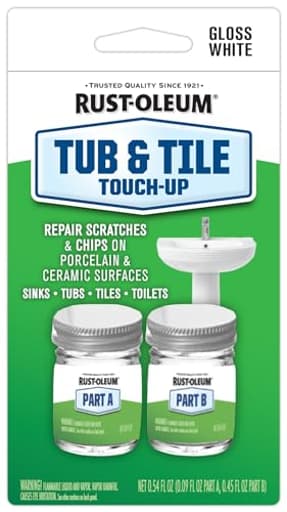
A two-piece touch-up kit in white designed for repairing chips and scratches on tub and tile surfaces. It provides a high-gloss, quick-drying finish compatible with porcelain, ceramic, fiberglass, acrylic, cast iron and steel; one component (Part A) is partially filled. The kit is intended for small, long-lasting spot repairs and is easy to apply.
Rust-Oleum Tub & Tile Paint 244166 Specialty Kit Tub and Tile Touch Up, White, 2 Piece Set, 0.45 Oz Review
Why I reached for this kit
A few months back, I had a handful of nagging issues: a couple of chips on a porcelain tub that had gone down to the metal, a small rust ring starting around the drain, and a tiny nick on a ceramic tile where something heavy made contact. None of these justified a refinish or replacement, but they were visible enough to bug me every day. I grabbed the Rust-Oleum tub and tile touch-up kit in white to see if I could extend the life of the fixtures without committing to a full resurfacing job.
What’s in the box and how it’s meant to work
This is a small two-part kit designed for spot repairs, not whole-surface refinishing. You get:
- Part A and Part B (Part A is intentionally only partially filled so you can pour it into Part B for mixing).
- An integrated brush in the Part B cap.
- Enough material for several chips or a couple of modest patches.
Once mixed, you’ve got roughly a day to use it before it cures in the bottle. That 24-hour window is real—plan your repairs so you can use as much of the mixture as you need in one go.
Prep is everything
I can’t overstate how much prep determines the outcome here. My steps that yielded the best results:
- Clean the area thoroughly with a degreaser. Rinse and dry completely.
- For chips with rust, remove the rust mechanically with 320–400 grit emery or wet/dry paper. For stubborn rust staining, a mild acid cleanser helps, but finish with sanding so you have clean, bright metal.
- Feather the edges around chips with 400–600 grit to give the coating some tooth and prevent ridges.
- Mask off around the repair if you’re particular about a crisp edge; I often prefer to float the edge freehand and wet-sand later for a seamless blend.
- Make sure the surface is bone-dry. Water hiding in pinholes will bubble the coating.
If you’re repairing around a drain, removing the drain hardware and treating the area below saves you from chasing rust creep later. It’s extra work, but it pays off.
Mixing and handling
Pour Part A into Part B and stir gently for at least a minute. Don’t whip it—bubbles will translate to pinholes. The viscosity is similar to correction fluid: thick enough to sit in small chips, but not so thick it won’t flow. I used the included brush for most testing but got cleaner results on small defects with a fine artist’s brush. Keep some isopropyl alcohol or acetone handy to clean your brush between passes if you’re doing multiple rounds.
Ventilation matters: the vapors are strong. I kept a fan running in a window, wore a basic respirator, and closed the door to the rest of the house.
Application tips that made the difference
- Think thin, multiple coats. I built up deeper chips in three to five passes, waiting about 15 minutes between coats. Self-leveling helps, but thick blobs will ridge or sag.
- For vertical areas, load the brush lightly and “tip off” the surface so you don’t get runs. This product is easiest on horizontal or near-horizontal surfaces; it can sag on steeper faces.
- If you’re patching a larger area (like a drain flange), layer to match the thickness of the surrounding porcelain. I stopped just shy of flush, then did a final skim coat that leveled nicely.
- Don’t chase perfection wet. If you get a small ridge or a dust nib, live with it and wet-sand after full cure.
- If you find pinholes after the first coat (common over pitted rust), dot them with a sharpened wooden skewer dipped in the mix, then brush a thin coat over the top.
I did all identified repairs in one session since the mix has a limited pot life. The small bottle goes further than it looks if you stay disciplined with thin coats.
Dry and cure
The surface sets up quickly, but I treated the 24-hour cure as a minimum. For high-exposure areas, I gave it 48–72 hours before running hot water over it. That extra time reduced the chance of imprinting or dull spots. After full cure, the finish felt hard and glassy, with good water resistance.
If you plan to wet-sand to blend edges, wait until the coating is fully hardened. I used 1000–2000 grit with water and a drop of dish soap, followed by a light polish. Don’t sand aggressively on fiberglass or acrylic; it’s easy to cut through surrounding material.
Finish and color match
The finish is a true high-gloss and looks at home on porcelain and ceramic. On a bright white tub, the color match was close but slightly “cooler”—a touch brighter than the surrounding enamel. From standing height, the patches disappeared; up close and at an angle, you can see where the repair sits proud of the surface unless you sand it flush. On a warmer off-white fixture, the whiteness is more noticeable. If your tub veers cream or almond, expect the patch to read as a brighter spot.
On the ceramic tile, the gloss matched well and the repair blended acceptably. If you’re picky, masking and a final wet-sand make a big difference.
Durability so far
After months of daily showers, the drain-area repair and the chip patches have held up without discoloration or edge lifting. Water exposure hasn’t softened the coating. That said, avoid suction-cup bath mats over a fresh repair—they can trap moisture and put shear force on the patch. Gentle cleaning (non-abrasive sponge, standard bathroom cleaner) has not dulled the gloss.
On fiberglass and acrylic test spots, adhesion was good with proper sanding prep. You’ll still see the patch if the base color isn’t a bright white, but performance-wise it stuck well.
Where this kit shines
- Small chips, pinholes, and rust breakthrough on porcelain-coated steel or cast iron.
- Thin edge repairs on tiles, especially on horizontal surfaces.
- Tight timelines where you need a functional repair in a day.
- Situations where replacing or reglazing isn’t justified.
Where it struggles
- Perfect color matching on older or warmer-white fixtures.
- Large, highly visible vertical areas, where sags are harder to control.
- Users hoping to tuck it away for months after mixing. You really do need to use the batch within a day.
- Aesthetic perfectionists unwilling to do a little wet-sanding and polishing.
Practical notes
- The bottles are small by design, and Part A is partially filled so there’s room to mix in Part B. It’s not shorted.
- There’s a small brush in the cap of Part B. It’s convenient, but a fine artist brush nets better control on tiny chips.
- Work clean and keep dust down. Hair and lint show up instantly in a high-gloss patch.
- If you have multiple bathrooms or can plan a repair day, batch your fixes to make the most of the mixed product.
Value and verdict on usability
Per ounce, this isn’t cheap. Per repair, it’s hard to beat. The ability to build thickness, the quick set, and water resistance make it genuinely useful for extending the life of a tub or tile that’s structurally fine but cosmetically blemished. The learning curve is modest: good prep, thin coats, patience on cure, and optional wet-sanding if you want the patch to disappear.
Recommendation
I recommend the Rust-Oleum tub and tile touch-up kit for small, targeted repairs on bright white porcelain, ceramic, fiberglass, acrylic, cast iron, or steel surfaces. It rewards good prep and careful application with a durable, high-gloss finish that blends well at normal viewing distance. If your fixtures skew off-white or you expect an invisible repair without sanding and polishing, temper your expectations—the color is a true bright white, and flawless blending takes extra effort. For the cost and time involved, though, it’s an excellent way to buy years of additional service from otherwise sound fixtures.
Project Ideas
Business
On-Demand Airbnb/Short‑Term Rental Touch-Ups
Offer a quick-response service for hosts to repair chips and scratches in tubs, sinks and tiles between guests. Market as a same-day cosmetic fix to maintain 5-star reviews and avoid costly replacements. Service package could include inspection, spot repairs using the kit, and photo proof—priced per-spot or as a monthly retainer for frequent hosts.
Listing-Prep Real Estate Cosmetic Service
Provide low-cost pre-sale or pre-listing touch-ups for realtors and home stagers to remove visible chips on porcelain, ceramic and cast-iron fixtures. Small repairs can improve bathroom appearance and reduce buyer objections. Offer bundled packages (bathroom only, whole house touch-ups) and quantify ROI by comparing repair cost versus reduction in negotiation concessions.
Branded DIY Repair Kits with Tutorials
Create and sell a value-added kit that pairs the touch-up paint with applicator brushes, fine sandpaper, cleaning pads, and a step-by-step printed guide plus a link to a short how-to video. Sell on Etsy, Amazon or local hardware stores. Upsell services like virtual color-matching help or a pre-paid on-site touch-up appointment.
Maintenance Contracts for Landlords & Property Managers
Offer routine preventative maintenance contracts that include small tub/tile repairs as part of turnover or seasonal inspections. Promote lower long-term costs versus full replacements and faster unit turnaround. Packages can be tiered by units per month and include inventory of touch-up materials, scheduled visits and reporting of larger issues that require replacement.
Creative
Dollhouse Bath & Sink Restoration
Use the touch-up kit to repair tiny chips and scratches on porcelain or ceramic dollhouse bathtubs, sinks and tiles. The high-gloss white finish matches miniature porcelain well; apply with a toothpick or micro brush in thin layers, sand lightly between coats for a smooth finish, and cure quickly so you can finish a piece in one session. Great for collectors or custom miniature makers who want authentic glossy fixtures.
Porcelain-Shard Jewelry & Charms
Turn broken plates or teacup shards into pendants, earrings or cufflinks. Smooth and shape shards, then use the touch-up paint to even out the color and add a durable high-gloss surface. Seal edges with clear epoxy if needed, set into bezels or wire-wrap, and create one-of-a-kind upcycled jewelry with a polished porcelain look.
Accent Repairs for Upcycled Bathroom Decor
Refresh vintage enameled trays, soap dishes, toothbrush holders or metal cast-iron pieces by repairing chips and repainting small worn areas. The kit’s compatibility with cast iron, steel, fiberglass and porcelain makes it ideal for mixed-material projects. Use stencils or dot accents to create a subtle designer look while hiding damage.
Mosaic Grout Highlights & Micro-Filling
Use the kit to add glossy highlights to mosaic tiles or to micro-fill tiny gaps in grout-line art. The quick-dry high-gloss finish can make specific tiles pop or seal small imperfections in coasters, trivets or backsplash accent pieces. Apply with a fine-tip applicator and wipe excess before it cures for crisp lines.