Features
- Restores Good Water Flow In Your Water Heater
- This Product Made In Japan
- Good Quality Guaranteed
Specifications
| Color | Black |
Related Tools
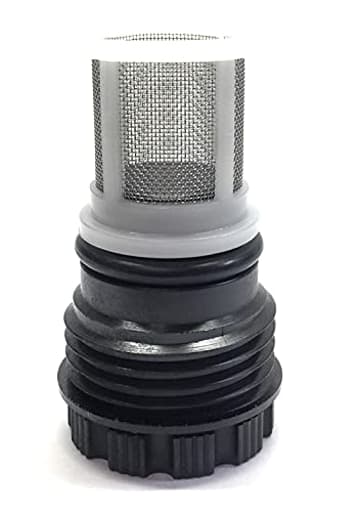
This inlet screen assembly is a replacement part for tankless water heaters that filters incoming water and helps maintain proper flow by preventing debris from entering the unit. It is made in Japan and is supplied in black.
Water Heaters Water Heater Parts & Accs Rinnai H98-510-S Tankless Water Heater Inlet Screen Assembly Review
Why this little screen matters
On a tankless water heater, the inlet screen is the first line of defense against grit, scale, and pipe debris. Think of it as the unit’s “air filter,” but for water. When it clogs or deforms, flow rates drop, burners modulate oddly, and you may start chasing error codes that trace back to one small part. I installed this inlet screen assembly as a direct replacement on my Rinnai-style tankless system and have been using it long enough to judge fit, function, and whether it’s worth keeping a spare in the toolbox.
Design and build
This screen assembly is a compact, black polymer body with a fine mesh insert that captures sediment before it reaches the heat exchanger. The build is tidy—no flashing or rough edges—and tolerances are tight enough that the screen seats confidently without wobble. The mesh density strikes a good balance: fine enough to protect the downstream internals, yet open enough not to throttle flow prematurely on clean water. It’s made in Japan, and the consistency shows in the molding and the uniformity of the mesh.
I’ve seen cheaper screens with brittle plastic or inconsistent mesh spot-welds that deform after a few hot-cold cycles. This one has held shape and has not pitted or frayed after multiple cleanings. The black finish also makes it easy to visually check for mineral buildup and trapped Teflon tape fragments—little details that make maintenance faster.
Fit and compatibility
In my setup, this screen was a direct, drop-in replacement for the Rinnai-style inlet port that uses the H98-510-S pattern. The fit was precise and leak-free once seated, with no need for improvisation. Threads aligned cleanly, and the lip captured the port’s bore as expected, so removal and reinstallation didn’t feel like a fight.
Two notes on compatibility:
- If your water heater uses a different screen geometry or part number, verify before ordering; these assemblies can look similar but differ by a millimeter or two where it counts.
- If your unit has seen multiple service cycles, inspect the receiving port for residual tape or sealant. A stray sliver can prevent the screen from fully seating and create a weep that looks like a bad O-ring.
Installation experience
Swapping the screen is straightforward and a nice DIY job if you’re comfortable with basic plumbing steps. Here’s how I approach it:
- Close the cold-water isolation valve to the heater. If you have full service valves, close both hot and cold.
- Open a nearby hot tap to relieve pressure. Give it a few seconds.
- Place a small bucket or tray under the inlet—there will be a splash of residual water.
- Remove the service cap or access plug and carefully pull the old screen. Needle-nose pliers help if it’s stubborn, but avoid gouging the plastic.
- Inspect the bore. Remove any debris, tape fragments, or scale. A soft brush or a wooden toothpick works well.
- Lightly check the O-ring on the screen assembly. If yours doesn’t include a new one, make sure the existing O-ring is still pliable and free of nicks. A dab of silicone-safe plumber’s grease is helpful.
- Insert the new screen, seat it evenly, and reassemble.
- Slowly reopen the valves and check for leaks. Run a hot tap to purge air.
From start to finish, it’s a 10–15 minute job. The only “gotcha” I’ve seen is forgetting to shut the correct valve or yanking the screen at an angle and nicking the mesh. Take your time and use a catch tray.
Performance and day-to-day impact
The most immediate effect after installing a fresh screen is restored, predictable flow and smoother burner behavior under varying demand. Pre-maintenance, my system was occasionally hunting under low-flow conditions—minor temperature fluctuations and the sensation that the heater was edging near a minimum flow threshold. After replacement, low-flow stability improved and the unit reached set temperature faster. High-demand tests (multiple fixtures open) also benefited, with less pressure drop through the heater.
On a drilled well with moderately hard water, I’ve settled on this rhythm:
- Quick check/clean every 3 months: pop the screen, rinse the mesh, and re-seat.
- Replacement around the 12–18 month mark, or sooner if the mesh shows deformation or persistent fouling.
Users on municipal water can likely stretch those intervals, but if your home sees construction work, pipe repairs, or a new filtration system install, check the screen immediately after—those are prime times for debris to accumulate.
Durability and maintenance
The mesh and body have tolerated repeated removal and cleaning without loosening or fraying. I typically backflush the screen under a sink sprayer and use a soft toothbrush to release fine silt. Avoid metal picks or aggressive scrubbing; the mesh is resilient but not invincible. If you notice the screen losing its shape or the plastic ring starting to oval, it’s time to replace rather than clean again. With the made-in-Japan build, I haven’t had premature failures or fit drift after a few thermal cycles.
One small tip: if your previous screen fought you on removal, there’s a chance a thread or the bore lip has a burr. Before installing this one, lightly inspect and smooth any roughness with a nylon brush. It makes the next service visit easier.
What could be better
- Clearer packaging on whether an O-ring is included would help. Mine installed seamlessly, but I always keep a compatible O-ring on hand. If yours arrives without one or the existing ring looks tired, replace it rather than hope for the best.
- Compatibility guidance on the box would save time. The part pattern aligns with the H98-510-S style inlet, but models and trim lines vary. A short cross-reference card would be handy.
Neither point affects the core function, but they’re worth noting if you’re trying to keep your maintenance shelf organized.
Value and use cases
This screen assembly earns its keep by preventing more expensive headaches. A clogged or leaking screen can masquerade as a faulty flow sensor, a recirculation issue, or even a heat exchanger problem. Spending a few minutes and a modest cost on a fresh screen beats chasing intermittent temperature complaints or error codes.
I’d especially recommend keeping a spare if:
- You’re on well water or have known sediment/mineral issues.
- Your heater serves a multi-bath home that runs close to its maximum flow rating.
- You’ve recently done plumbing work upstream and expect residual debris.
For city-water users with good upstream filtration, one screen may last quite a while with periodic cleaning, but a spare is cheap insurance.
Tips to get the most from it
- Pair the screen with a whole-house sediment filter if your water is gritty. The screen will last longer and you’ll maintain consistent flow.
- Log your maintenance dates. If you start seeing more frequent fouling, it’s a sign to investigate upstream water quality or filter changes.
- Don’t overtighten the cap or fittings around the inlet port. Most leaks are O-ring related, not lack-of-torque problems.
- If you experience chronic low-flow errors after installation, double-check that the screen is oriented correctly and fully seated, and verify that no tape shreds or scale flakes remain in the bore.
The bottom line
The inlet screen is a simple part that has an outsized impact on a tankless system’s reliability and performance. This black, made-in-Japan screen assembly fits cleanly, protects the heater effectively, and stands up to repeated maintenance without losing shape. Installation is friendly for DIYers with basic plumbing sense, and the performance uplift after replacing a tired screen is immediate and noticeable—steadier temperature control and restored flow.
Recommendation: I recommend this inlet screen. It’s well-built, fits the H98-510-S style inlet cleanly, and makes regular maintenance painless. If you have hard or sediment-laden water, keep one on the shelf so you’re not waiting when flow starts to slip. For most homeowners and pros alike, it’s an easy, cost-effective way to keep a tankless heater running at its best.
Project Ideas
Business
OEM replacement parts e-store
Create a niche e-commerce shop focused on genuine replacement inlet screens (highlighting 'Made in Japan' quality and restored flow benefits). Offer cross-compatible fit lists, clear part photos, and fast shipping—target plumbers, HVAC suppliers, and DIY homeowners.
Subscription maintenance program
Sell a recurring service for landlords and property managers: scheduled tankless water heater maintenance that includes inlet screen inspection/replacement, descaling, and a report. Monthly or annual plans create steady revenue and reduce emergency repair calls.
Upcycled craft product line
Collect used inlet screens and turn them into finished upcycled products—lampshades, jewelry, or decorative home goods—marketed to eco-conscious buyers. Package with a 'repurposed parts' story and sell via Etsy, craft fairs, and social channels.
Workshops + DIY repair kits
Host hands-on workshops (online or in-person) teaching homeowners how to clean and replace inlet screens and perform basic tankless heater upkeep. Sell accompanying kits that include a genuine replacement screen, simple tools, and step-by-step guides or video access.
Creative
Mini planter drainage insert
Cut the inlet screen to size and glue it into the base of small pots or recycled tins to create a durable drainage layer that keeps soil in place while allowing water to escape. The black finish gives a neat, modern look for desktop succulents or air plants.
Industrial tealight lantern
Use the circular screen as a heat-safe diffuser and exterior texture for a small tealight lantern. Pair with a metal or wood frame and a smoked glass panel to make a steampunk/industrial accent lamp for shelves or patios.
Model/miniature vent grilles
Repurpose the fine mesh and frame as scale vents or radiator grilles for architectural models, RC vehicles, dioramas, or model trains. It adds realistic texture and is easy to trim to custom shapes for hobby builds.
Textured jewelry and hardware
Cut small sections of the screen to create textured pendants, cufflinks, or brooch backs—mount on resin or metal bezels for a modern industrial look. Because the part is black and high-quality, finished pieces will have a polished, durable appearance.