Features
- CONVENIENT LIGHT: Lighted surface mounted door bell button makes it easier for visitors to locate even after dark.
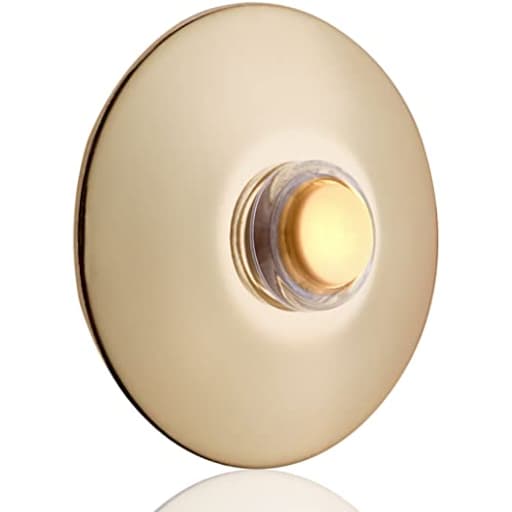
- CLASSIC DOORBELL: Elegant and simple design with a durable plastic button and a sleek 2.5-inch round metal housing. Compact enough to blend seamlessly onto the facade of your home.
- EASY TO INSTALL: Installing will only take a matter of minutes. If replacing existing buttons, drilling may not be required. Bell wire is not included.
- WIDE COMPATIBILITY: Versatile enough that it will work with most models of transformers and wired chimes.
- IDEAL PLACEMENT: Door bell push button will work more ideally when used on stucco surfaces.
- PLEASE NOTE: A diode is needed (not included) if you are using a digital chime (plays a melody; has a speaker for the sound). A diode is not needed is you are using a mechanical chime (2-Note sound; has a small mallet hitting a metal bar for the sound).
Specifications
| Color | Brass |
| Size | 1-Pack (Lighted) |
| Unit Count | 1 |
Related Tools
A lighted surface-mounted doorbell button with a 2.5-inch round metal housing and a durable plastic push button, finished in brass. Installs in minutes (bell wire not included), is compatible with most transformers and wired chimes, is suited to stucco surfaces, and requires a diode (not included) for use with digital/melody chimes but not for mechanical chimes.
Newhouse Hardware BR5WL Lighted Doorbell Button, 1-Pack, Brass Review
Why I tried this button
My front door had an aging round, brass pushbutton that had seen better days. I wanted a straightforward, surface-mounted replacement that would cover the existing stucco cutout without needing to patch or repaint. The Newhouse lighted doorbell button fit the bill on paper: 2.5-inch round trim to hide rough edges, simple two-wire hookup, and a constant glow so visitors can find it at night.
Design and build
The faceplate is a circular metal ring with a brass finish and a plastic button at the center. The overall look is classic and low-key, the kind of thing that disappears into the facade rather than making a statement. The finish on my sample was even and clean, and it matched my existing brass hardware closely enough that I didn’t feel the need to swap anything else.
Under the trim, the assembly is a mix of metal and plastic components: a spring clip that holds it in the wall, a central “stack” that includes the illuminated button mechanism, and two terminal screws for the bell wires. It’s a typical arrangement for a surface-mounted, lighted pushbutton. The illumination is bright enough to be obvious from the walkway without looking like a miniature headlight, and the lens diffuses the glow evenly around the button.
One note: the button runs ever so slightly warm to the touch when the transformer is powered. That’s normal for a lighted unit and not a cause for concern, but it’s noticeable if you go looking for it.
Installation experience
This is an easy swap if you already have a wired chime and transformer in place. I removed the old button, straightened the existing bell wires, and dry-fit the new unit to confirm the 2.5-inch plate covered the old paint line. The included spring clip is designed for surface-mount holes and had no problem biting into stucco.
The only “gotcha” is how delicate the inner stack can be while you’re attaching the wires. If you back the terminal screws out too far, the front and rear halves of the assembly can separate and you’ll be juggling small pieces. The trick is simple:
- Loosen the terminal screws only enough to slip the wire under the head.
- Pinch the white inner housing with your fingers (or lightly with pliers) while tightening to avoid twisting stress on the tabs that hold it together.
- Don’t remove the screws fully; there’s no need.
Once wired, I bent the spring clip inward slightly with my thumbs, set the assembly square to the wall, and pressed it home. On stucco, the clip grabbed firmly and the faceplate sat flush. A thin bead of clear exterior-grade sealant around the top half was all I needed to keep wind-driven rain out of the hole.
Total time, including removing the old button, was under 15 minutes.
Compatibility and the diode question
The button worked immediately with a standard two-note mechanical chime. If you’re pairing it with a digital or “melody” chime, budget for a small diode across the chime terminals; that’s required for most illuminated buttons to keep the digital board from false-triggering or “ghost ringing.” The button doesn’t include a diode, which is typical for this price point. Mechanical chimes generally don’t need one.
Also consider transformer size. A constantly illuminated button draws a tiny continuous current. On an older transformer that’s already undersized, a brighter lamp can push things over the edge. If your chime is weak or buzzes after the swap, check that your transformer is in the common 16V/10VA neighborhood and in good health.
Everyday use
After install, the experience is exactly what you’d expect. The button action is positive and crisp, and the chime rings reliably. The glow is a warm pinpoint that makes the target obvious in the evening. From a few feet away, it looks like a solid brass unit even though the central button is plastic. Up close, you can tell the button is plastic, but it doesn’t feel flimsy.
The brass finish has held up fine through sun and a couple of storms. No tarnish yet, no peeling at the edges. On stucco, the round plate is a major win—there’s a lot of forgiveness in coverage compared to skinny rectangular buttons.
Shortcomings and quirks
- Installation fragility: The internal sandwich of parts can separate if you over-loosen the terminal screws or push on things at odd angles. It’s not hard to manage, but it’s easy to get wrong if you rush. Treat it like a small appliance, not a doorknob.
- Variable “grip” in the wall: The spring clip sets the tension. On my stucco opening it was tight. In a larger or irregular hole, you may want a couple dabs of construction adhesive or a ring of sealant behind the plate to prevent rotation over time.
- Light runs warm and may not be easily serviceable: The glow is constant and slightly warms the button. If the lamp ever fails, replacement may require partial disassembly and steady hands. This isn’t unusual for lighted pushbuttons, but it’s worth noting if you expect decades from the same lamp.
- No extras: There’s no included diode for digital chimes and no bell wire. If you’re doing a fresh install, plan on sourcing wire and a transformer/chime separately.
Tips for a smooth install
- Kill power at the transformer before you start.
- Photograph the old wiring so you can mirror it.
- Use needle-nose pliers to form a small hook in each wire; slip the hook under the screw head and tighten clockwise so the wire draws in as you turn.
- Hold the inner housing with your fingers while tightening to keep the assembly from twisting apart.
- If your wall hole is oversized or crumbly, add a thin ring of silicone behind the metal plate to prevent rotation and to keep out weather.
- On digital chimes, install the proper diode across the chime’s front and transformer terminals as recommended by the chime manufacturer.
Durability so far
After repeated use, the mechanism still feels consistent and the finish hasn’t degraded. As with most budget lighted buttons, the long-term question mark is the lamp. If you press your doorbell dozens of times a day or live in a harsh coastal environment, you might want to consider a heavier-duty unit with a sealed LED module. For typical residential use, this one should be fine, provided it’s installed carefully.
Who this suits best
- Homeowners replacing an older round pushbutton, especially on stucco or rough siding where a round plate covers more sins.
- Anyone who wants a simple, wired, always-lit target without getting into smart doorbell ecosystems.
- DIYers comfortable handling small parts and making clean low-voltage connections.
Who should look elsewhere:
- If you need a bulletproof, one-piece assembly that can handle rough handling during install, there are sturdier, more expensive pushbuttons with captive internals.
- If your chime is digital and you don’t want to fuss with diodes, consider a non-lighted button or a button bundled with the correct diode.
The bottom line
The Newhouse lighted doorbell button nails the basics: a classic look, steady illumination, and straightforward wiring, all in a form factor that’s especially friendly to stucco and retrofit openings. It does require a bit of care during installation—the inner parts can come apart if you over-loosen the terminals, and the spring clip is the main thing holding it in the wall. Treat it gently, keep the screws from backing out all the way, and it goes in quickly and securely.
Recommendation: I recommend it with caveats. If you’re replacing a round button and you’re comfortable with small, delicate assemblies, this is an affordable, functional choice that looks good and works as expected. If you want a truly rugged, one-piece unit or plan to install on a sloppy opening where the clip won’t bite, spend more for a heavier-duty design or be prepared to add a dab of adhesive to keep it locked in place.
Project Ideas
Business
Custom Entrance Hardware Kits
Assemble and sell boutique doorbell kits targeted at homeowners and short-term rental owners: matching brass button, house numbers, simple installation guide, and optional diode or wiring adaptors for digital chimes. Offer aesthetic customization (patina, engraving) and local installation service.
Personalized Gift Buttons
Create a line of engraved, mounted brass buttons sold as housewarming or wedding gifts. Mount the lighted button on a decorative wooden plaque with a monogram or message and include battery-powered LED conversion for a plug-free bedside or hallway nightlight.
Press-for-Service Buttons for Small Retail
Produce portable, branded 'Press for Service' illuminated buttons for boutiques, farmers markets and kiosks. Offer customization (logo, color) and a simple package that includes mounting options and battery-powered LED wiring so vendors can use them without rewiring their counters.
DIY Smart Doorbell Retrofit Kits
Sell retrofit kits that convert a basic lighted doorbell button into a smart trigger: include diode for digital chimes, a small wireless transmitter or Wi‑Fi module, wiring instructions, and optional integration with popular smart home platforms. Offer installation as an upsell.
Upcycled Home-Decor Line
Build a small maker brand that repurposes surplus lighted doorbell buttons into a line of home-decor items — mini lamps, cabinet pulls, illuminated signage — emphasizing vintage-industrial style. Sell via Etsy, local markets, or wholesale to boutique home stores.
Creative
Steampunk Accent Lamp
Mount the brass button on a small wooden or metal base, wire a warm LED behind the button and add brass fittings, gears and filigree to create a pocket-sized steampunk desk lamp or vignette. The button can be the on/off switch or a decorative illuminated element.
Illuminated Jewelry / Trinket Box
Fit the lighted doorbell button into the lid of a handmade wooden jewelry box so the button becomes the latch/switch. Pressing it can release a simple latch (mechanical or magnetic) and illuminate an interior LED for a dramatic reveal.
Photo Frame Nightlight
Integrate the button into a picture frame edge as a subtle nightlight control. Behind the button mount a low-voltage LED panel or ring; power with a small battery pack or hidden micro-USB. Works great for children's room photos or memorial frames.
Garden Path Marker / Accent
Convert the brass housing into a low-profile garden marker: waterproof the internals, replace the bulb with a small LED or solar LED module and mount on a short post. The brass finish gives a refined look for paths or planter accents that glow at night.
Interactive Art / Sound Trigger
Use the button as a tactile input for an interactive piece — wire it to a microcontroller (Arduino/Teensy) that plays a short audio clip, lights an array, or triggers movement. Ideal for gallery installations, kids' projects, or interactive signage.