Features
- Lighted Wall Mounted Doorbell Button: the lighted doorbell button switch can be applied on cement or wood surfaces, easy to find in the dark, bring convenience to you at night too
- Power Saving: low voltage hardwired door bell ringer button, save electricity for you
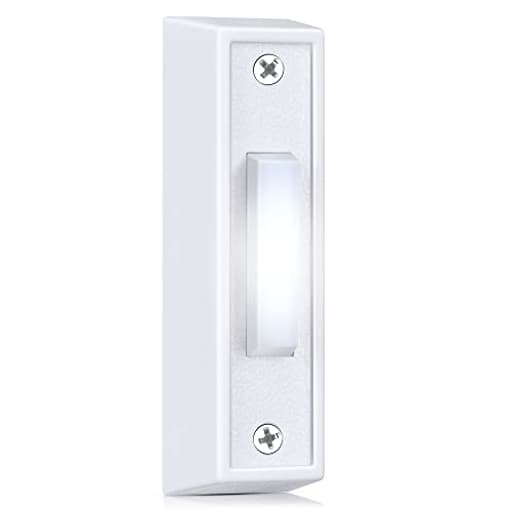
- Specification: the wired doorbell button is approx. 2.8 x 0.86 x 0.59 inches/ 7.2 x 2.2 x 1.5 cm (length x width x height), with 2 screws and easy to install (wires not included
- Reliable Material: rugged doorbell cover, not easy to break; The interior is made of quality copper sheet with a long service life
- Use Widely: the doorbell push button almost universal, suitable with low voltage chime system, good replacement for your old garage door opener or you door bell switches
Specifications
| Color | White, White Light |
| Unit Count | 1 |
Related Tools
Lighted wall-mounted doorbell button with LED illumination for visibility in low light; designed for hardwired low-voltage chime systems and compatible with most wired doorbell chimes, transformers, ringers, and buzzers. The white switch has a rugged cover and copper contacts for durability, measures about 2.8 x 0.86 x 0.59 inches, and includes two mounting screws (wires not included).
Saillong 1 Piece Lighted Doorbell Button, Wall Mounted Garage Door Opener Switch with LED Light Compatible with Most Wire Doorbell Chimes, Transformer, Ringers, Buzzers Review
Why I picked this simple, lighted button
I like small upgrades that quietly improve daily life, and a lighted doorbell button is a perfect example. The simplified name for the switch I tested is the Saillong lighted button—a compact, low‑profile, wired push button with an integrated white LED. I installed it in two places: as a straight replacement for a tired front‑door button and as a surface‑mounted trigger for a wall‑mounted garage door opener. In both scenarios, it did exactly what I wanted: make the button easy to spot in low light without adding complexity or introducing compatibility headaches.
Design and build
This is a minimalist, rectangular button finished in white with a white LED. It’s small—about 2.8 x 0.86 x 0.59 inches—so it doesn’t dominate trim or siding, and the low profile looks tidy rather than cheap. The housing feels better than its price would suggest: the cover is rigid enough that it won’t flex under pressure, and the interior uses copper contacts instead of flimsy spring steel. That matters for longevity, especially outdoors where humidity and oxidation can accelerate wear.
The LED sits behind the button cap and produces a clean, neutral white glow. It’s bright enough to be seen from the walkway at night, but it didn’t glare or spill light through my door seam. If you prefer subtle over showy, this hits a nice balance.
A note on weather: there’s no explicit IP rating. Like most simple wired buttons, it’s intended for covered exposures (e.g., under an eave or porch). If you’re mounting on an unsheltered exterior wall, I’d add a thin bead of clear sealant around the perimeter after installation.
Installation experience
For a standard doorbell replacement in a low‑voltage system (typically 16–24 VAC), installation was quick:
- Cut power to the transformer at the breaker or remove the transformer fuse if accessible.
- Remove the old button and note the two low‑voltage wires.
- Fasten those two wires to the Saillong’s screw terminals; polarity doesn’t matter for the switch function.
- Position the button, mark the holes, drill pilot holes (masonry bit and anchors for concrete/brick; standard wood bit for trim), and secure it with the included screws.
Total time: about 10 minutes with hand tools. Because this is a low‑voltage device, you’re not opening a high‑voltage box, but I still recommend cutting power—doorbell transformers can sting, and you don’t want to short the circuit while working.
The package includes two mounting screws but no wire. If you’re replacing an existing button, you’ll reuse the existing doorbell wire (18–22 AWG is typical).
Surface‑mounted garage door use
I also tried it as a wall‑mounted momentary push button for a garage door opener. Electrically, it works fine: it’s just a normally open switch that closes on press. Physically, there’s one small hiccup—there’s no pre‑made top or bottom port for surface‑run wires. My garage has the control wire coming down the wall, so I needed a way to route that into the back. I made a small notch on the top edge with a round file, which took a minute and preserved a clean look. If your wire comes from behind the button (in‑wall), you won’t need to do this.
Compatibility and electrical behavior
The Saillong is designed for low‑voltage, hardwired systems and worked with:
- A two‑tone mechanical chime driven by a 16 VAC transformer
- An electronic chime module
- A standard garage door opener wall control input
Lighted buttons sometimes cause older mechanical chimes to hum or not fully release because the LED draws a tiny trickle current. In my tests, the LED didn’t introduce humming with a common 16 VAC mechanical chime. If your chime does hum, you can usually solve it by switching to an electronic chime, adding a small resistor/diode kit made for illuminated buttons, or using the transformer’s “front” and “trans” terminals per the chime’s wiring diagram. For most modern chimes, you should be fine out of the box.
The LED’s draw is minimal—this isn’t going to nudge your utility bill in any meaningful way. It stayed consistently lit without flicker.
Day‑to‑day use
There isn’t much to say about pressing a button, and that’s the point. The plunger has a positive, snappy feel with a short travel and a crisp contact. In several weeks outdoors, it didn’t stick or feel mushy after rain. The light makes the entryway feel more purposeful at night; visitors immediately find the target instead of hunting for a tiny unlit dot.
In the garage, the discrete white glow is easy to locate without lighting up the space. Because the LED is diffused, it’s readable from an angle rather than only head‑on.
What I like
- Clean, low‑profile design that doesn’t look bargain‑bin
- Bright-but-not-glaring white LED that’s easy to spot at night
- Copper contacts and a rugged face that should stand up to frequent presses
- Simple two‑wire install with included mounting screws
- Broad compatibility with low‑voltage chimes, transformers, and garage door inputs
What could be better
- No molded port or notch for surface‑run wires. If you’re not bringing wire from behind the button, you’ll need to make a tiny notch with a file or rotary tool.
- No stated weather rating. It handled covered outdoor placement fine, but I’d prefer a light gasket or explicit IP spec for harsher exposures.
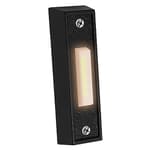
- Only available in white with white light. A few finish options would help users match trim or chime lights.
Practical tips for a smooth install
- Verify your transformer output: most systems are 16 VAC. If your chime is underpowered or strangely quiet, check the transformer label or test with a multimeter.
- Pre‑drill pilot holes, especially in hardwood trim, to avoid cracking. For masonry, use anchors sized to the included screws.
- If installing on painted surfaces, score a tiny outline with a utility knife before tightening to reduce paint lifting.
- For uncovered exterior installs, run a thin bead of clear silicone around the perimeter and lightly snug the screws—don’t overtighten.
- If your mechanical chime hums after installing a lighted button, consult the chime diagram. A simple inline resistor or a different terminal combination often resolves it.
Who this is for
- Homeowners replacing an aging or yellowed doorbell button who want a subtle night‑visible upgrade without moving to a smart doorbell
- Renters and property managers who need a low‑cost, reliable button for apartments or multifamily entries
- Anyone wanting a straightforward garage door wall button that’s easy to see in dim light (with the caveat about adding a small notch for surface wires)
The bottom line
The Saillong lighted button is a straightforward, reliable upgrade that checks the right boxes: easy to install, compatible with common low‑voltage setups, and illuminated in a way that’s useful rather than flashy. The build feels sturdier than many generic buttons, and the copper contact design inspires confidence. It’s not feature‑rich, but that’s the appeal—there’s nothing to configure, no batteries to replace, and little that can go wrong.
Recommendation: I recommend this button for most wired doorbell and garage door applications. It’s a simple, inexpensive way to improve nighttime usability and refresh curb appeal, with solid build quality and minimal installation friction. The only reasons to look elsewhere are if you need a specific finish, a fully weather‑sealed unit for direct exposure, or a plug‑and‑play surface‑wire port. For typical covered entries and garages, it’s a smart, low‑effort upgrade that just works.
Project Ideas
Business
Custom Decorative Faceplate Shop
Offer bespoke faceplates that fit over the lighted button—woodburned, hand-painted, engraved metal, or printed acrylic themes (farmhouse, mid-century, seasonal). Sell as replacements or bundled with the button for easy installation; market on Etsy, craft fairs, and home-decor shops.
Smart Retrofit Kit
Package the button with a simple IoT retrofit: a small relay or optocoupler and a Wi‑Fi enabled microcontroller (pre-configured) that senses the button press and sends smartphone notifications, logs visitor data, or integrates with smart home systems. Sell DIY kits and prebuilt units for older wired chimes.
Subscription Faceplate Drops
Run a subscription model where customers receive seasonal or holiday-themed faceplates every quarter (spring florals, Halloween, winter holidays). Keep margins with low-cost production (laser cut/printed runs) and recurring revenue from design-forward homeowners.
Contract Replacement Service for Property Managers
Offer bulk replacement and upgrade services for rental properties, condos, and offices—replace worn doorbell buttons with durable lighted units, optional branding faceplates, and basic wiring checks. Provide volume pricing, quick installs, and maintenance contracts.
Maker Kits & Workshops
Sell educational kits that combine the button with electronics (breadboard, microcontroller, wiring) and step-by-step projects (IoT notifier, sound pad, light sculpture). Host local workshops or online classes teaching wiring, basic soldering, and creative installations—target maker spaces and schools.
Creative
Mini Nightlight Marker
Use the lighted button as a low-voltage nightlight for hallways or stair edges. Mount the button flush into small reclaimed wood blocks or resin tiles and wire it to a low-voltage transformer so it stays gently illuminated at night—great for a subtle, decorative safety marker.
Custom Themed Doorplate
Create personalized doorplates by swapping the plain cover for custom-cut acrylic or metal faces. Laser-engrave names, logos, or seasonal motifs, paint or inlay with resin, then mount the illuminated button behind the artwork so the design glows from within.
Interactive Soundpad for Kids
Integrate the button into a kids' activity board that triggers sounds or short music clips. Connect the mechanical contacts to a small sound module (or microcontroller) so pressing the button plays a recorded message, animal sound, or a short tune—useful for learning and sensory play.
Multi-Button Light Sculpture
Build a tabletop or wall sculpture composed of several lighted buttons arranged in a pattern. Wire them in low-voltage circuits with individual switches or a microcontroller to create chase patterns, reactive lighting, or simple games like ‘Simon Says’ using the tactile, durable buttons.
Retro-Fitted Garage/Tool Shop Switch
Repurpose the rugged button as a visible, illuminated shop or garage control switch. Mount it in a metal plate near machinery, workbenches, or exterior gate openers. Its illumination helps locate controls in dim workshops and adds a vintage industrial look.