Features
- No Need to Remove the Housing Cover: 1. Remove the old button carefully. Its held on by the notches on the button (use new button for reference). Used needle nose pliers and carefully tugged on the old plastic button, working my way around the button’s circumference and avoiding the button’s mechanism. 2. Pay close attention to the notches and position of the opened slit. On THIS pro, the opened slit at the 6 o'clock position. 3. Place the new button over the push button’s mechanism by lining up with the slit at 6, push gently on the button into position. 4. Test pulling the button gently to ensure it snapped into place.5. Test doorbell. 6 Done!!!
- 4-Piece Value Pack - Take advantage of this cost-effective 4-piece set to resolve issues without the need for purchasing new devices.
- Equivalent to Original - Replacing damaged buttons ensures the normal operation of your doorbell, prioritizing both your safety and privacy, just like the original buttons.
- Upgraded Design - Upgraded Design - Doorbell Pro replacement buttons offer improved performance compared to the original buttons as they are made with high-strength material. They are more responsive, allowing you to easily press and activate your Doorbell Pro.
- Installation Guide - Does not require taking the unit apart; instead, a needle nose plier does the trick, ensuring that the small slot faces down. Replacing your cracked button with a new one only takes a few minutes.
Specifications
| Color | BLACK |
| Unit Count | 4 |
Related Tools
Four-piece replacement push-button set for a video doorbell or peephole camera, supplied with screws to replace cracked or unresponsive buttons without replacing the entire unit. Each button snaps into place over the existing mechanism so the housing does not need to be removed; installation takes minutes using needle-nose pliers to align the small slot downward. Buttons are molded from high-strength plastic for greater durability and reliable activation.
ALLICAVER Doorbell Button Replacement for Doorbell Pro/Peephole Camera - 4-Pack Doorbell Button Includes 2 Screws, Fixes Cracked Buttons No Expensive Device Needed, Easy DIY Installs in Minutes Review
My Ring Pro’s button finally split last summer, starting as a hairline crack and quickly turning into a floppy, unreliable press. I wasn’t keen on pulling the entire doorbell off the wall, and I definitely didn’t want to replace a working unit over a failed rubber cap. The ALLICAVER button kit promised a quick swap from the outside—no disassembly—and four chances to get it right. That was exactly the proposition I wanted to test.
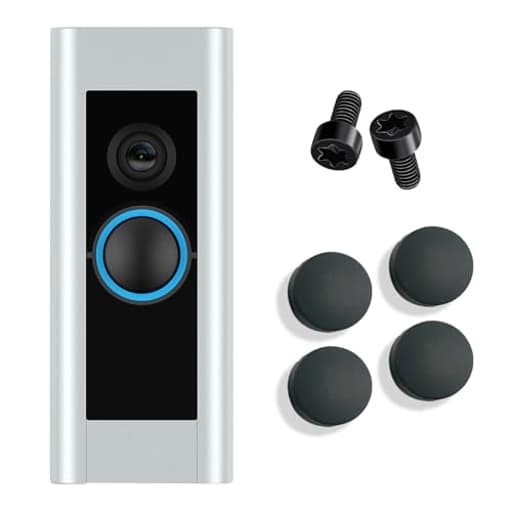
What you get and what it’s for
The kit is simple: four replacement button caps in black and a pair of small screws I didn’t end up needing. The idea is to replace the cracked or sticky cover over the existing button mechanism on a Ring Doorbell Pro (and similar peephole-style cameras) without opening the housing. Each cap has small retention clips and an alignment slit; you line it up, press it on, and the ring light remains intact.
It’s a pragmatic fix for a very common failure point: the original soft button cover tends to split from UV exposure and frequent presses. Replacing just the cap restores usability and cosmetics with minimal fuss—and gives you spares for the future.
Design and build
The replacement caps are molded from a firmer, high-strength plastic rather than the softer, gummy rubber you’ll find on many originals. In hand, they feel stiffer and more dimensionally stable. The snap features are crisply defined, and the inner profile is cut to clear the LED ring while latching around the inner plastic. The front face has just enough give to feel like a proper button, but it doesn’t deform or “squish” under a firm press.
Visually, the matte black finish blends well with the Ring Pro’s faceplate. It’s not glossy and doesn’t look aftermarket once installed. There’s no branding, no odd texture, no light bleed into the LED ring.
Installation: my process and tips
I installed the cap on a first-generation Ring Doorbell Pro without removing the main unit from the wall. Here’s exactly what worked for me:
- Tools: fine-point tweezers and a small precision flathead screwdriver. A headlamp or bright task light helps.
- Protect the LED ring: I put a strip of painter’s tape around the LED ring to avoid accidental scuffs.
- Remove the old cap: My original was cracked, so instead of yanking, I gently worked around the circumference with the small flathead to lift fragments and reduce tension on the clips. Tweezers were great for pulling pieces away as they loosened. The goal is to avoid prying against the inner mechanism.
- Orient the new cap: On my unit, the alignment slit needed to face down at roughly the 6 o’clock position. Before you toss the old cap, note the slit location; if the cap is too damaged, look for the small tab on the internal frame and match the slit to it.
- Snap in place: I seated the new cap squarely, applied gentle pressure, and felt a soft click. Do not force it—if it’s not going, recheck the orientation.
- Test: A quick press confirmed a confident return and proper actuation. I tugged lightly around the edges to ensure it was fully latched.
Total hands-on time was a few minutes, and most of it was spent carefully removing the old cover. The install itself is a 30-second job once you’re ready to snap the new one in.
A few cautions:
- Don’t pry upward against the LED ring; work on the cap’s sidewalls.
- If your old button is intact but stiff, resist the urge to pull it off in one go. Relieve the clip tension by loosening the perimeter first.
- Orientation matters. If the button feels dead or doesn’t return cleanly, it’s probably misaligned—remove and reseat with the slit in the correct position.
Fit and compatibility
On my first-gen Pro, fit was precise and flush. The gap around the LED ring stayed even, and there was no interference with the light or the press. Button geometry can vary slightly across hardware revisions, so it’s worth double-checking the latch and slit orientation before you fully commit. If the cap doesn’t sit flat or you need excessive force, stop and reassess; forcing it is the fastest path to damage.
While I can’t certify every variant, the cap’s inner profile seems designed to accommodate minor differences in the mounting flange and tab positions. If you have a very early or unusual hardware revision, set your expectations accordingly and proceed carefully.
Feel and performance
The press is more positive than the original rubber cap. There’s a cleaner start to the movement and a more distinct return, which eliminates that vague, mushy feeling. My unit responded reliably with light presses, and I wasn’t able to trigger accidental double-presses by grazing the edge, something that occasionally happened with the floppy, cracked original.
Even in direct afternoon sun, the cap remained cool enough to touch and didn’t soften. A few weeks in, it’s still crisp with no sign of clouding or edge lift.
Durability prospects
The stiffer plastic gives me more confidence against UV cracking than the original soft cover. The thin lip at the clip line is the stress point on most of these buttons; here, the lip is well-supported and the clip geometry distributes the load evenly when pressed. I can’t fast-forward a year to see how it fares, but the material choice is sound and the fit is snug—both good indicators.
The real durability win is the four-pack. If the cap eventually degrades, I already have spares and the know-how to replace it in minutes.
Value
Replacing a full video doorbell because a rubber cap failed is wasteful and expensive. This kit costs a fraction of a new unit and includes three backups. There’s no special tool required, no firmware risks, and no re-aiming or re-wiring. It’s the kind of fix I wish were standard issue in the original box.
What could be better
- Documentation: The kit arrives without a printed guide. A one-page diagram showing the clip points and the common slit position would make first-time installs less nerve-racking.
- Orientation variability: Most Pros I’ve seen use 6 o’clock for the slit, but some don’t. Clearer markings on the cap (tiny embossed arrow) could help.
- Tool suggestion: Including a slim plastic spudger or pair of pointed tweezers would be more useful than the screws for most users, since you generally won’t open the housing.
Who should use it
- Ideal for: Ring Doorbell Pro owners with cracked, sticky, or unresponsive button covers who are comfortable with small, delicate prying work and careful alignment.
- Think twice if: Your doorbell is an uncommon hardware revision, the original cap is completely missing and you can’t identify the tab position, or you’re not confident working around an LED ring without slipping. It’s still achievable, but patience and dexterity are required.
Practical install checklist
- Turn on a bright light and protect the LED ring with tape.
- Use a fine flathead and tweezers; avoid bulky pliers that can slip and mar the faceplate.
- Loosen the perimeter of the old cap to relieve clip tension; remove in pieces if it’s cracked.
- Identify the inner tab and align the cap’s slit to it—often 6 o’clock.
- Press evenly until it clicks. Tug gently to confirm it’s latched. Test the bell.
The bottom line
The ALLICAVER button kit does exactly what I hoped: it restores a battered Ring Pro button to full function and clean looks without removing the doorbell or opening the housing. The material feels sturdier than the original, the press is more satisfying, and the fit on my unit is spot on. Installation is fast if you take a careful, methodical approach—and the extra caps make this a long-term, low-cost fix.
Recommendation: I recommend this kit to anyone with a cracked or unresponsive Ring Pro button who prefers a quick, non-invasive repair. It’s inexpensive, thoughtfully molded, and—provided you mind the orientation and work gently—easy to install. The lack of a printed guide is a miss, and compatibility can vary slightly by hardware revision, but the overall value and outcome make it well worth keeping in your toolbox (and on your doorbell).
Project Ideas
Business
Quick-Fix Doorbell Service
Offer a mobile 10–15 minute repair service targeting landlords, Airbnb hosts, and busy homeowners: carry the 4-pack replacement buttons, needle-nose pliers, and screws to replace cracked buttons on-site. Promote as an affordable alternative to full unit replacement that preserves camera/privacy and avoids expensive device swaps.
Landlord & Host Maintenance Subscription
Create a subscription maintenance package for property managers and short-term rental hosts that includes periodic shipments of replacement kits (4-pack), a short how-to card/video, and remote troubleshooting. Bundle with discounted on-call install visits for customers who prefer professional help—reduce emergency booking losses by ensuring functioning doorbells.
White-Label Installer Accessory Pack
Buy bulk replacement buttons and repackage them as branded accessory packs for smart-home installers and electricians. Include custom-branded instructions emphasizing the 6 o'clock slit alignment and simple needle-nose pliers technique. Sell as an upsell during installations or include them in premium service kits.
Retail Emergency Repair Kit
Assemble a small retail SKU for hardware stores and online marketplaces: the 4-button pack plus a pocket needle-nose plier, two screws, and a laminated step-by-step guide. Market it as an 'emergency doorbell repair' kit for consumers to keep in a household toolbox—position as cheaper than replacing the entire smart doorbell device.
How-To Content + Affiliate Sales Funnel
Produce short video tutorials and before/after case studies showing the simple snap-in replacement (slot at 6 o'clock, no housing removal). Monetize via affiliate links to the 4-pack and basic pliers, and offer downloadable instruction PDFs for a small fee. Use SEO and local-targeted ads to capture searches like 'doorbell button cracked' and convert DIY customers into buyers or bookers for paid installs.
Creative
Decorative Doorbell Faceplate Remix
Design a custom faceplate for your doorbell that accepts the snap-in replacement buttons. Cut a thin decorative plate from wood, metal, or acrylic, paint or stencil a pattern, then route a small socket that aligns the button slit at 6 o'clock so the replacement snaps in cleanly. Use the four-pack to create interchangeable colored/texture buttons so homeowners can change the look seasonally without touching the main device.
Tactile Tech Wall Art
Make mixed-media wall panels that incorporate the black high-strength buttons as tactile elements. Mount several buttons on a painted wooden panel, wire a shallow LED behind each (or leave them as purely tactile), and arrange them in geometric patterns. The buttons add an industrial, techy texture and can be pressed for fidget-friendly interactive art.
Portable Doorbell Test Switch
Turn a spare replacement button into a handheld test switch for installers and DIYers. Mount the button into a small handheld enclosure with an extension probe that can depress the internal mechanism (mirror the 6 o'clock slit alignment). This gives a quick, non-invasive way to trigger and test doorbell cameras during installs or troubleshooting without removing the housing.
Maker-Class Prototyping Buttons
Use the durable replacement buttons in maker projects or classroom electronics where a sturdy, responsive tactile push is needed. Snap the buttons into 3D-printed panels or breadboard-friendly mounts to teach students about inputs, debouncing, and enclosure design. The buttons' robust plastic and no-housing-needed fit make them easy to reuse across projects.