Features
- Simple unlighted surface mount doorbell push button switch can be used on stucco or wood surfaces
- Doorbell buttons wired with rectangular plastic housing, bell wire is not included
- If using as replacement door bell button, drilling may not be required
- Will work with almost any door bell transformer and wired chimes
- PLEASE NOTE: A diode is needed (not included) if you are using a digital chime (plays a melody; has a speaker for the sound). A diode is NOT needed if you are using a mechanical doorbell chime (a 2-note sound; like a small mallet hitting a metal bar).
Specifications
| Color | White |
| Size | Unlighted |
| Unit Count | 1 |
Related Tools
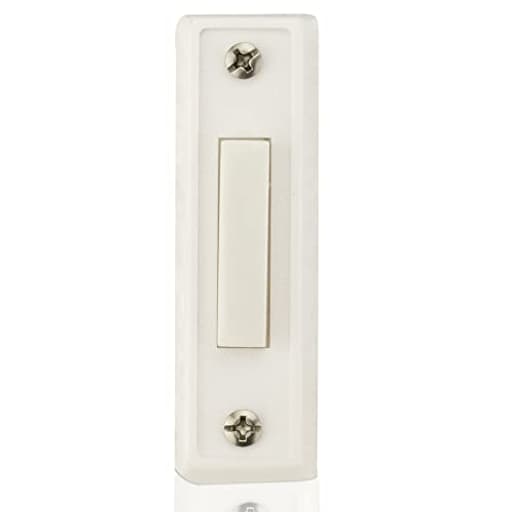
Unlighted surface-mount doorbell push button in a rectangular plastic housing designed for stucco or wood surfaces. It connects to bell wire (not included) and is compatible with most doorbell transformers and wired chimes; drilling may not be required when replacing an existing button. A diode is required for use with digital (melody) chimes but is not needed for mechanical two-note chimes.
Newhouse Hardware BT1W Unlighted Doorbell Button, 1-Pack, White Review
Why I reached for this simple button
My entryway project wasn’t glamorous: the old doorbell button had cracked and gone chalky, and the chime had become intermittent unless you pressed the sweet spot at a funny angle. I wanted a straightforward, wired replacement—no cameras, no app, nothing that would argue with my existing transformer or chime. The Newhouse BT1W fit the bill: a plain, surface‑mount, unlighted button in a rectangular plastic housing. It promises broad compatibility and quick replacement without drilling in most cases. That’s exactly how it played out at my door.
Design and build
This is a basic, low‑profile rectangle with a centered plunger, done in white plastic. The aesthetic is utilitarian rather than decorative: clean but clearly plastic. In a traditional trim stack around a front door, it disappears in the best way—no odd curves, logos, or bezels. There’s no illumination, which I actually prefer for a few reasons: fewer parts to fail, fewer compatibility edge cases with chimes, and no dim glow to attract bugs at night.
The housing is a surface‑mount design that sits flat against wood or stucco. The footprint is large enough to cover the paint outline from my old button, but if your previous button was wider or had an escutcheon plate, you might still see a “tan line.” There’s no gasket in the box, so if you’re mounting on textured stucco or an uneven surface, plan to add a thin bead of exterior‑grade sealant around the perimeter after installation to keep water out of the wall cavity.
The plunger has a light, positive action. There’s a definite “click,” and the throw is short, which helps prevent guests from leaning on it. The screw terminals are the familiar two‑post design with slotted heads—nothing fancy, but secure.
Installation experience
Replacing an existing doorbell button rarely gets simpler than this. My process took under ten minutes, including cautious prep:
- Turned off power to the transformer at the breaker. Doorbell circuits are low voltage, but I still treat them with respect.
- Removed the old button and gently pulled the two bell wires out of the wall. A small piece of painter’s tape on the wall held them in place so they wouldn’t slip back into the cavity.
- Loosened the BT1W’s terminal screws, looped each wire under a screw, and tightened them. Polarity doesn’t matter for a simple momentary switch like this.
- Reused the existing mounting holes; in my case, everything lined up. If you’re replacing a similar rectangle, odds are good you won’t need to drill. If you’re mounting on new wood trim, a small pilot hole prevents splitting. For stucco, pre‑drill with a masonry bit and use anchors if needed.
- Snugged the housing to the surface—just enough to sit flush, not so much that the plastic distorts.
- Restored power and tested.
Bell wire isn’t included, which is typical. If you’re running new wire, 18‑ or 20‑gauge doorbell wire works well. All told, this is an accessible DIY task—even if you’ve never touched a doorbell before.
Compatibility notes: mechanical vs. digital chimes
The BT1W is just a momentary switch, so it plays well with almost any standard doorbell transformer and wired chime. I tested it with a mechanical two‑tone chime (the classic physical striker and metal bars) and it worked exactly as expected.
If you have a digital/melody chime (a speaker that plays tunes), you may need to add a diode across the button terminals to ensure the chime plays fully and doesn’t “ghost” or cut off. There’s no diode in the package; check your chime’s manual for the correct orientation and spec. A common 1N400x series diode will usually do, installed across the two screws at the button as directed by the chime manufacturer. With purely mechanical chimes, a diode is not required.
Because this button is unlighted, you avoid the extra trickle current that some illuminated buttons use to power their backlight—one less cause of buzzing or partial rings with sensitive chimes. That’s a quiet advantage if your system has been finicky.
Day‑to‑day use
In use, the button feels consistent and resilient. The face cleans up with a damp cloth and hasn’t scuffed under normal contact. My chime triggers reliably with light presses and doesn’t double‑ring, which tells me the spring and contacts are tuned properly. There’s no audible hum, and the switch doesn’t “stick” in humid weather.
The lack of a backlight is a tradeoff. On a dark porch, guests won’t get that glow to guide them. If you have a porch light on a sensor, or a fixture near the door, you won’t miss it. If you rely on the doorbell itself to be a beacon, you might prefer a lighted model (or a separate low‑profile light near the doorway).
Durability and weather
Surface‑mount buttons inevitably live outdoors. The BT1W’s housing is plastic with a simple mechanical switch inside. That’s a plus for weather resistance—no LEDs or tiny electronics to fail from moisture. The fit between the plunger and bezel on my unit is snug enough to keep wind‑driven rain from reaching the contacts. If you have heavy exposure (no trim, fully open to the elements), I recommend adding a tidy bead of sealant around the perimeter and ensuring your wire entry hole is caulked. Over time, UV will age white plastic; expect a gradual matte finish rather than a glossy sheen. Functionally, that shouldn’t matter.
What I like
- Fast, no‑drama replacement. Two wires, two screws, and you’re done.
- Unlighted design minimizes compatibility issues and buzzing with various chimes.
- Broad transformer/chime compatibility, especially with mechanical two‑tone units.
- Positive, short‑throw button feel with reliable contact.
- Low profile that looks clean on wood or stucco.
Where it could be better
- No illumination. If you want a backlit target at night, this isn’t it.
- Plastic looks utilitarian. It’s tidy but won’t pass for metal from up close.
- No gasket included. A thin foam or rubber backer would help on rough stucco.
- Diode not included for digital chimes. Not unusual, but you’ll need to source one if your chime requires it.
Who it’s for
- Homeowners and landlords who need a quick, inexpensive fix for a broken button.
- Anyone with a conventional mechanical chime looking for maximum reliability.
- Rentals or secondary entries where you want something tidy and dependable rather than decorative.
- Situations where lighted buttons have caused buzzing or half‑rings.
If you’re building a decorative entry with brass or oil‑rubbed hardware, you might prefer a metal‑faced button. If you need visibility in the dark, consider the lighted version or add a small porch light on a dusk sensor. And if you’re on the hunt for “smart,” this isn’t that—pair it with your existing chime and transformer, not a Wi‑Fi app.
Practical tips for a clean install
- Kill power at the breaker. Even low voltage deserves safe habits.
- Tape the wires to the wall while you work; losing them into the cavity is a pain.
- Pre‑drill pilots in wood trim; use anchors for stucco.
- If your chime is digital, consult its manual for diode placement across the button terminals.
- Seal the wire entry hole and the perimeter if mounting on textured or exposed surfaces.
The bottom line
The Newhouse BT1W is the kind of part I appreciate as a tool reviewer: unassuming, well‑sorted, and honest about what it is. It’s a simple, unlighted, surface‑mount doorbell button that installs in minutes and works with the broad universe of wired chimes and standard transformers. It doesn’t try to be smart or stylish; it just delivers a crisp press and a reliable ring.
Recommendation: I recommend this button for anyone who wants a straightforward, dependable replacement, especially if you’re running a mechanical two‑note chime and value compatibility over cosmetics. It’s budget‑friendly, easy to install, and avoids the common quirks that illuminated buttons can introduce. If nighttime visibility or premium finishes are priorities, look at a lighted or metal‑faced alternative; otherwise, this is exactly the quiet upgrade a tired doorbell needs.
Project Ideas
Business
Custom Decorative Faceplate Line
Offer a small-batch product line: decorative faceplates and painted housings that fit over the standard BT1W button. Sell combinations (button + faceplate) online and at craft fairs. Target homeowners who want a personalized exterior detail. Keep costs low by sourcing the base button in bulk and producing faceplates via laser-cut wood, enamel decals, or 3D printing.
DIY Smart-Retrofit Kit
Create a retrofit kit that converts a wired doorbell button into a smart trigger: include the BT1W, a tiny relay module or Wi‑Fi button controller, a diode and wiring instructions for compatibility with digital chimes, and step-by-step installation guides. Market to renters and homeowners who want smart notifications without replacing transformers or chimes.
Doorbell Replacement + Branding Service
Offer a service for short-term rental hosts and small businesses to replace and brand their exterior doorbell buttons (logo engraving, color-matching, or themed designs). Package as a low-cost upgrade for Airbnb hosts, cafes, and boutique shops—include simple installation and a weatherproofing guarantee.
Hands-On Workshop: Upgrade Your Doorbell
Run local workshops teaching basic doorbell maintenance and customization: how to swap a button safely, add a diode for digital chimes, and create decorative coverings. Charge per attendee and include a take-home BT1W button and basic faceplate. Use the class to upsell custom faceplate orders and DIY smart-retrofit kits.
Niche B2B Supply: Low-Voltage Momentary Switch Packs
Position the BT1W as a low-cost momentary switch for small installers and hobbyists. Sell bulk packs with wiring accessories (screws, weather sealant, diodes) to electricians, stage/set designers, escape-room builders, and makers. Offer private labeling for recurring business clients to secure repeat orders.
Creative
Garden Gate Chime
Mount the unlighted doorbell button on a garden gate post as a momentary trigger for a small low-voltage chime or solenoid-driven wind chime. Weatherproof the housing with silicone seams and use bell wire to run to a sheltered chime box. Great for adding a tactile, vintage greeting at a garden entrance or allotment plot.
Interactive Wall Art Button
Incorporate the push button into mixed-media wall art to give viewers an interactive element. Wiring the button to a small speaker or an LED strip (powered from a low-voltage supply) lets the artwork play a short sound or light sequence when pressed. The button's unobtrusive rectangular housing can be painted or covered to blend with the piece.
Hidden Compartment Release
Use the button as a discreet release mechanism for a DIY furniture secret compartment or jewelry box. The momentary switch can trigger a small linear actuator or electronic latch. Because the button is surface-mount and slim, it tucks into an edge or underside and can be painted to match the piece.
Escape Room Puzzle Trigger
Add the button as a pressure/sequence input in a home escape-room kit. Players must find and press the right button (or combination of buttons wired together) to unlock the next clue. The doorbell button's tactile 'click' makes it satisfying and reliable under repeated use.
Retrofit Notification Button for Workshops
Mount the button at a workbench or studio as a convenient momentary trigger for an LED status indicator, buzzer, or overhead signal (low-voltage). Use it for 'need assistance' or 'part ready' signals in a shared maker space; its simple wiring and surface mount make installation quick without major drilling.