Features
- Gorilla All Purpose Wood Filler is the go-to product for strong, durable repairs on cracks, gouges and holes.
- The unique formula is easy to spread allowing for a smooth, natural finish.
- Its high performance stainability, paintability, and sandability provides you with a professional looking finished project.
- Shrink & Crack Resistant; Interior/ Exterior; Water Resistant
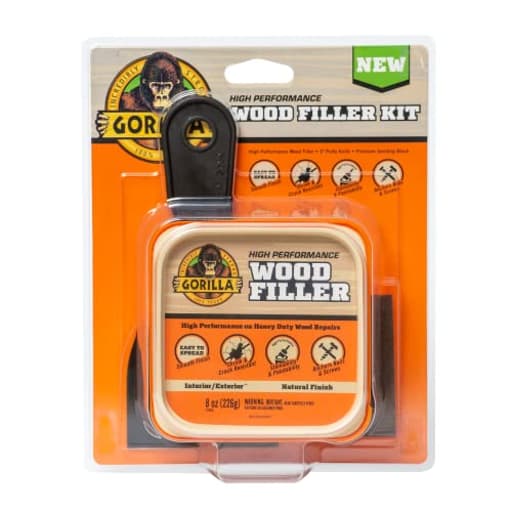
- Kit Includes: 8oz Tub of High Performance Wood Filler, 3" Putty Knife, Premium Sanding Block
Specifications
| Color | Kit |
| Size | 1 - Pack |
| Unit Count | 1 |
Related Tools
All-purpose wood filler for repairing cracks, gouges, and holes in interior and exterior wood surfaces; water-resistant and formulated to resist shrinkage and cracking. Includes an 8 oz tub of filler, a 3" putty knife, and a sanding block; the filler spreads smoothly and is stainable, paintable, and sandable for a finished surface.
GORILLA All Purpose Wood Filler Wood Repair Kit with Putty Knife and Sanding Block Review
A practical, ready-to-go filler kit that fits most repair lists
I put the Gorilla wood filler kit through a fairly typical spread of jobs: nail holes in painted trim, a doorjamb gouge, the chipped edge of a plywood shelf, and a small outdoor repair on a cedar bench. Across those tasks, the kit did what I hoped a general-purpose filler would do—spread smoothly, set up quickly, sand cleanly, and disappear under paint. It won’t replace epoxy for large rot repairs or an oil-based filler for perfect stain matching, but as an everyday patch-and-prep solution, it earns a place on the shelf.
What you get and how it feels in hand
The kit includes an 8 oz tub of filler, a 3-inch putty knife, and a small sanding block. The putty knife is flexible enough for feathering thin patches and wide enough to bridge typical door and trim dings. The sanding block is a nice touch for beginners; I still reached for my own assortment of papers to fine-tune grits, but the included block is perfectly serviceable for leveling and blending.
The filler itself has the right “thick peanut butter” consistency for pressing into voids without slumping. It isn’t soupy, and it isn’t so stiff that you fight it. That balance is especially useful on vertical surfaces, where runny filler is a recipe for frustration.
Application and working time
I got best results by pressing the filler firmly into the void rather than just wiping over the surface. For nail holes and shallow scratches, one pass is usually enough. For anything deeper than about 1/8 inch, I recommend layering—fill, let it set, then top up—rather than trying to pack a cavity in one go. This approach minimizes any chance of shrinkage telegraphing back later.
The working time is brisk, which I appreciated for small, repetitive jobs like trim touch-ups. I could move quickly across a room, filling and smoothing, and be ready to sand sooner than with many other water-based fillers. If you prefer leisurely sculpting, this isn’t that; plan your moves, overfill slightly, and do your shaping at the sanding stage.
Tip: keep the lid on the tub closed while you work. If the filler sits open, it skins over and thickens faster than you’d like. If you open the tub and find it a bit dry, a few drops of water and a thorough mix can restore a good working consistency. Don’t overdo the water—too much and you’ll trade spreadability for unnecessary shrink.
Drying, sanding, and finishing
Dry time depends on depth and conditions, but shallow patches were sandable for me in well under an hour, often much faster. That speed can save a lot of stop-and-start on prep days. Once cured, the filler sands into a fine powder and doesn’t gum up paper. I could feather edges cleanly into painted trim and bare wood alike, which is where a lot of fillers fall apart (literally). Corners and edges held up well to careful sanding; for crisp profiles, I sometimes masked with tape, filled, then removed the tape at the green stage to keep sharp lines.
Under paint, patches disappear, full stop. For stain, it behaves about as well as a water-based filler can. It takes stain, but not always identically to the surrounding wood—especially on softwoods and plywood veneers. If stain-matching is mission critical, test on scrap, consider a gel stain, or plan to tone the patch with a touch-up pen. For painted finishes, a quick coat of primer—shellac-based if you’re dealing with tannin-prone species—gave me a perfectly uniform surface.
Exterior use and durability
The filler is water-resistant and rated for interior/exterior work. I used it to tidy up a small gouge on a cedar bench and a hairline gap on a fence cap. After curing and topcoating with exterior paint, the patches held up fine through summer storms. I wouldn’t use any water-based filler uncoated outdoors, and this one is no exception—seal it with paint or a suitable finish. For areas subject to movement, like wide joints on weather-exposed trim, a flexible exterior caulk may be a better choice. For actual rot repairs or large voids on exterior elements, epoxy consolidants and fillers still reign.
Strength and screw-holding
Once cured, the filler is hard and machines predictably: you can sand, file, drill, and shape it. It’s robust enough for cosmetic repairs and light-duty fixes where the base wood still provides structure. You can sometimes sink a small fastener through a patch or use it as a veneer over a countersunk screw, but I wouldn’t rely on any wood filler to hold a structural screw on its own. If the goal is to rebuild missing wood with strength, that’s the epoxy category.
Cleanup and user experience
Cleanup is as easy as you’d expect from a water-based product—soap and water before it cures. Odor is mild. The kit’s convenience factors matter more than they sound: having a decent putty knife and sanding block in the box means anyone can open, fill, sand, and paint without rummaging for tools.
A few small annoyances: the fast set time punishes indecision, so pre-cut your patches mentally and work in manageable sections. The tub can dry around the edges if you’re casual with the lid. And while the formula is labeled as shrink- and crack-resistant, deep fills will still settle slightly if you thin the product too much or skip layering. None of those are dealbreakers; they’re simply the trade-offs of a quick, water-based filler.
Best practices for results that look pro
- Press, don’t just skim: force the filler into the defect to key it in.
- Slight overfill: plan to sand back to flush; it’s easier to remove than to add.
- Build in lifts for depth: two thin passes beat one thick gob.
- Smooth with a damp knife: a lightly moistened blade can help get a cleaner surface and reduce sanding.
- Mask for crisp lines: tape along edges, fill, then pull at the green stage.
- Prime before paint: especially on patched MDF or tannin-heavy woods.
- Seal outdoors: always topcoat with paint or an exterior-rated finish.
- Store smart: lay a piece of plastic wrap on the surface of the filler and screw the lid tight; keep the tub out of freezing temps.
Where it fits in a shop or job kit
If your work involves painted trim, furniture touch-ups, plywood projects, and small exterior maintenance, this kit covers a lot of ground with minimal fuss. It’s easy for beginners to control and fast enough for pros to keep moving. For specialty needs—large structural repairs, stain-critical cabinetry, or extensive rot remediation—you’ll want to supplement with epoxy systems or specialty fillers. But for most day-to-day patching, it’s an efficient, reliable option.
The bottom line
I recommend the Gorilla wood filler kit for anyone who needs a straightforward, fast-curing, and easy-to-sand filler for routine wood repairs. It stands out for its smooth application, quick turnaround, and predictably clean finish under paint. The included knife and sanding block lower the barrier to entry, and the water-resistant formula makes it viable for small exterior fixes once sealed. Just keep the lid closed, build deep fills in layers, and be realistic about stain matching and structural use. Used that way, it’s a dependable fix-it companion that earns its keep on both DIY and pro projects.
Project Ideas
Business
Micro-Furniture Repair Service
Offer a local on-call service for quick chip, hole and gouge repairs on furniture, trim and doors. Use the kit for efficient, durable fixes; price jobs in tiers (small touch-up, medium repair, large restoration) and upsell refinishing or color-matching. Mobile startup costs are low — pay for supplies and simple tools.
Refinish & Flip Side Hustle
Source damaged but solid furniture from thrift stores or curb alerts, use wood filler to repair imperfections, then refinish for resale. Small upgrades (fill, sand, refinish) can dramatically increase resale value with limited time investment; package multiple small pieces for flea markets or online platforms like Facebook Marketplace and Etsy.
Hands-On Repair Workshops
Teach community classes showing homeowners how to fix common wood damage using the all-purpose kit. Charge per participant, provide kits as part of the fee, and sell follow-up kits or private lessons. Workshops build trust and create repeat customers who need larger restoration work.
Curated Repair Kits + Digital Tutorials
Assemble enhanced repair kits (the filler, putty knife, extra abrasives, pigment packets and instruction cards) and sell them online with step-by-step video tutorials. Offer tiered kits (basic, pro) and add remote consulting or color-matching services for higher-margin sales to hobbyists and small contractors.
Creative
Seamless Reclaimed Frame Revival
Use the filler to repair cracks, gouges and missing chunks in reclaimed wood picture frames or mirror surrounds. Smooth with the included sanding block until flush, then stain or paint to match the wood tone for an invisible repair — or selectively distress the finish for a vintage look.
Textured Relief Wall Art
Spread tinted wood filler onto a shallow wooden panel to build up raised patterns, geometric shapes, or floral motifs. Once cured and sanded, highlight the relief with contrasting paint or stain for modern 3-D wall art that looks carved but is faster and easier to create.
Inlay-Look Tabletop Makeover
Fill chips, gouges and missing veneer sections and shape the filler to create faux inlays or contrasting geometric inserts. After sanding flush, use stains, dyes, or paint to produce an inlay appearance without routing or expensive materials — great for small side tables and drawer fronts.
Outdoor Planter Stand Rescue
Repair weather-damaged legs or splintered edges on outdoor furniture and planter stands using the water-resistant filler, then sand and seal with an exterior-grade finish. The filler’s shrink- and crack-resistant properties make it ideal for stabilizing pieces before repainting or staining for a refreshed garden display.