Features
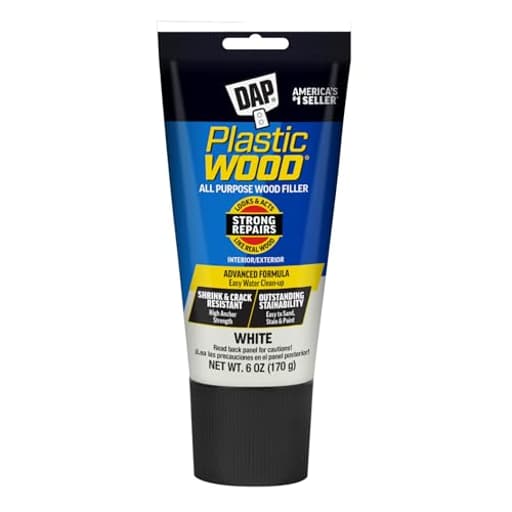
- DAP plastic wood filler looks and acts like real wood; ideal for corners and vertical surfaces on interior or exterior wood
- Easy-to-use, latex-based formula can be planed, cut, drilled, screwed, nailed, sanded, stained and painted, unlike many wood putty fillers
- White wood filler is shrink, crack and crumble resistant with strong nail and screw anchoring for easy wood repairs
- Thick, knife grade formula can be molded and sculpted allowing it to fill any shape imperfection
- Low odor wood filler dries in 3 to 6 hours for repairs up to 1/8" in depth and 36 hours for deeper fills 1/4" and over
Specifications
| Color | White |
| Size | 6 Oz. |
| Unit Count | 1 |
| Edition | BUILDING_MATERIAL |
Related Tools
A white, latex-based wood filler for repairing and shaping interior or exterior wood surfaces, including corners and vertical areas; it can be applied in a thick, knife-grade consistency to fill and sculpt imperfections. It can be planed, cut, drilled, screwed, nailed, sanded, stained and painted, resists shrinking, cracking and crumbling, and dries in about 3–6 hours for repairs up to 1/8" and about 36 hours for deeper fills (1/4" and over).
PLASTIC WOOD DAP Plastic Wood All Purpose Latex Wood Filler, White, 6 Oz - Packaging may vary Review
Why I keep a tube of DAP Plastic Wood in my trim kit
Small repairs have a way of multiplying once you start looking for them. I spent a weekend chasing nail holes, chipped corners, and an old hinge mortise that needed filling, and this white, latex-based Plastic Wood became my go-to. It’s a thick, knife-grade filler that you can push into defects, sculpt on verticals, and then sand and finish like wood. After several projects indoors and out, I’ve found it to be a reliable, easy-to-control filler—especially for painted surfaces—though there are a few quirks worth knowing.
What it is, and where it shines
DAP Plastic Wood (the white, latex version in the squeeze tube) is built for general wood repair on both interior and exterior surfaces. The consistency is dense and pasty, not runny, which is exactly what you want for corners, edges, and vertical repairs where you don’t want sagging. It bonds well to primed or bare wood, takes screws and nails better than typical lightweight spackle, and is reasonably resistant to shrinking and cracking if you apply it in sane layers.
Because it’s white, it’s particularly well suited to repairs that will be painted. You can stain it, but as with most light-colored fillers, don’t expect an invisible match under clear finishes. For paint-grade trim, doors, casings, and baseboards, it’s excellent.
Application and workability
Application is straightforward. I prep by vacuuming dust, wiping with a slightly damp cloth, and letting the surface fully dry. The filler extrudes with some resistance—more on that later—and spreads cleanly with a flexible putty knife. It has just enough body to pack into voids without smearing all over adjacent surfaces.
- Nail holes and minor dings: A thin skim wipes in easily and levels nicely. In my shop at around 70°F and low humidity, small fills were sandable in 45–60 minutes.
- Edge and corner rebuilds: The knife-grade body makes it easy to rebuild a chipped stair nose or door edge. I applied in two to three lifts, letting each layer dry before shaping the next. The upright holds were impressive—no noticeable slump on vertical profiles.
- Larger voids: For anything deeper than about 1/8", I worked in lifts. The manufacturer guidance of 3–6 hours for shallow repairs and roughly a day or more for deeper 1/4"+ fills tracks with my experience. Plan overnight cures for the best results on bigger patches.
One technique that helped: for textured areas or to feather into adjacent surfaces, I lightly dampened a small, stiff paintbrush and stippled the filled area after the initial set. It softens the surface just enough to blend edges before full cure, saving sanding time and making patches disappear under paint.
Sanding and finishing
Once cured, this filler sands like a medium-density wood—crisp but not brittle. I start at 120 grit to knock down high spots and finish at 180–220 for paint-grade smoothness. If you sand too early, it can gum up the paper, so I err on the side of waiting an extra 30 minutes on thicker fills.
Primers adhere well and the white color hides quickly under paint. For stain, it does accept dye and pigment, but it stays lighter than surrounding wood and telegraphs the repair, as expected. On a pine test board, even with a gel stain, the filled areas read as pale. For stain-grade work where the repair needs to disappear, a tinted filler or a two-part epoxy that you can color-match will deliver better results.
Strength and hardware anchoring
One advantage of this filler over lightweight spackles is that it can be cut, drilled, and even holds brads or small screws once fully cured. I tested a small hook screw in a patched area of a coat rack, and it bit just fine; I wouldn’t count on it for anything structural, but it’s more robust than typical spackle or caulked-over holes. On trim, casing, and door repairs, it feels solid and doesn’t crumble under a scribe or block plane once fully cured.
Shrink and crack resistance were good in my tests. A week after repairing several baseboard gaps and a door edge, I saw no hairline cracks telegraphing through the paint, which is often where bargain fillers show their weakness.
Cleanup, odor, and working time
Cleanup is a breeze—soap and water on tools and hands before it fully sets. There’s very little odor, and I had no problem using it indoors without ventilation. Working time is ample enough for small repairs, but remember it’s a latex product: the surface skins faster in warm, dry conditions. I keep a damp rag handy to wipe the knife and keep edges clean.
A small tip that improved control: instead of cutting the nozzle wide, I drilled a small hole near the tip. It keeps the bead fine for precision work and reduces waste.
Packaging quirks
The 6 oz squeeze tube is convenient for spot repairs and keeping in a tool bag, but it has two drawbacks:
- As you use half the tube, it takes more hand strength to squeeze out the remainder. The filler’s thickness plus the stiff tube wall make the last third a bit of a forearm workout.
- There’s a surprising amount of air space at the back of a fresh tube. It’s not unusual, but it can make your first squeeze feel like the tube is underfilled.
Neither issue is a dealbreaker, but both are noticeable. A tub option would be more efficient for bench work and larger projects; for now, the tube excels for on-site touch-ups.
Exterior use and durability
This filler is rated for exterior use, and it held up fine in my tests on primed outdoor trim that was top-coated with exterior paint. As with any latex filler, the key to longevity is sealing it with a good primer and paint. I wouldn’t use it as a rot-replacement material or in constantly wet areas. For deep exterior damage, a two-part epoxy wood repair system remains the gold standard. But for small exterior dings and open nail holes prior to painting, this product is perfectly serviceable.
Practical tips for best results
- Prep matters: remove dust and any loose fibers. On old finishes, scuff-sand for better adhesion.
- Work in lifts: for anything deeper than 1/8", fill in layers and allow full dry time between coats.
- Shape early: after the initial set, refine with a damp brush or a lightly wetted putty knife to reduce sanding.
- Be patient on dry time: environmental conditions can double or halve cure times. If it still feels cool or rubbery, wait.
- Sand progressively: 120 → 180/220 for paint-grade, and dust off thoroughly before priming.
- Seal it: always prime before paint, and always topcoat for exterior exposure.
Where it fits in a kit
If you primarily do paint-grade carpentry, trim, door, and furniture touch-ups, DAP Plastic Wood earns a spot. It’s clean, predictable, and tougher than spackle without the odor and cleanup hassles of solvent-based putties. For stain-grade furniture restoration or major structural repairs, look elsewhere.
The bottom line
I recommend this filler for everyday, paint-grade wood repairs and small exterior touch-ups. It applies cleanly, holds on verticals, sands beautifully, and takes paint well with minimal shrinkage or telegraphing. The low odor and water cleanup make it easy to live with in occupied spaces. The downsides—stiff tube toward the end, some trapped air, and less-than-ideal stain matching—are easy to manage and common to this class of product. For the price and convenience, it’s a highly useful addition to a DIYer’s or pro’s kit for quick, durable repairs.
Project Ideas
Business
Mobile cosmetic repair & touch-up service
Offer same-day minor wood repairs for homeowners and landlords—fill nail holes, repair trim corners, rebuild small sections of damaged molding and match paint. Market on local listings with before/after photos. Pricing can be per repair (small fills) or hourly; emphasize quick-dry capability for fast turnarounds and minimal downtime.
Upcycled furniture boutique
Source inexpensive or damaged furniture, use the filler to repair and add sculpted details, refinish in trending colors/finishes, and resell locally or online. Position pieces as bespoke—highlight restoration work and added decorative elements. Keep a workflow: repair → sculpt → sand → prime/paint → finish to maintain consistent quality and margins.
Custom trim & applique production
Produce small runs of decorative appliqués, rosettes and corbels that contractors or DIYers can affix to cabinets and furniture. Use the filler to sculpt designs on lightweight substrates, finish and sell as unfinished (for painters) or prefinished pieces. Sell via Etsy, local woodworking shops, or partner with trim retailers.
Workshops and DIY kits
Teach short classes on basic wood repair, decorative sculpting and finishing using this easy-to-use filler. Offer in-person workshops or online tutorials; sell companion kits (filler, putty knife, sandpaper, mini brushes). Workshops build credibility, drive material sales, and create repeat customers for repair/ decor services.
Staging & prop repair service for real estate/events
Provide quick cosmetic fixes and create temporary decorative accents for home staging companies, photographers and event designers. Use the filler to hide blemishes, rebuild trim, or craft cheap ornamental details that can be painted to match décor. Charge per-job with add-ons for rush services and prop creation; emphasize speed and reversibility.
Creative
Mini architectural mouldings & corbels
Use the filler to sculpt small decorative mouldings, corbels and appliqués on thin wood or MDF blanks. Press or build up the thick, knife-grade filler in layers, shape with carving tools while soft, let cure, sand smooth and paint or gild. Ideal for restoring or customizing picture frames, shelves and cabinet faces—works on vertical surfaces and holds detail well.
Seamless furniture repair & faux-replacement
Fill gouges, missing trim sections or screw holes and sculpt new profiles (chair spindles, trim corners) directly in the repair area. After drying, plane/ sand to match surrounding contours, then stain or paint for a near-invisible repair. Tips: build shallow layers for faster drying, carve wood grain with a pointed tool before it fully cures, prime before painting for best color match.
Textured wall-art panels
Create low-relief wall panels by spreading the filler onto a primed wood panel and sculpting patterns (waves, geometric ridges, floral motifs). Once dry, sand selectively, prime and apply layered paints, washes or metallic highlights for dimensional art. Because the filler sands and holds shape, you can get crisp texture without heavy tools.
Custom picture frames & relief medallions
Apply and sculpt the filler directly onto frame blanks or disc-shaped substrates to form bespoke rosettes and medallions. After cure, sand, drill for mounting, and finish with paint, stain or gold leaf. Good for creating period-style accents without carving solid wood—attach lightweight ornaments to furniture or cabinetry.
Outdoor-friendly decorative markers & stakes
Use the filler to build up motifs on wood garden stakes (names, plant icons, numbers). Because this formula is exterior-capable and resists cracking, once cured and fully sealed with an exterior primer and polyurethane or marine varnish it can withstand the elements. Make sets of herb markers, house numbers or painted garden signs.