Features
- Two-part epoxy paste to replace missing or rotted wood is resistant to dry rot, UV light, fresh and salt water
- Can be used in indoor and outdoor applications with an application temperature range of 35 to 115 degrees F and a service temperature range of -20 to 200 degrees F
- High tack helps reduce drips and sags while hardening
- Mix PC-Woody part B mwith PC-Woody part A in equal volumes on a flat surface using the tool included. DO NOT ATTEMPT TO MIX WITH GLOVES
- Not recommended to mix PC-Woody in teaspoon size increments or smaller simply because of the likelihood of an ‘off-ratio’ mix
Specifications
| Color | Tan |
| Size | 6 oz with Tool |
| Unit Count | 1 |
Related Tools
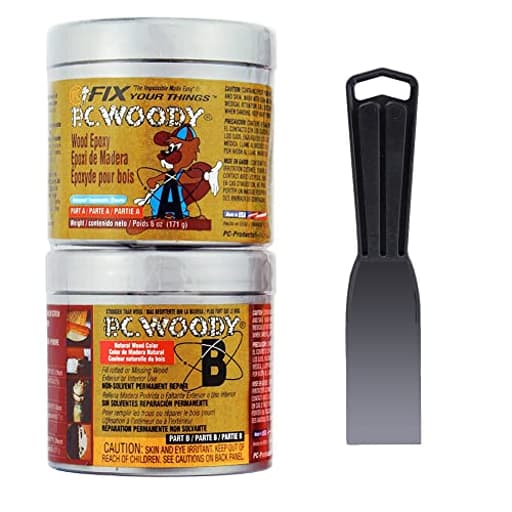
Two-part epoxy paste for replacing missing or rotted wood, supplied in two cans totaling 6 oz with an included mixing tool; tan color. It resists dry rot, UV, and fresh/salt water, can be applied at 35–115°F and used in service from −20 to 200°F; mix parts A and B in equal volumes on a flat surface with the included tool and avoid mixing with gloves or in very small (teaspoon) increments to prevent off‑ratio mixes.
PC Products PC-Woody Wood Repair Epoxy Paste Kit with Mixing Tool, Two-Part 6 oz in Two Cans, Tan Review
Why I reached for PC‑Woody
A rotted window sill can turn a simple paint job into a carpentry project. On a recent exterior refresh, I uncovered punky trim, screw holes that no longer held fast, and a chunked-out corner that would have meant replacing the entire board. I reached for PC‑Woody, a two-part epoxy paste, to see if I could restore the original profiles instead of rebuilding them.
What’s in the kit
The kit is straightforward: two cans (Part A and Part B) totaling 6 oz in tan, plus a mixing tool. It’s a paste—think peanut-butter consistency—meant to replace missing or rotted wood rather than just skim coat. It’s rated for indoor and outdoor use, resists dry rot, UV, fresh and salt water, and can be applied at 35–115°F with a service range down to −20°F and up to 200°F. In other words, it’s built for real-world conditions and exterior work.
Mixing and working time
PC‑Woody mixes 1:1 by volume. I strongly recommend portioning equal volumes onto a flat mixing board and using the included tool to blend until the color is uniform. Don’t try to “squish” it together with gloved hands—that’s a recipe for contamination and off-ratio blending. The manufacturer also warns against mixing in tiny (teaspoon) batches, and I can see why: too small a sample makes it easy to guess wrong on ratio and end up with tacky spots that never cure properly.
The working time is generous; this is not a rapid-set epoxy. On a mild day (around 70°F), I had plenty of time to press it into voids, shape profiles, and clean up edges. The trade-off is cure speed. Expect to leave it overnight before aggressive sanding or machining. This slow cure is a feature in some scenarios—big gap fills and detailed sculpting—but it means you can’t patch at lunch and paint by dinner.
Application: prep, build, and shape
Success with any wood repair compound begins with prep:
- Remove all loose and rotted wood. I use a chisel, oscillating tool, and a stiff brush.
- Make sure the area is dry. Trapping moisture invites problems.
- For deep voids, undercut edges slightly so the epoxy locks in mechanically.
- Dust off thoroughly.
The paste’s high tack is a double-edged sword. It’s excellent for staying put on vertical surfaces and in overhead repairs—no slumping or sagging in my experience—but it also wants to stick to your putty knife and ride back out of the hole. A few techniques help:
- Press it in with small, firm strokes rather than troweling long passes.
- Slightly overfill and plan to sand back after cure.
- Keep your tool clean. Wipe the blade frequently to prevent build-up.
- For deeper repairs, build in two lifts. The tack supports this well.
I used it to rebuild a rounded outside corner and to fill long grain splits. It feathers nicely at the edges if you take your time, and that tackiness keeps thin layers from curling or lifting.
Sanding, machining, and finishing
Once cured, PC‑Woody is hard—closer to wood than to a flexible filler. It sands cleanly and doesn’t gum up abrasives. Plan on 80–120 grit for rough shaping, then 180–220 for finishing before primer. I had no trouble routing a small chamfer after cure, and drilling for new screws felt confidence-inspiring. Where screw holes had wallowed out, the repaired substrate held threads tightly and didn’t flake.
Paint adhesion was excellent. After sanding and a quick dust-off, I primed with an exterior bonding primer and topcoated with acrylic latex. The tan base disappears under paint with no ghosting or telegraphing. I prefer to topcoat epoxy even if it’s advertised as UV resistant; it protects the repair and blends the sheen.
Outdoor performance
The real test for any epoxy paste is outdoors. I repaired exterior trim and a fascia return, then left them through a season of rain, sun, and freeze-thaw. PC‑Woody stayed stable: no shrink lines around the perimeter, no cracks, and no surface chalking showing through paint. The high tack during application translates to a solid interface with the wood; lightly undercut edges and proper prep make a difference here.
The wide application temperature range (35–115°F) is practical. I did one patch on a chilly morning in the high 40s; the paste was stiffer and the cure slower, but still workable. If you’re at the lower end of that range, expect to extend cure time. Conversely, in the heat you’ll have a shorter open time and a slightly softer mix during spread.
Strength and stability
PC‑Woody is not just a cosmetic filler. It bonds strongly and creates a repair you can actually use—screw into, plane lightly, and shape. For fastening into the repair (say, for a hinge screw that lost bite in the stile), I drill pilot holes and avoid over-torquing; the epoxy holds well when treated like hardwood. On larger rebuilds—like reconstructing a window sill nose—this paste has enough body to bridge broader spans when you back it with a form or build in lifts.
It’s worth noting what it’s not: it’s not a flexible caulk and not a structural beam repair product. Don’t use it across joints that move; it’s best on static, consolidated wood.
Usability trade-offs
Two aspects require patience:
- Stickiness during smoothing: That high tack that prevents sags also makes it tough to blade the surface perfectly flat. I treat this as a “sand to finish” system—get it close, then plan on sanding rather than chasing a perfect trowel finish. Overfilling slightly saves time later.
- Cure time: It cures slower than quick-dry fillers. If your schedule demands same-day paint, look elsewhere. If you value working time, gap-filling, and durability, the slower set is a fair trade.
The 6 oz size goes farther than you think for patch work, but a major rebuild can consume a kit quickly. For particularly punky substrates, I often consolidate the wood fibers first with a separate liquid consolidant; PC‑Woody adheres well to sound, sealed fibers, but it won’t solve moisture or rot that’s still active.
Practical tips from the bench
- Measure parts by volume, not by eye. Use the included tool on a flat, non-porous board and mix until the color is uniform.
- Avoid micro-batches. Mixing in teaspoon-sized amounts invites ratio errors and sticky cures.
- Work in lifts for deep cavities. The paste’s tack makes this easy and reduces trapped air.
- Overfill intentionally. It sands quickly once cured, and you’ll get crisper profiles.
- Prime before paint. Even with UV resistance, a primer and topcoat protect the repair and unify the sheen.
Where it shines, where it doesn’t
Best for:
- Exterior/interior trim, sills, casings, and fascia with missing or rotted sections
- Rebuilding corners, edges, and profiles where sag-free paste helps
- Restoring screw holding strength in stripped holes
- Environments with temperature swings and moisture exposure
Less ideal for:
- Joints that move (use a flexible system there)
- Projects requiring same-day paint
- Ultra-small touch-ups where precise ratio is hard to achieve
Verdict
PC‑Woody has become a go-to in my kit for serious wood repairs. Its peanut-butter body, high tack, and slow, steady cure make it easy to place and sculpt, and once it sets, it behaves like a dense, machinable wood. It sands cleanly, takes paint well, and stands up to weather. The trade-offs—sticky during application and not a fast cure—are manageable with good prep and workflow.
Recommendation: I recommend PC‑Woody for anyone tackling rot repair, missing trim sections, or stripped screw holes where longevity matters. If you can spare the cure time and aren’t expecting a butter-smooth trowel finish straight off the knife, it rewards you with durable, paint-ready repairs that hold up season after season.
Project Ideas
Business
Specialized Rotted-Wood Repair Service
Offer a focused service repairing window sills, door thresholds, fascia, and porch posts for homeowners. Use the epoxy paste to replace missing wood on-site for cost-effective, long-lasting repairs. Market the service for its weather resistance and fast turnaround; provide before/after photos and emphasize correct mixing practices and application temperature windows to ensure quality results.
Marine Trim & Small-Boat Repair Shop
Start a micro-business repairing cosmetic and small structural wood damage on boats (above-water areas) and marine trim. Leverage the paste's resistance to fresh/salt water and UV as a selling point. Offer mobile service at marinas for quick patch-and-paint jobs, and create bundled packages for winterizing and spring prep.
Furniture Upcycling & Resale
Use the epoxy paste to restore and stabilize vintage furniture pieces with rot or missing ornamentation, then refinish and sell them online or at markets. Position offerings as durable, restored antiques with a warranty on structural repairs; include a short note in listings explaining the marine- and UV-resistant repair materials used to assure buyers of longevity.
Workshops & DIY Repair Kits
Run local classes teaching homeowners how to repair rotted wood around the house with a two-part epoxy paste. Sell small starter kits (with measured jars, mixing tool, instructional cards) and digital guides. Emphasize best practices: equal-volume mixing on a flat surface with the included tool, avoid mixing with gloves, and avoid very tiny batches that risk off-ratio mixes.
Contractor Subcontract Specialty
Position yourself as a subcontractor to renovation companies that need reliable small-scale wood repairs (sills, trim, decorative elements) that are quicker and cheaper than full piece replacements. Provide quick estimates, fast turnaround, and documentation of materials and cure times; highlight the product's service temperature range and its resistance properties to differentiate from ordinary fillers.
Creative
Built-in Corbel & Trim Repairs
Use the epoxy paste to rebuild missing sections of interior trim, corbels, and decorative moulding. Pack the two-part paste into the damaged area, sculpt with the included mixing tool while tacky, let cure, then sand and paint to match. The paste's UV and moisture resistance makes repaired trim suitable for bathrooms or near windows; follow the 35–115°F application range and avoid mixing in very small amounts to keep the correct ratio.
Custom Faux-Wood Garden Accents
Sculpt small, weatherproof garden accents (finials, knotty-log toppers, planter trims) by building shapes on a substrate or form and carving after cure. Because the material resists fresh/salt water and UV, finished pieces can be left outdoors and painted or stained. Use the tan color as a base for faux-wood finishes and remember to mix parts A and B in equal volumes on a flat surface with the included tool.
Antique Frame & Furniture Restoration
Repair rotted corners or missing ornamentation on picture frames and small furniture elements by filling gaps, re-sculpting details, and blending into the original piece. The high tack reduces sagging on vertical pieces while curing. After sanding and finishing, restored antiques can be resold or kept — practice small patches first (but not teaspoon-size mixes) to avoid off-ratio issues.
Nautical Décor & Mini Boat Fixes
Create durable nautical décor (cleat replicas, mini buoys, dock plaques) or use the paste for small above-water boat repairs where a putty-style filler is needed. Its resistance to salt water and UV makes it ideal for seaside décor and trim. Sculpt, cure, and paint with marine-grade finishes; observe the product's service temperature range of −20 to 200°F for outdoor use.
Custom House Numbers & Door Hardware Bases
Form weatherproof bases or mounting blocks for house numbers, mailbox plaques, and door hardware. The tan color blends well under paint or stain, and the cured material provides a solid substrate for screws and anchors. Apply in the recommended temperature range and use enough volume to ensure a proper equal-volume mix so the repair is strong and long-lasting.