A messy workspace slows you down. Color-coded tool storage fixes this by assigning colors to tools and their storage spots, making organization simple and quick. Here’s why it works and how to set it up:
- What It Is: Each tool type (e.g., hammers, screwdrivers) gets a specific color for easy identification.
- Why It Helps: Speeds up finding tools, reduces misplaced items, and keeps your workspace organized.
- How to Start: Pick durable, high-contrast colors. Mark tools and storage areas using tape, paint, or foam liners.
- Maintenance: Create a reference guide, train users, and check weekly for misplaced items.
For advanced tracking, pair this system with digital tools like Toolstash to monitor tool usage and location. Start small, stay consistent, and enjoy a more efficient workspace.
How To Color Code Your Socket Set, Wrenches, Ratchet, Cases, Tools & Do It Yourself
How to Choose Colors
Selecting the right colors for your tools and storage setup isn't just about aesthetics - it’s about making your workspace more efficient and organized. Thoughtful color choices can improve visibility, simplify tool identification, and enhance overall functionality.
Color Selection Guidelines
Focus on visibility. Pick colors that stand out under your shop's lighting conditions. Test them out before applying them across your setup. High contrast is key - tools with bright outlines against dark foam backgrounds make it easy to spot missing items and speed up identification.
Stick to a simple palette. Using a limited range of colors for primary categories reduces confusion and makes it easier to recognize tools at a glance.
Think about durability. Opt for vibrant, durable colors that can withstand dirt and grime. Saturated colors tend to perform better in workshop environments compared to muted tones or pastels.
Common Color Assignments
Certain colors naturally align with specific tool categories, making them effective choices for many workshops:
- Red: Best for safety tools and emergency equipment. Its high visibility and association with urgency make it ideal for these items.
- Yellow: Perfect for frequently used hand tools like hammers. Its brightness ensures tools are easy to locate.
- Blue: A great match for precision tools like measuring devices and drill bits, as it conveys a sense of accuracy and focus.
- Green: Suited for maintenance and cleaning supplies, reflecting ideas of care and upkeep.
| Color | Best For | Why It Works |
|---|---|---|
| Red | Safety tools, emergency equipment | Highly visible, signals urgency |
| Yellow | Hammers, frequently used tools | Bright and easy to spot |
| Blue | Precision tools, measuring devices | Conveys accuracy and focus |
| Green | Maintenance and cleaning supplies | Associated with care and upkeep |
Customizing Colors for Your Workshop
Once you’ve got the basics down, tweak your color scheme to suit your specific workspace. Tailored choices can make your setup even more efficient, complementing tool-marking methods and maintaining consistency.
- Home Garages: Warmer, less industrial color schemes often work better in home settings. Choose colors that blend with your garage’s overall design.
- Professional Workshops: Stick to industrial color schemes with standardized associations. This ensures everyone in the space can quickly identify and organize tools.
Don’t forget to factor in your tool collection and storage setup. Large tool collections may need subcategories within your main color scheme. Additionally, the type of storage - pegboards, drawers, or open shelving - can impact how colors appear. Adjust your approach to fit your unique workspace for the best results.
Setting Up Your Color-Coded System
Start your color-coding system by clearly marking tools and storage areas with consistent visual cues. Applying your chosen colors systematically ensures everything stays organized and easy to find.
Marking Tools and Storage Areas
Once you've picked your colors, mark your tools and their storage spots carefully. Use durable materials like vinyl tape or industrial-grade paint for a long-lasting setup. Colored vinyl tape is a great option - it’s tough, affordable, and comes in a variety of colors. Wrap a strip of tape around tool handles or place it on a metal surface near the grip, ensuring it doesn’t interfere with the tool’s function.
For storage areas, use the same colored tape to outline spaces on pegboards or mark the edges of bins. If you’re looking for something more permanent, industrial paint is a solid choice. Opt for paints designed for workshop environments, as they can handle oils, solvents, and frequent use.
Adhesive labels are another effective option, especially for smooth surfaces like toolbox drawers or cabinet doors. Look for workshop-specific labels that resist dirt and moisture better than standard office labels. The key is to match the colors of your tools with their designated storage areas. For example, a yellow hammer should sit in a yellow-marked spot on the pegboard. If it’s missing, the empty space will clearly show the color outline, making it easy to see what’s out of place.
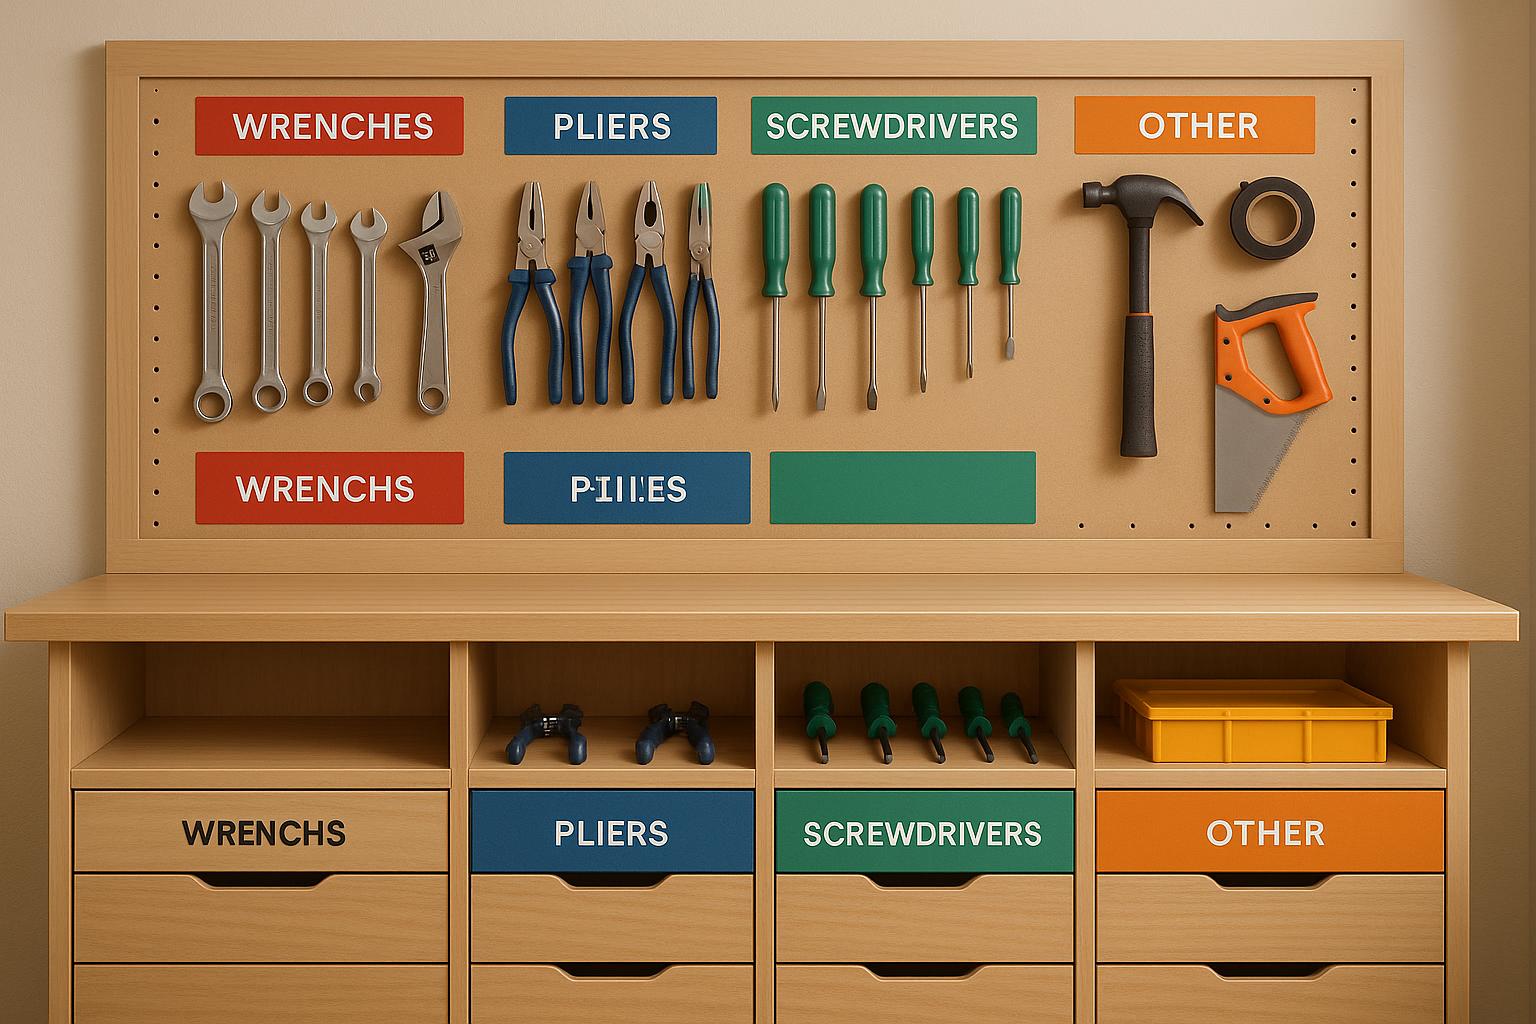
Using Shadow Boards and Foam Liners
Shadow boards take your color system to the next level by providing instant visual feedback. These wall-mounted boards use colored outlines to show where each tool belongs. When a tool is removed, the bright background becomes visible, making it obvious what’s missing.
To create a shadow board, trace each tool onto the board and outline it with vinyl shadow board tape. Choose a tape color that contrasts with both the tool and the board’s background for easy visibility during inventory checks.
For drawer storage, foam liners offer a compact and effective solution. Use a two-layer system: cut tool shapes from dark foam and place them over a bright-colored base sheet. When a tool is removed - say, a screwdriver - the bright base color shows through, making it clear what’s missing. This method not only keeps your tools organized but also reduces the risk of losing them.
| Method | Best Application | Key Advantage | Typical Cost Range |
|---|---|---|---|
| Colored Vinyl Tape | Pegboards, wall storage | Quick visibility of missing tools | $5–$15 per roll |
| Foam Liners | Toolbox drawers | Custom fit, two-color contrast | $20–$100+ depending on size |
| Shadow Board Tape | Industrial workshops | Professional look, durable | $10–$25 per roll |
Keeping Colors Consistent
Consistency is the backbone of a successful color-coding system. If tools are returned to the wrong spot or assigned incorrect colors, the system becomes unreliable. To avoid this, create a reference guide that links each color to a specific tool category. For example, assign blue to precision tools, red to safety equipment, and yellow to frequently used hand tools.
Make sure everyone using the workspace knows the system. Post the reference guide in a visible spot and review it with new users. Emphasize that the system only works if tools are consistently returned to their proper places.
Regular upkeep is just as important. Check weekly for misplaced tools or mismatched colors, and fix any issues immediately. Replace faded or peeling tape before it becomes unreadable. When adding new tools, assign them colors based on your existing system and update the reference guide.
To streamline things further, consider using digital tools. Platforms like Toolstash let you tag tools with the same color categories, ensuring your physical and digital systems stay aligned. This is especially helpful in shared workspaces.
Maintaining Your System
Once you've set up your color-coded system, keeping it in good shape is key to ensuring it remains an effective tool for organization. Regular upkeep and training are essential to maintaining its reliability.
Making a Reference Guide
Start by creating a clear and durable reference guide that outlines each color and its corresponding tool category. For example, blue could represent precision tools like calipers and micrometers, while red might be for safety gear like goggles and ear protection. Adding examples helps eliminate any confusion.
Use sturdy materials such as laminated paper or vinyl signage to make the guide suitable for workshop conditions. Ensure the guide is large enough to read from a distance, with bold text and color swatches that match your actual storage system. The goal is to make it as easy as possible for users to identify and follow the system.
While a physical guide is essential, having a digital version is equally valuable. A digital copy can be shared with new team members or accessed remotely when you're away from the workshop. You can also integrate tools like Toolstash's digital inventory tracking to complement your physical guide, ensuring your system remains accurate and up-to-date.
As your system evolves, document any changes. For instance, if you add a new tool category or reassign a color, update your guide immediately. An outdated reference guide can create more confusion than having no guide at all. Replace old versions promptly to avoid mix-ups.
Once your guide is finalized, make sure everyone on your team knows how to use it effectively.
Training and Follow-Up
With your reference guide in place, kick off user training. This step is crucial for ensuring everyone understands and uses the system properly. Spend about 15-20 minutes walking through each color category with your team. Show them where each tool belongs and how the visual cues work. For example, point out how the yellow outline on the pegboard matches the yellow tape on the hammer handle.
To keep the system running smoothly, schedule regular follow-ups. A quick 5-minute refresher every few months can reinforce the system and address any questions or concerns that have come up.
Accountability is another important factor. Conduct weekly spot checks to ensure tools are being returned to their correct locations. If something is out of place, address it immediately to prevent small issues from snowballing into larger ones.
Encourage feedback from your team. This could be as simple as asking whether a particular category is becoming overcrowded or if a frequently used tool needs a more accessible spot. Regular input helps you identify and resolve problems before they disrupt the entire system.
For workshops with multiple users, consider assigning responsibility for maintaining the system. Some teams conduct weekly audits where the last person to use the workspace ensures everything is properly stored. Others rotate this responsibility, giving everyone a role in keeping the system organized.
Digital tools can make training and follow-up even easier. For example, Toolstash's inventory tracking features let you see where tools are in real time, helping you quickly spot items that aren't returned to their designated zones. Its lending management capabilities also make it clear whether a tool is missing or just temporarily borrowed.
Finally, pay extra attention to new users. During their first few weeks, pair them with experienced team members who can guide them through the system. This hands-on mentorship often works better than formal training alone, as people learn best through repeated, practical use of the system.
Using Toolstash with Color Codes
Pairing a physical color-coded system with digital tracking can transform how you manage tools. Toolstash, a tool management platform, works seamlessly with your color-coded setup, creating a hybrid system that combines visual organization with digital precision.
Imagine this: a missing tool on your color-coded board not only leaves a visual gap but also triggers a digital alert. While your pegboards and foam liners provide instant feedback, Toolstash’s digital layer pinpoints where the tool is, who has it, and when it’s expected back. This integration bridges the gap between physical and digital systems, making tool management smoother and more efficient.
Digital Inventory Tracking
Toolstash takes your color-coded storage to the next level by digitizing every detail. You can assign custom color codes in the platform that align perfectly with your physical system, ensuring consistency across both.
One standout feature is AI Snap, which simplifies inventory creation. Instead of manually entering tool details, just snap a photo, and the AI automatically identifies and categorizes the tool. This eliminates the hassle of data entry, making it easier to maintain accurate digital records.
Toolstash updates tool statuses in real time, reflecting the gaps in your physical system. For example, if a hammer is missing from its yellow-outlined spot on your pegboard, Toolstash can show whether it’s checked out, borrowed, or misplaced. This saves time spent searching and reduces the frustration of missing tools.
For workshops with expensive or specialized tools, this digital layer adds accountability. Every tool movement is tracked, creating an audit trail that complements your visual system and minimizes the risk of loss.
Smart Categorization and Location Features
Toolstash doesn’t just track tools; it learns your organizational habits. If you use blue for precision tools, the platform recognizes this and suggests blue for new measuring instruments. This smart categorization keeps your system intuitive without requiring constant manual input.
Machine learning also groups similar tools together. For instance, when you add a new type of wrench, Toolstash suggests categorizing it with your existing wrenches, ensuring your setup remains logical and easy to navigate.
Location tracking adds another layer of precision. Whether a tool is in a drawer, on a pegboard, or checked out to a job site, Toolstash records its exact location. If a blue-coded drill isn’t in its bin, the platform shows its last known location or current user. This feature is especially helpful when reorganizing or expanding your storage system, as it keeps everything accurately documented during transitions.
Toolstash also generates reports that highlight trends in tool usage. For example, you can see which color-coded categories are accessed most often or which tools frequently go missing. These insights help you optimize your storage layout and adjust your inventory to meet demand.
Tool Lending and Data Management
In shared workshops, Toolstash’s lending management features make it easier to keep track of who has what. The platform handles check-ins and check-outs, sends reminders for overdue returns, and logs every tool’s movement. This is especially useful for maintaining order in color-coded systems where multiple users share tools.
For instance, if someone borrows a red-coded safety tool, others can check its status in Toolstash instead of wondering why it’s missing. QR codes and tool numbers link physical tools to their digital records, ensuring they’re returned to the correct spot.
Toolstash also safeguards your data, storing maintenance records, purchase details, and usage histories securely. This is particularly important for businesses managing high-value or specialized tools, providing both physical and digital protection.
As your system grows, Toolstash’s digital records serve as a reliable backup. Reporting features can identify patterns, such as tools with high borrowing rates, helping you decide whether to expand storage areas or add duplicate tools to reduce bottlenecks. By combining physical organization with digital tools, Toolstash simplifies management and keeps your system running efficiently.
Conclusion
Creating an effective organizational system starts with careful planning, consistent color usage, and a blend of physical and digital tools. Begin by assigning meaningful colors, clearly labeling tools and storage areas, and ensuring regular training sessions to keep everyone aligned.
Once your physical system is in place, integrating digital tools takes it to the next level. For example, while color-coded pegboards and foam liners offer quick visual cues for missing tools, a platform like Toolstash adds another layer of precision and accountability. Together, these systems create a seamless approach to tool management, transforming a basic setup into a well-rounded, efficient solution.
Consistency in color assignments across your workspace is key. A little effort upfront can save countless hours in the long run. Workers can quickly locate tools, expensive equipment stays accounted for, and the clear, visual system simplifies training for new team members. Whether you're organizing your home garage or managing a professional workshop, combining smart color choices with digital tools ensures smooth operations and long-term reliability.
Start small - focus on one category of tools, refine your system, and then expand. Over time, this thoughtful approach will save you frustration and make every task more efficient. You’ll appreciate the effort every time you grab the right tool from its designated spot.
FAQs
What’s the best way to choose colors for organizing tools in my workspace?
When organizing your tools with a color-coded system, start by sorting them into categories based on their function, size, or how often you use them. Then, assign bright, easily distinguishable colors to each group - colors like red, blue, or yellow are great for quick identification. For instance, you could designate green for gardening tools, red for power tools, and blue for hand tools.
To keep things consistent, use the same color scheme across all storage spaces, including toolboxes, shelves, and pegboards. Adding labels with the tool category names can further reinforce the system. This approach not only keeps your workspace tidy but also makes it much easier to find the tools you need without hassle.
What should I watch out for when creating a color-coded tool storage system?
When creating a color-coded tool storage system, there are a few pitfalls you’ll want to steer clear of to keep things running smoothly:
- Overloading with colors: Using too many colors can complicate the system and make it harder to remember what’s what. Stick to a simple, easy-to-follow palette with clear distinctions between categories.
- Inconsistent labeling: Relying solely on colors without consistent labels can cause confusion. Combine colors with clear, easy-to-read labels to keep things organized and intuitive.
- Skipping the planning phase: Jumping straight into color coding without a clear strategy can lead to a messy, inefficient system. Take the time to plan out your approach before diving in.
By avoiding these common mistakes, you can set up a system that saves time and makes locating tools a breeze. Tools like Toolstash can even help you maintain consistency and keep track of your inventory effortlessly.
How can Toolstash make a color-coded tool storage system more efficient?
Toolstash takes the hassle out of managing a color-coded tool storage system by providing features like location tracking, smart categorization, and detailed inventory management. These capabilities help keep your tools well-organized and easy to find.
Thanks to its AI-powered tool addition, adding new tools to your inventory becomes a breeze. This feature not only saves time but also minimizes mistakes. By combining digital management with your existing color-coded system, Toolstash ensures consistency, helps you locate tools faster, and makes your workflow more efficient.