Want to organize your tools efficiently and save space? A DIY wall-mounted tool storage system is the solution. By utilizing your walls, you can keep tools visible, accessible, and off the floor, creating a cleaner and safer workspace. Whether you’re a homeowner or a professional, this setup can help you avoid clutter, protect valuable tools, and streamline your projects.
Key Takeaways:
- Save Space: Move tools off the floor and onto walls, freeing up room for work.
- Stay Organized: Group tools by type and frequency of use to avoid duplicates and lost items.
- Increase Safety: Reduce trip hazards and keep sharp tools out of reach of kids and pets.
- Cost: Expect to spend $150–$350 per linear foot for materials, with 4–6 hours of work needed.
- Customization: Combine pegboards, shelves, slatwalls, or cabinets for a tailored setup.
Steps to Build:
- Plan: Take inventory of your tools and measure wall space.
- Design: Choose a system (pegboard, shelves, slatwall, or cabinets) based on your tools.
- Prepare Materials: Use plywood, screws, and optional features like hooks or bins.
- Build & Install: Assemble the system, mount it securely to studs, and finish it with paint or stain.
- Maintain: Regularly check for loose fasteners and reorganize as needed.
Pair your setup with digital tools like Toolstash to track inventory, categorize tools, and prevent misplacement. A well-planned system saves time, protects your tools, and keeps your workspace efficient.
How to Build a French Cleat Wall System | Easy DIY Tool Storage
Planning Your Wall-Mounted Tool Storage System
Creating a wall-mounted tool storage system that fits your collection and workspace is all about planning. Knowing what you have, where it will go, and how you'll use it can save you time, money, and plenty of headaches down the road. Start by taking stock of your tools to design a system that works for you.
Reviewing Your Tool Collection
Gather every tool you own in one spot - whether it’s on a table or the garage floor - and take a good look at what you’re working with.
Start by grouping your tools into categories: hand tools like screwdrivers and wrenches, power tools such as drills and saws, measuring tools, and any specialty items. Once sorted, think about how often you use each tool. Tools you reach for daily should be easy to grab - store them at eye level or within arm’s reach of your main work area. Tools you use weekly can go slightly higher or to the side, while rarely used items can be tucked away in less accessible spots.
For heavy power tools, make sure you have sturdy shelves that can handle the weight. Lighter tools, like hammers or pliers, can go on a pegboard. Measure your largest tools to ensure your storage system has enough clearance, and don’t forget about accessories like drill bits, saw blades, and extension cords - they need their own organized spaces too.
Plan for growth. Tool collections have a way of expanding quickly, so leave extra room to avoid overcrowding later. Having a clear inventory now will help you design a system where everything has its place.
If you want to take it a step further, consider using a digital tool management app like Toolstash. It lets you keep detailed records of your tools, automatically organizes them into categories, and uses AI-powered photo recognition to add new items easily. This can help you spot storage patterns and plan the ideal layout for your wall-mounted system. Once you’ve organized your tools, it’s time to measure your wall space.
Measuring and Preparing Your Wall Space
Grab a tape measure and record the width and height of your available wall space. Keep an eye out for anything that could disrupt your layout, like outlets, light switches, windows, or doors.
Use a stud finder to locate the wall studs, as these will provide the support needed for mounting. Mark the stud locations clearly with a pencil. Attaching storage directly to drywall without stud support can lead to disaster - tools and walls don’t mix well when things come crashing down.
Measure the distance between the studs, which is typically 16 or 24 inches on center. This spacing will impact how you design your storage system. Use a level to ensure your marks are straight and aligned before starting construction.
Don’t forget about clearance. Leave at least three feet of space in front of your storage area for comfortable access, and double-check that cabinet doors or drawers won’t interfere with garage doors, windows, or other fixtures when opened.
To avoid costly mistakes, sketch a scale drawing of your wall and mark where each storage component will go. Be mindful of the depth of your system - deep shelves or cabinets could interfere with parking or other activities in your garage. With accurate measurements and clear stud markings, you’ll be ready to choose a storage design that fits your workflow.
Selecting a Storage Design
Now that your tools are organized and your wall space is measured, it’s time to pick a storage design that suits your needs. This choice will depend on the types of tools you own, the size of your space, and how you like to work.
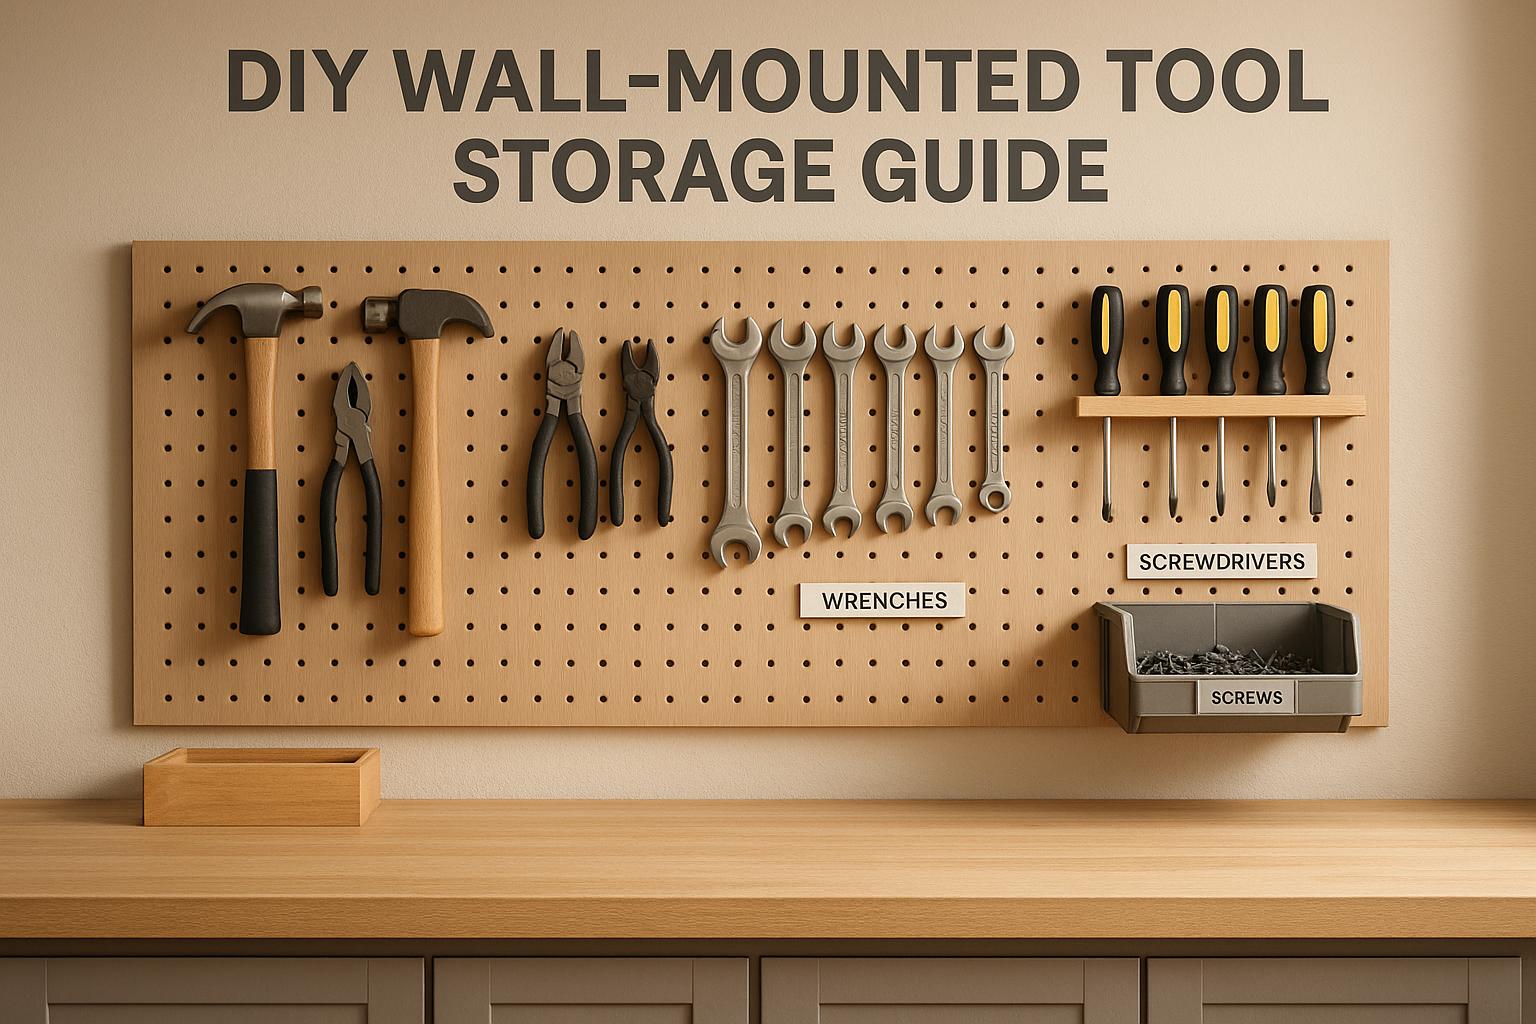
Pegboards are great for hand tools and small items. They’re flexible, allowing you to rearrange hooks and holders as needed, and they keep everything visible and easy to access. However, they’re best for lighter tools since they can’t handle much weight.
Open shelves are ideal for larger items like power tools, toolboxes, and supplies. They’re simple to build and budget-friendly, but they can look messy if not organized properly. Dust buildup can also be an issue in garages.
Slatwall systems offer a highly customizable solution with holders designed for different tool types. They can handle more weight than pegboards and provide a polished, professional look. However, they tend to be more expensive and require more effort to install.
Cabinet-style storage is perfect for keeping valuable tools secure and dust-free. Adjustable shelves make it easy to store tools of various sizes, and the doors help hide clutter. The downside is that cabinets take up more wall space and reduce visibility, making it harder to quickly grab what you need.
| Design Type | Pros | Cons | Best Use Cases |
|---|---|---|---|
| Pegboard | Flexible, easy access, affordable | Limited weight capacity | Hand tools, small accessories, daily items |
| Open Shelves | Visible, easy to reach, low cost | Can look cluttered, collects dust | Power tools, bins, supplies |
| Slatwall | Customizable, supports heavier tools | Higher cost, complex installation | Mixed tool types, versatile setups |
| Cabinet-Style | Secure, dust-free, adjustable shelves | Requires more space, less tool visibility | Valuable tools, rarely used items |
If you’re building a custom wall-mounted cabinet, expect to spend between $150 and $350 per linear foot, depending on your materials and design complexity. For a moderately skilled DIYer, the project should take about 4 to 6 hours to complete[3].
For the best results, consider mixing and matching storage types. Many setups use pegboards for frequently used hand tools, shelves for power tools and supplies, and cabinets for valuable or rarely used items. This combination lets you enjoy the strengths of each system while minimizing their drawbacks.
Materials and Tools Required
Before diving into your project, it's smart to gather all the materials and tools you'll need. This not only saves you from extra trips to the hardware store but also keeps the workflow smooth. While the exact list depends on your design, most wall-mounted storage systems share some common elements. Let’s break it down.
Required Materials
For the main structure, 3/4-inch plywood is a go-to choice. A single 4' x 8' sheet, priced between $50 and $80, provides plenty of material for a sturdy storage panel. Opt for cabinet-grade birch or maple plywood for a better finish and durability, though it’s pricier. Budget-friendly options like OSB or MDF are cheaper but require more effort to finish and aren’t as durable.
For backing panels or lighter shelves, 1/2-inch plywood works well. One 4' x 8' sheet usually costs $40 to $60. If your design includes pegboard sections, pick up a 1/4-inch pegboard sheet, which typically costs $20 to $30.
You'll also need several 8-foot 1x3-inch pine boards for frames, cleats, and trim. These cost around $8 to $12 each.
Fasteners are essential. Stock up on 2-inch wood screws for general assembly and 1 5/8-inch screws for thinner materials. A one-pound box costs $6 to $10. For mounting to wall studs, use 2-inch wood screws. If you're mounting to drywall without studs, invest in toggle bolts or heavy-duty wall anchors rated for at least 50 pounds per anchor.
Other essentials include wood glue for reinforcing joints ($4 to $8 for an 8-ounce bottle) and sandpaper (120 to 220 grit) to smooth edges and prep surfaces for finishing.
To protect and enhance the look of your storage system, consider paint, stain, or polyurethane. These finishing supplies cost $15 to $30 per quart. Alternatively, pre-finished plywood can save time and effort while offering a polished look.
| Material | Typical Size/Type | Estimated Price (USD) |
|---|---|---|
| 3/4" plywood (main panels) | 4' x 8' sheet | $50–$80 |
| 1/2" plywood (backing) | 4' x 8' sheet | $40–$60 |
| 1/4" pegboard | 4' x 8' sheet | $20–$30 |
| 1x3" pine boards | 8' length | $8–$12 |
| Wood screws (1 lb box) | 2", 1 5/8" | $6–$10 |
| Wood glue | 8 oz bottle | $4–$8 |
Tools You'll Need
A circular saw is essential for cutting plywood and boards, with prices ranging from $60 to $150. If you have access to a table saw, it’s even better for precise cuts, especially when working on grooves or joints.
A cordless drill/driver is another must-have, costing $40 to $120. An impact driver can speed up screw-driving tasks, but it’s optional.
Accuracy is key, so gather measuring and marking tools like a tape measure, stud finder, and level. These tools typically cost $30 to $60 combined.
For cleaner, hidden joints, a pocket hole jig is a great investment, priced between $30 and $100. To hold pieces in place during assembly, you’ll need bar clamps; a set of four 24-inch clamps costs $40 to $80.
A jigsaw is handy for custom cuts, such as curves or intricate shapes. Expect to pay $50 to $120 for a decent model.
Don’t forget safety gear: safety glasses, a dust mask or respirator, and work gloves. This essential protection costs $5 to $20 total and is non-negotiable for safe working conditions.
Optional Materials for Customization
Once you’ve got the basics, you can add some optional components to make your storage system even more functional and tailored to your needs.
- Hooks and hangers: Pegboard hooks ($1 to $3 each) and heavy-duty wall hooks ($5 to $15) are perfect for organizing tools.
- Magnetic strips: These hold metal tools like screwdrivers and wrenches securely. A 12 to 18-inch strip costs $10 to $25.
- Plastic bins and containers: Keep small items organized. Clear bins range from $3 to $15 depending on size.
- Drawer slides: Add pull-out shelves or trays for easier access. Good-quality slides cost $15 to $40 per pair.
- Metal shelf standards and clips: These allow for adjustable shelving systems and cost $10 to $20 for a complete set.
- Piano hinges: Ideal for fold-down work surfaces or tool panels, priced at $10 to $20 for 30 to 48-inch lengths.
- Door pulls: Add style and functionality to cabinet doors. Basic pulls cost $5 to $15 each.
You can also use scrap wood to create custom holders and brackets for specific tools, ensuring everything has a designated spot. To take it a step further, consider using Toolstash for inventory tracking, smart categorization, and AI-powered tool management. It complements your physical setup and helps you stay organized.
Step-by-Step Construction Guide
With your materials and tools ready, it's time to dive into the building process. This stage demands precision and patience, but by following these steps, you’ll create a storage system that’s both sturdy and practical.
Cutting and Preparing Materials
Start by measuring your wall space to confirm the dimensions of your storage system. A common panel size is 30″ high by 48″ wide, but you should adjust these to fit your specific needs[2]. Use a carpenter's pencil and square to mark your cut lines, and always double-check your measurements before cutting - this helps reduce errors and prevents wasting materials.
When using power tools, prioritize safety. Wear safety glasses, a dust mask, and hearing protection. Secure your plywood panels with clamps while cutting, keep your hands clear of the blades, and follow the manufacturer’s safety guidelines. Always unplug tools when changing blades or bits. Before installation, reconfirm the location of wall studs and mark these spots on both the wall and your back panel to ensure everything aligns perfectly during assembly[2].
Once all your materials are cut and prepped, you’re ready to move on to assembling the structure.
Building the Storage System
Lay out all the cut pieces in your workspace to stay organized. Sand each surface with 120–220 grit sandpaper to remove splinters and create a smooth finish[2]. Apply wood glue to the joints for added strength before securing them with screws. Work on a flat surface, and use bar clamps to hold pieces in place. Check frequently with a square to ensure proper angles. To keep the spacing between tool holders consistent, use scrap wood as spacers for a polished, professional look[2].
For example, MWA Woodworks crafted a custom tool storage wall using pre-finished maple plywood with routed grooves to keep tools precisely organized[2].
Once the structure is assembled, pre-drill mounting holes in the back panel to align with your marked stud positions. This step prevents the wood from splitting and ensures clean, precise holes for mounting.
With the main structure complete, you’re ready to install and add the finishing touches.
Installing and Finishing
After assembly, mount the system securely to your pre-marked studs. Before installation, apply your preferred finish - whether it’s polyurethane, paint, or stain - to protect the wood and enhance the look of your workspace[2]. For a polished appearance, consider using pre-finished plywood or adding edge banding. Allow the finish to dry completely before proceeding.
When mounting, use a stud finder to locate the wall studs again and pre-drill holes to prevent splitting. Secure the unit to the studs with 2.5″–3″ cabinet screws to ensure it can handle the weight of your tools[2]. For heavier setups, use washers with the screws for additional support, and space the fasteners evenly along the top and bottom of the unit.
If you’re mounting larger panels, grab a helper to keep everything aligned. Use a level to make sure the system is straight before tightening the screws. Once mounted, you can add custom holders made from leftover materials to create specific spots for each tool[2].
For an extra layer of organization, consider integrating Toolstash. This feature helps with smart categorization and location tracking, making it especially useful for larger or shared workshops.
Finally, check the stability of your installation by gently pressing on different sections. If any area feels loose, tighten the screws or add more fasteners to ensure everything is secure and ready for use.
Customization and Maintenance Ideas
Improve your DIY wall-mounted tool storage system with thoughtful upgrades and consistent maintenance to keep it aligned with your needs.
Adding Adjustable Features
Incorporating adjustable elements like movable shelves, modular racks, or bins can make your storage more flexible as your tool collection grows [1][3]. Pre-drilled pin holes or slotted standards let you change shelf heights easily [3]. Installing a pegboard or French cleat system is another smart move - these systems allow you to reposition hooks and holders or add new ones with minimal effort [2][3]. French cleats, in particular, make it possible to swap out entire sections of storage without dealing with individual components. Just ensure your wall panel is securely anchored to studs and leave about 20% extra space for future tools to avoid overcrowding. For even better organization, consider designing custom holders for specific tools [2].
You can also integrate digital tracking tools for a seamless connection between your physical and digital organization.
Using Digital Tool Management
Digital tools like Toolstash can revolutionize how you manage your tools. This software offers features like inventory tracking, AI-assisted tool addition, and smart categorization, helping you keep tabs on your collection, track borrowed tools, and plan future purchases. Pairing it with your physical storage system makes finding and organizing tools in larger or shared workshops much easier.
With Toolstash's "Track Your Tools" feature, you can create a complete inventory of the tools on your wall-mounted system. The "AI Snap" function simplifies adding new tools - just snap a photo, and your digital inventory updates instantly.
Using "Smart Categorization", group your tools logically - like woodworking tools in one section and electrical tools in another - then align your wall-mounted storage to match these categories. This creates a smooth workflow between your digital and physical setups.
For precise tracking, assign each tool a specific spot using labels such as "Pegboard Section A, Hook 3" or "Shelf 2, Bin 5." Toolstash’s "Detailed Records" feature lets you store important details like tool dimensions, frequency of use, or required accessories, which can guide future tweaks to your storage system.
By combining digital updates with physical maintenance, you can keep your system running efficiently.
Maintaining Your Storage System
Regular upkeep is key to ensuring your storage system stays safe and functional. Inspect for loose fasteners, damaged components, or dust buildup on shelves and bins [1][2]. Every few months, check mounting screws, brackets, and overall system integrity for signs of wear, looseness, or moisture damage [2].
Use a shop vacuum or microfiber cloth to clean surfaces, and for wooden parts, apply a wood-safe cleaner and occasionally use mineral oil or wax to keep them in good condition [1]. For metal racks, wipe them down with a damp cloth and dry thoroughly to prevent rust [1], especially in areas prone to moisture or metal shavings.
Periodically reorganize your tools to optimize space and accessibility. Replace worn-out holders or accessories as needed, and adjust the layout to keep frequently used tools within easy reach while storing less-used items out of the way.
Be vigilant about safety - check for sagging shelves, bent hooks, or any signs that the mounting system is pulling away from the wall. Address these issues immediately to prevent accidents. Always secure storage units to wall studs, and if you’ve added significant weight since installation, consider upgrading to larger screws or adding extra mounting points.
Building a custom wall-mounted tool storage system in the U.S. typically costs between $75 and $300 [1][3], and ongoing maintenance costs are minimal with proactive care. Combining digital tracking with regular maintenance ensures your system stays organized and functional for years to come.
Conclusion
A DIY wall-mounted system can transform a cluttered workspace into a well-organized haven. The process is straightforward: take stock of your tools, measure your wall space, choose a design that fits your needs, gather the necessary materials, and assemble and install the system with care. On average, this project costs between $150 and $350 per linear foot and takes about 4 to 6 hours to complete [3]. The result? Less time wasted searching for tools and a lot less frustration.
But why stop at just the physical setup? Pairing your wall-mounted system with digital management tools takes your organization to another level. With features like inventory tracking, AI-powered tool recognition via photos, and precise location tracking, you’ll never have to wonder which tool is missing or where it’s stored. A quick glance at your digital inventory tells you exactly which hook or shelf holds that elusive wrench or screwdriver.
Smart categorization and digital tracking also simplify lending tools to friends or family. Instead of losing track of borrowed items, platforms like Toolstash keep tabs on who has what, saving you from endless searches. Plus, the built-in AI assistant can even suggest DIY projects tailored to the tools you already own, making it easier to dive into your next project.
Your system can grow and adapt over time. With modular components, adjustable features, and routine maintenance, you’ll have a setup that evolves alongside your expanding tool collection and skillset. And with digital tools keeping everything in check, you won’t lose track of anything - even during your busiest project days.
FAQs
What’s the best way to choose a wall-mounted storage system that fits my tools and workspace?
To choose the best wall-mounted storage system, start by assessing your tool collection's size, variety, and the available space in your workspace. Think about how frequently you use certain tools, the weight of the items, and whether you’ll need the option to rearrange or expand the system in the future.
A tool management platform like Toolstash can make this process much easier. With features such as smart categorization and AI-driven tool addition, it helps you maintain an organized inventory, visualize your storage needs, and design a system that prioritizes both efficiency and accessibility.
What should I avoid when installing a wall-mounted tool storage system to make sure it’s safe and long-lasting?
To make sure your wall-mounted tool storage system is both secure and long-lasting, steer clear of these frequent missteps:
- Skipping wall stud checks: Always secure heavy storage systems directly into wall studs, not just drywall. Wall studs provide the strength needed to support the weight of your tools safely.
- Using the wrong hardware: Be sure to select screws, anchors, and brackets designed to handle the weight of your tools. Using hardware that's too light or unsuitable can make the system unstable.
- Overloading the system: Even the strongest storage setups have weight limits. Exceeding these limits can lead to damage or even accidents.
By taking the time to plan properly and choosing the right materials, you can set up a tool storage system that’s safe and dependable for your workspace.
How can I use digital tools like Toolstash to better organize my tools and improve my wall-mounted storage system?
Digital tools like Toolstash can transform how you manage your wall-mounted tool storage. With this app, you can keep a detailed inventory of your tools, track their exact locations, and sort them into categories for quick and easy access. Thanks to its AI-powered features, you can even add tools by snapping a photo, and it offers personalized DIY tips based on the tools you own.
Toolstash also simplifies lending and borrowing tools with friends, so you’ll always know who has what. By combining digital organization with your physical setup, you can save time, cut down on clutter, and keep your workspace efficient and hassle-free.