Want a workspace that works with you, not against you? An ergonomic workbench reduces strain, increases comfort, and helps you work more efficiently. Here’s the key to getting it right:
- Height matters: Sitting? Go for 27″–30″. Standing? Use 36″–42″ depending on the task.
- Tool placement: Keep frequently used tools within 15–20 inches of reach.
- Safety first: Rounded edges, sturdy materials, and anti-fatigue mats minimize risks.
- Lighting and power: Bright, adjustable lighting and easily accessible outlets are must-haves.
- Stay organized: Use pegboards, labeled bins, and modular storage to keep tools in order.
A well-designed workbench isn’t just about comfort - it’s about working smarter and staying focused on your projects. Let’s break down how to set up your perfect DIY space.
How to Chose Your Workbench Height
Choosing the Right Workbench Dimensions
Getting the dimensions of your workbench just right is crucial for comfort and efficiency. A poorly sized workbench can make tasks uncomfortable and even hinder productivity. On the other hand, a well-designed workbench not only feels better to use but also helps you get more done, as we’ve touched on earlier.
The ideal setup varies depending on the type of work you’re doing. A surface perfect for detailed, precision tasks might be impractical for larger, heavier projects - and vice versa. Let’s break down how to tailor your workbench to suit both your tasks and your comfort.
Workbench Height and Adjustability
When it comes to ergonomics, height is a game-changer. For seated tasks, a height of 27″ to 30″ allows your arms to rest naturally. For standing tasks, the height range shifts depending on the type of work: 36″ to 38″ is better for heavy-duty tasks, while 40″ to 42″ is ideal for precision work.
Adjustable-height workbenches are a versatile option, letting you seamlessly switch between sitting and standing. This flexibility can help reduce fatigue and ease strain on your spine, keeping you focused during long hours of work. A range of 27″ to 42″ is a good benchmark, as it covers most tasks and user preferences.
| Work Position | Height Range | Best For |
|---|---|---|
| Sitting | 27″ - 30″ | Precision/Sitting |
| Standing (Heavy Work) | 36″ - 38″ | Heavy Standing Work |
| Standing (Precision) | 40″ - 42″ | Precision Tasks |
Beyond height, don’t overlook the width and depth of your workbench. A width of 48″ to 72″ offers enough space for tools and arm movement, while a depth of 24″ to 36″ ensures you can work comfortably without overreaching.
While these dimensions are key to improving performance, it’s just as important to incorporate safety into your design.
Safety Considerations for Workbench Design
Safety should be baked into every aspect of your workbench. For starters, rounded edges are a smart choice - they minimize the risk of injury, especially at hip or thigh height, where sharp corners can be a hazard when you’re deeply focused on your project.
Make sure there’s at least 24″ of vertical clearance under the workbench and 30″ of width to allow for easy movement. Avoid placing supports or storage compartments in areas where your knees might bump into them, especially when you’re seated or reaching for tools stored below.
Durability is another key factor. Choose sturdy materials like steel frames or fiberboard that’s at least 1.25″ thick to ensure your workbench can handle heavy use. Whatever materials you go with, double-check that all joints and connections are secure so the structure stays solid under pressure.
If you’ll be standing for long periods, anti-fatigue mats are a worthwhile addition. These mats can help reduce strain on your legs and back, letting you stay focused on your work instead of your discomfort.
For those planning extensive tool organization, platforms like Toolstash can help you keep everything in order. With a well-organized workspace, you’ll always know exactly where to find what you need, making your projects run even smoother.
Choosing Seating and Accessories
Getting the right seating and accessories for your workbench is essential. The wrong chair can lead to spinal compression, muscle fatigue, and overall discomfort. On the other hand, a well-designed chair and supportive accessories can help you maintain good posture, reduce strain, and stay productive during those long DIY projects[1][2].
Think of your seating as an integral part of your workbench setup. It should complement the height of your bench and the kind of tasks you’re working on. Similarly, your accessories should enhance your comfort and workflow.
Seating Options
When selecting a chair or stool for your workbench, look for options with adjustable heights (16″–21″) and lumbar support (12″–19″ backrest). These features ensure your spine and thighs maintain a 90° angle, keeping your thighs horizontal and your feet flat or supported[2].
Adjustability is key - both the seat and backrest should allow for easy modifications while you’re seated. For tasks requiring precision at lower bench heights, fully adjustable task chairs are ideal. If you’re working at higher benches (typically 36″ to 42″ tall), drafting stools with footrings provide the necessary support without forcing awkward positions. Sit-stand stools offer a hybrid solution, supporting semi-standing postures that can ease fatigue during transitions.
Don’t forget about footrests if your feet don’t comfortably reach the floor - they help distribute weight evenly and improve circulation during extended work sessions. For standing tasks, anti-fatigue mats are a great addition. They reduce foot pressure and help prevent issues like blood pooling in your legs over time[1][2].
Switching Between Sitting and Standing
For maximum comfort and productivity, consider a setup that allows you to alternate between sitting and standing. Changing positions throughout your work session has proven health benefits, including reduced spinal compression, increased alertness, and lower fatigue and discomfort levels[2].
Height-adjustable workbenches make this transition seamless. Look for models that adjust electronically between 26″ and 46″, a range that accommodates most users and tasks[4]. These benches make it easy to switch postures without interrupting your workflow.
To further enhance your setup, add ergonomic accessories like adjustable chairs, monitor arms, tool racks, and task lighting. Features like adjustable keyboard shelves and cable management systems that move with you can also help maintain an ergonomic and organized workspace, no matter your position.
Tool Organization and Access
Keeping your tools organized isn't just about tidiness - it can save you a ton of time and effort. In fact, proper organization can reduce search time by 30% and cut down on physical strain by ensuring tools are always within easy reach[6]. Setting up your ergonomic workbench with smart access in mind is key to staying comfortable and efficient.
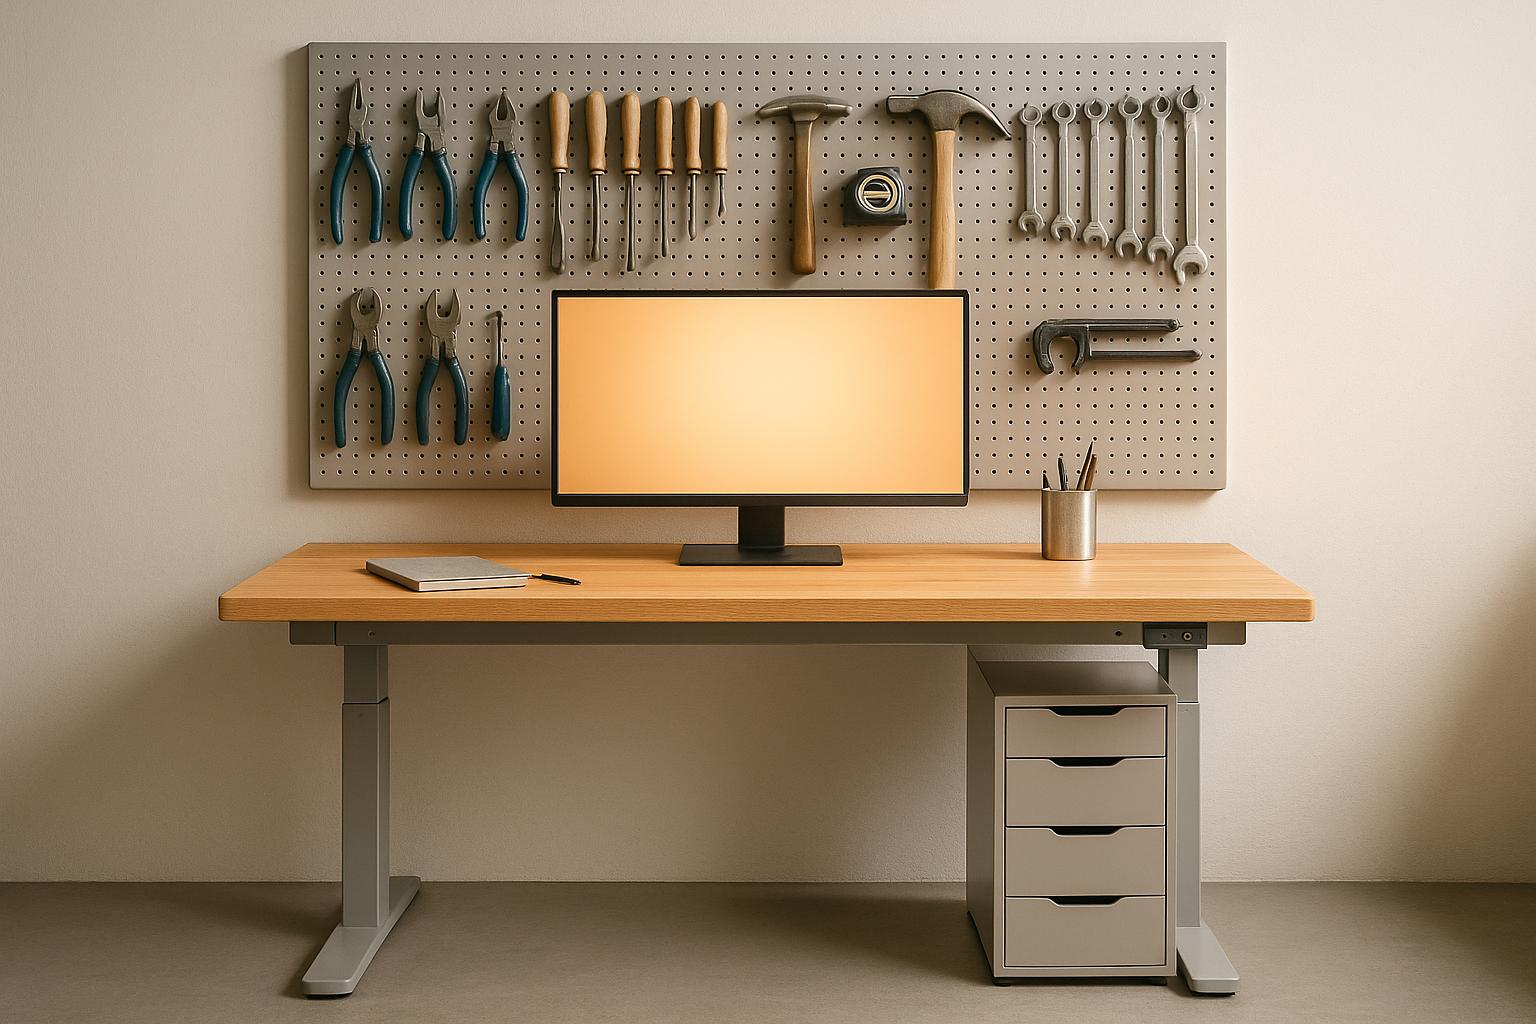
For tools you use most often, keep them close - around 15–20 inches from the bench's edge. This area, often called the "Green Zone", is ideal for frequent use. Less frequently used items can be stored further away, keeping your workspace clear and functional.
Using Modular Storage Solutions
A pegboard is a versatile and visual way to store tools above your workbench. You can easily rearrange it as your collection grows, making it a flexible option for evolving needs. Pair the pegboard with clearly labeled bins and drawers to store smaller items like fasteners and screws. This simple system prevents those frustrating moments of hunting for a tiny part mid-project.
If you want to take it a step further, color-coding can make your setup even more efficient. For example, one case study found that using color-coded bins and adjustable shelving reduced tool search time by 30% and helped people complete projects faster[5]. Try assigning specific colors to different types of work - blue for electrical tools, red for automotive, and green for woodworking.
For tools that need extra protection, like sharp blades, chemicals, or precision instruments, modular cabinets are a great choice. These cabinets keep tools safe from dust and moisture while offering secure storage. Look for options that can expand either vertically or horizontally, so your storage can grow as your needs change.
Using Tool Management Platforms
When you've maxed out physical organization, digital tools can take your system to the next level. Platforms like Toolstash help you track, organize, and manage your tools more effectively. While your pegboard and cabinets handle physical access, Toolstash handles everything else - from inventory tracking to smart categorization.
One standout feature is Toolstash's AI Snap, which lets you catalog tools just by snapping a photo. No more tedious manual entries! Once uploaded, the platform uses smart categorization to logically organize your inventory, making digital searches a breeze.
For workshops with multiple storage areas - or if you share tools with others - location tracking is a game changer. You can assign specific spots to each tool, like "Pegboard Section A" or "Drawer 3, Left Side", so you always know exactly where to find it. This is especially handy for tools that move between different areas.
Another useful feature is the platform's lending and borrowing management. Lost or misplaced tools can add up, accounting for up to 15% of annual tool expenses in both industrial and DIY settings[8]. With Toolstash, you can track who borrowed what and when, ensuring tools are returned to their proper place.
Finally, inventory tracking provides insights into your tool usage. The platform generates reports showing which tools you use most often, helping you reorganize your physical storage to keep high-use items within easy reach.
For shared spaces, Toolstash also offers secure data storage, keeping your inventory private while allowing controlled access for family or workshop partners.
Adding Technology and Safety Features
Creating an ergonomic workbench goes beyond just comfort and organization - it also involves smart lighting, a safe electrical setup, and the integration of technology. These features not only make the workspace more efficient but also significantly improve safety and productivity. For instance, OSHA reports that poor lighting is a factor in up to 20% of workplace accidents in industrial environments [7].
Lighting and Electrical Setup
Good lighting is essential for preventing eye strain and ensuring accuracy in your work. For general DIY tasks, aim for brightness levels between 300–500 lux. For more precise activities, like electronics repair or intricate woodworking, increase the brightness to 750–1,000 lux [4]. A color temperature of 4,000–5,000 Kelvin is ideal for providing neutral to cool white light, which helps maintain focus and reduces eye fatigue [4].
LED task lights are a great choice due to their long lifespan, energy efficiency, and adjustable brightness [4]. To cover all your lighting needs, consider layering different types: overhead LED panels for broad illumination, adjustable arm lamps for focused tasks, and under-shelf lighting to eliminate shadows in specific areas.
When planning your electrical setup, prioritize accessibility. Install outlets above the work surface for easy reach [4]. Power strips with surge protection can be mounted under the bench or along the back edge, keeping them handy but out of the way. Proper cable management - using trays, clips, or sleeves - keeps your workspace organized and minimizes tripping risks. If your workbench is height-adjustable, make sure the cables have enough slack to move freely without pulling or snagging [4].
To ensure safety, all electrical work should comply with the National Electrical Code (NEC). Installing ground-fault circuit interrupters (GFCIs) for all workshop outlets is a simple yet effective way to reduce the risk of electrical shocks [7].
Once your lighting and electrical systems are sorted, the next step is incorporating technology into your setup.
Monitor and Screen Placement
If your work involves computer use - whether for watching tutorials, referencing plans, or using design software - proper monitor placement is key to maintaining good posture and reducing neck strain. Position your monitor at or slightly below eye level, about 20–30 inches from your eyes, to minimize discomfort and glare [1]. For sitting setups, the top of the screen should be between 42.6 and 52.6 inches from the floor, depending on your height. For standing setups, aim for 56.9–69.8 inches [1].
Ensure a minimum distance of 15.7 inches from the screen, but more space is often more comfortable [1]. Tilt the monitor upward by 10–20 degrees and align it perpendicular to your line of sight to reduce glare and eye fatigue during extended use [1][9].
Monitor arms can greatly enhance your workbench setup. These mounts allow you to adjust the height, tilt, and distance of your screen, making it easy to switch between sitting and standing positions. In shared workspaces, adjustable mounts become even more useful, as they allow for quick customization based on individual needs.
To avoid screen glare, don’t place lights directly behind you. Instead, position them to the sides or use overhead fixtures that provide even, glare-free lighting [7]. This thoughtful arrangement ensures a comfortable and efficient workspace.
Setting Up Your Workbench Layout
Once you've sorted out the lighting and tech for your workspace, it's time to focus on arranging your workbench to make it as efficient and comfortable as possible. The key is to define work zones and position tools in a way that aligns with natural movements. Let’s break down how to organize tools and create adaptable storage that grows with your needs.
Arranging Tools for Easy Access
A well-organized workbench starts with clearly defined work zones. Keep the tools you use most often within 16–18 inches of the front edge of your bench, while less frequently used items can be placed further back, around 24–28 inches[6]. This ensures essentials like screwdrivers, pliers, and measuring tapes are always within arm's reach.
Vertical storage is a game-changer for keeping your workspace clear and your tools visible. Pegboards mounted at eye level are perfect for hanging tools, while magnetic strips are excellent for storing metal items like wrenches and screwdrivers. Grouping tools by function - such as keeping all measuring tools together, storing cutting tools in one area, and organizing fastening tools separately - can save time and reduce decision fatigue during projects.
If you're working in a shared space, consider symmetrical storage solutions that cater to both right- and left-handed users. Installing pegboards or adjustable racks on both sides of the workbench ensures everyone can work comfortably.
For even better organization, try color coding or labeling. Use different colored bins or simple labels to make finding tools faster, especially during complex tasks.
You can also enhance your physical setup with a touch of digital organization. Tools like Toolstash offer features like smart categorization and location tracking, making it easy to keep tabs on your inventory - an especially handy tool in shared workspaces.
Designing for Modularity and Future Changes
Once your tools are arranged for easy access, focus on creating a storage system that's flexible enough to adapt to future needs. Building in this flexibility from the start will help your workspace stay efficient as your projects and tools evolve.
Adjustable shelving is an excellent option, allowing you to change storage heights to fit everything from small hardware to bulky power tools. Stackable bins and drawers also let you add, remove, or rearrange storage as your inventory grows.
Slatwall panels are another versatile choice. These grooved panels can hold hooks, shelves, and bins that can be repositioned quickly, making them ideal for tools and supplies of various shapes and sizes.
Even your workbench surface can be part of this modular approach. Removable work mats protect the surface and can be swapped out depending on the project, while modular vises and stops can be positioned where needed and stored away when not in use.
Don’t forget cord management - reconfigurable cable trays help keep your workspace tidy and free of hazards, no matter how often you rearrange.
The beauty of modular storage is its ability to adapt your workspace to different types of projects. Whether you're transitioning from woodworking to electronics, being able to reconfigure your layout in minutes can make a huge difference.
Leave some breathing room in your setup to allow for growth. Avoid the temptation to fill every available space right away - keeping some areas open will make it easier to accommodate new tools or reorganize down the line.
With tools like Toolstash, managing a modular setup becomes even easier, as it tracks inventory and storage locations effortlessly. This means you can focus more on your projects and less on hunting for tools.
Conclusion
Designing an ergonomic workbench is about more than just building a surface - it’s about creating a workspace that aligns with your body’s needs and enhances your efficiency. The principles we’ve covered work together to create a safer, more comfortable, and productive environment for your DIY projects.
Incorporating thoughtful organization takes this a step further. Strategies like modular storage and smart tool placement ensure that everything you need is within reach. When tools are easy to locate and access, you can focus on creating instead of wasting time searching.
Safety features also play a critical role. Proper lighting, secure cable management, and rounded edges not only prevent accidents but also help you stay focused on the task at hand [7][4].
And here’s the best part: a workspace that adapts as your skills and tool collection grow saves you from constant redesigns. This flexibility allows your workbench to evolve alongside your projects.
Over time, the benefits are clear - fewer injuries, less strain on your body, and a more satisfying DIY experience [7][3]. When your workspace is designed to support both your physical health and workflow, you’re more likely to take on challenging projects and refine your craft. It’s a setup that keeps pace with your ambitions and helps you achieve more.
FAQs
What are the advantages of an adjustable-height workbench, and how does it boost productivity?
An adjustable-height workbench lets you customize the surface height to match your needs, making DIY tasks more comfortable and reducing physical strain. This setup promotes better ergonomics, helping you stay focused and work more efficiently for extended periods.
With reduced discomfort and improved posture, these workbenches are particularly useful for detailed or lengthy projects. Pairing this with a well-organized tool setup can streamline your workflow and save valuable time.
What’s the best way to organize my tools for better efficiency and less time spent searching?
Keeping your workspace organized and efficient can save you a lot of time and hassle. A tool management platform like Toolstash can help you streamline the process by keeping an organized inventory of your tools. It automatically categorizes everything, making it simple to find what you need when you need it.
One standout feature is its AI-powered tool addition. Just snap a photo of a tool, and it’s added to your inventory in seconds. This makes it easier to maintain order in your workspace, so you can spend more time on your DIY projects and less time hunting for tools.
What safety features should I include in a workbench to reduce the risk of injuries during DIY projects?
When designing a workbench, safety should always come first to avoid potential injuries. Here are some important features to keep in mind:
- Rounded edges and corners: Sharp edges can lead to accidental cuts or scrapes, so opting for smooth, rounded corners is a smart choice.
- Sturdy construction: A solid, stable workbench made from durable materials ensures it can handle heavy tools and projects without wobbling or tipping over.
- Comfortable height: Aim for a workbench height of around 36–38 inches, which suits most adults and helps prevent unnecessary strain on your back and shoulders.
- Non-slip surface: Adding a non-slip mat or coating to the surface keeps your tools and materials in place while you work, reducing the chance of accidents.
- Tool organization: Built-in storage options like pegboards, shelves, or drawers help you keep tools and materials neatly arranged, cutting down on clutter and improving safety.
By incorporating these features, you’ll create a workspace that’s not only safer but also more practical for tackling your DIY projects.