Features
- 【1 PIECE 12x12" TIN PANEL】– Please note this is a sample panel,approximately a 12 x 12-inch portion of a panel and will not lay into a standard grid. For larger size, please go to our "pack of 5pcs 24x24"".
- 【Perfect for DIY and Home Renovation Projects】– Not just for ceilings, Holydecot Tin tiles can be used to create an antiqued backsplash or rustic accent wall in your home, also a great stair riser tiles.
- 【INSTALLATION】– Nail-Up, Easy-to-Cut. These tiles can be easily cut with tin snips, trimmed to any shape or size to fit your targeted area
- 【MATERIAL】– Authentic tin/metal, not cheap plastic or foam board; achieve the rustic authenticity.
- 【COLOR】– White painted with natural antique finish, no need further painting. Embossed real metal design accents any wall designs.
Specifications
| Color | Antique White |
| Size | 12x12" 1pc |
Related Tools

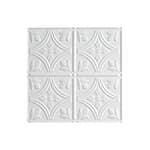
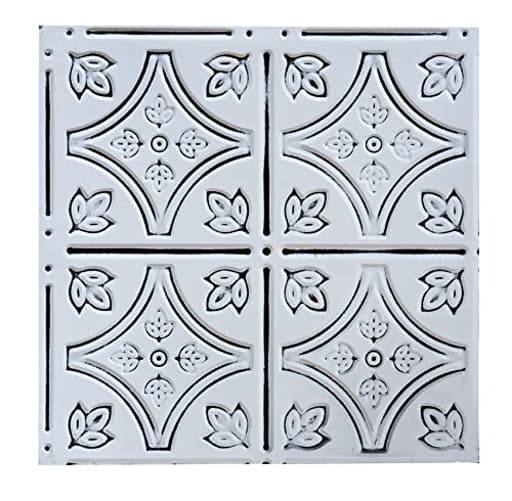
A single 12 x 12 inch embossed tin panel sample finished in antique white for use on walls, ceilings, backsplashes, or stair risers. Made of authentic metal, it is designed for nail-up installation and can be cut with tin snips to fit; the piece is a sample portion and will not fit into a standard ceiling grid.
Holydecot Tin Wall Tiles Nail-Up Ceiling Tiles Stair Riser Kitchen Backsplash - Antique White 12x12 inch Sample Review
A hands-on look at an antique tin tile sample that punches above its size
I picked up the antique white tin tile sample to answer a few practical questions before committing to a larger order: How sturdy is the metal? Does the finish read “antique” or “spray-painted”? Will it cut cleanly with basic snips, and can I nail it up without mangling the embossing? After a week of test-fitting on a backsplash mockup, a stair riser, and a small ceiling board, I have a clear sense of where this sample shines and where to be cautious.
First, a quick orientation: this is a single 12 x 12 inch embossed metal panel, painted in an antique white finish. It’s real metal—thin-gauge tin/steel, not plastic—and it’s made for nail-up installation over a solid substrate. It’s a sample, which means it’s not intended to drop into a standard 2x2 ceiling grid. Think of it as a one-square-foot swatch you can cut, nail, and live with before committing to a full project.
Design and finish
The embossing is crisp and deeper than I expected for a thin panel. Pressed motifs can look mushy on cheaper panels; these have enough relief that highlights and shadows read well even in low light. The antique white finish leans warm with subtle distressing on the high points of the pattern, which helps avoid the “freshly primed” look. Up close, it has a matte-to-satin sheen—more vintage powder-coat than glossy enamel—and it plays nicely with both warm woods and cool stone.
Color accuracy is always tricky online, but in person the tone sits between cream and soft white. Under daylight it reads clean; under warm LEDs it takes on a gently aged cast. If you’re trying to coordinate with existing trim, bring this sample into your space; the finish has just enough character that it can shift with lighting.
Material and build
The panel is lightweight but not flimsy. It flexes under hand pressure yet springs back, which is what you want in a nail-up tile: compliant enough to follow minor substrate irregularities, stiff enough to keep its pattern sharp. The edges are cleanly sheared. Expect sharp edges and corners—gloves are not optional if you value your knuckles.
My sample arrived with one corner slightly bent. It took a few passes with a rubber mallet over a piece of softwood to flatten it back out without scarring the paint. Metal of this thickness can pick up minor dings in transit; they’re usually fixable, but check your piece on arrival.
Installation experience
This is a nail-up panel. You’ll need a flat, solid backing—plywood, MDF, or furring strips—rather than an existing drop ceiling grid. I tested two mounting methods:
- Brad nailer (18-gauge) with short brads and a light touch
- Hand-driven decorative cone-head nails, pre-drilling to 1/16 inch to avoid dimpling
Both methods worked. If you choose brads, dial down the pressure to prevent the gun from dimpling the metal; aim for consistent perimeter and field nailing (every 6–8 inches on the edges, and 12–16 inches in the field). For hand nails, pre-drilling is worth the extra step. It keeps the hammered metal face free of puckers and ensures the nail seats cleanly without deforming the embossing.
On a backsplash mockup, I combined construction adhesive with a few brads as temporary clamps while the glue set. That strategy provides a flatter finish over time and minimizes visible fasteners. Just be sure your adhesive is rated for painted metal and indoor use.
Cutting and shaping
Tin snips are all you need, but the right snips matter. Straight-cut aviation snips gave me the cleanest edge; left/right snips are helpful for curves and notches around outlets or corner returns. The metal will curl as you cut—standard behavior—so plan your cut lines to keep the finished face supported. After cutting, I dressed the edge with a fine file to remove burrs.
For holes and small cutouts, a step bit and painter’s tape (to protect the finish) worked well. If you need dead-straight, visible cuts, score lightly with a utility knife and a straightedge, then follow with snips. A light tap with a rubber mallet over a flat scrap will re-flatten any induced curl.
Using the sample in real projects
While it’s marketed as a sample, a single square foot is plenty to test fit, cut, and finish workflow. It’s also enough to complete small design accents:
- Backsplash centerpiece: I bordered the sample with thin trim to create a focal inset behind a bar sink.
- Stair riser: The sample perfectly covered one riser; nailed and caulked, it adds a lot of character.
- Cabinet or furniture panels: Center a cut portion within a frame for door insets or headboard accents.
For full-scale applications—ceilings, large accent walls—you’ll want the larger 24 x 24 panels intended to tile a larger area. The sample helps you dial in layout: identify how the pattern repeats, where seams will land, and how the antique finish looks across angles and lighting.
Seams, trim, and finishing touches
Real metal looks best with thoughtful edge management. A few practical tips:
- Plan seams to land where you can cover them with simple T-moulding or where the pattern’s valleys meet, which disguises gaps.
- Use matching or paintable caulk at inside corners and along countertops. Wipe caulk with a damp finger before it skins.
- Consider a clear, non-yellowing topcoat if the tile will face heavy splashes or grease (backsplashes near ranges). A waterborne polyurethane or a clear enamel suitable for metal can add durability without changing the look; test on the sample first.
- For ceilings, find the room center and snap chalk lines; dry-fit a few tiles to check pattern alignment before committing.
Where it excels
- Authenticity: It’s real metal, and it looks it. The warmth of the antique white avoids the sterile vibe some faux tiles have.
- Workability: Cuts cleanly with hand tools, nails up without drama, and takes adhesive if you want a cleaner face.
- Versatility: Ceilings, accent walls, backsplashes, stair risers—anywhere you want a vintage or cottage touch.
What to watch out for
- Not for grids: This sample won’t drop into a standard suspended ceiling grid. It’s for nail-up over a substrate.
- Edge safety: The cut edges and corners are sharp. Gloves and eye protection aren’t optional.
- Shipping dings: Thin metal is prone to corner bends. Minor bends are correctable with a rubber mallet, but check your piece on arrival.
- Pattern alignment: If you move to full-size panels, spend time on layout. Embossed patterns can make seams conspicuous when misaligned.
Who will appreciate it
- DIY renovators wanting to test a real-metal tile before investing in a full order
- Homeowners aiming for farmhouse, cottage, or vintage-industrial aesthetics without shiny chrome
- Craft and furniture builders looking for small, authentic metal accents
If you prefer invisible fasteners, foam or PVC panels may be easier and less fussy, but they lack the weight, feel, and longevity of real metal. This tin panel strikes a good balance: authentic, approachable for a first-time installer, and flexible in use.
Practical tips from my install
- Pre-drill for hand nails to prevent dimples in the embossing.
- Use a rubber mallet and softwood backing to flatten any shipping bends without marring the finish.
- Tape the cut line before snipping to minimize paint chipping; remove tape immediately after the cut.
- For backsplashes, combine a thin bead of construction adhesive with a few brads to hold position while the adhesive cures.
- Finish edges with simple wood or metal trim; it elevates the look disproportionately to the effort.
Recommendation
I recommend this tin tile sample if you’re serious about using real metal panels and want to validate fit, finish, and workflow before ordering larger tiles. The embossing is crisp, the antique white finish feels genuinely aged rather than faux, and the panel works well with basic tools. It nails up cleanly over a proper substrate, cuts predictably, and offers enough surface area to test around outlets, corners, and edges. Be mindful of sharp edges and the possibility of minor shipping bends, but both are manageable with basic safety gear and a rubber mallet. For anyone weighing real metal against plastic alternatives—or planning a small accent like a stair riser—this sample is a practical, low-risk way to ensure the look and process are right for your space.
Project Ideas
Business
Custom Stair Riser Installations
Offer a niche contracting service installing custom tin stair risers for homeowners and boutique rentals. Market to clients renovating older homes or looking for unique transitional elements. Use the 12x12 sample to show texture and color; sell packages by stair count or linear foot. Upsells: coordinating stair tread nosing, protective clear coat, and stair runner installation.
Tile Sample Kits for Designers
Create curated sample kits for interior designers and contractors using multiple 12x12 panels in coordinated colors/finishes. Package with installation instructions, care tips, and a mini adhesive/nail kit. Sell kits online and to showrooms as a tactile alternative to photo swatches. Offer subscription replenishment for designers who frequently specify tiles.
Pop-up Backsplash Installation Service
Run an hourly-rate pop-up service that installs small antique tin backsplashes for kitchens, bars, and powder rooms. Position as same-week, low-disruption upgrades: the nail-up installation is quick and the antique white finish needs little prep. Target real estate agents staging homes, short-term rental owners, and urban homeowners wanting fast style upgrades. Bundle with temporary protective coatings and a maintenance guide.
Workshops and DIY Clinics
Host paid workshops teaching homeowners and crafters how to cut, fit, and install tin panels for backsplashes, stair risers, and art. Use the 12x12 sample as the hands-on material for each student. Revenue streams: ticket fees, kit sales (panel + tin snips + nails + instructions), and follow-up private coaching. Partner with hardware stores or community centers for space and cross-promotion.
Small-Batch Home Accent Product Line
Design a line of finished home accents—framed panels, backsplash starter kits, decorative coasters—using the tin panels as the core material. Position as artisan, limited-run collections (seasonal patterns, holiday themes). Sell via Etsy, local boutiques, and craft markets. Include care cards and installation tips; offer a concierge installation service for larger orders to increase average order value.
Creative
Vintage Stair Riser Medallions
Cut the 12x12 embossed tin into smaller panels or shapes to cover stair risers. Layout alternating patterns or a continuous motif down the staircase. Because the tile is nail-up and easy to cut with tin snips, you can trim to fit curved or odd-height risers. Finish by sealing edges with clear polyurethane or a thin bead of caulk to prevent snags. Use a mix of antique white panels and a few hand-painted accents (metal-specific paint) for depth.
Mini Backsplash Tile Sampler Board
Create a countertop sample board by mounting one or several 12x12 tin panels onto a small piece of plywood to show clients potential backsplash layouts. This becomes a living mood board: paint small swatches, apply grout-look caulk to mimic grout lines, and add LED strip behind the panel for a warm, shadowed effect. Great for experimenting with patterns before committing to a full wall installation.
Decorative Headboard Panel
Assemble several 12x12 panels into a rectangular grid to form a vintage-style headboard. Mount panels onto a thin plywood backing and add a French cleat for wall hanging. For a softer look, upholster a narrow foam border around the edges or backlight the headboard with LED to highlight the embossing. The authentic tin finish gives a unique antique aesthetic without heavy carpentry.
Framed Metal Artwork Series
Use the embossed tile as the focal panel inside a deep wood frame to create a series of wall art pieces. Cut each panel into different shapes—hexagons, circles, or rectangles—and layer with paper, thin wood inlays, or small mirrors for mixed-media art. The antique white surface takes gilding or patina treatments well if you want to age or highlight raised areas.
Functional Accent Pieces (Trays, Coasters, Shelf Backs)
Cut the panel to create durable, decorative liners for trays, coasters, or small shelf backs. For coasters, cut into 4x4 squares, round the edges, sand lightly, and seal with food-safe epoxy. Tray liners can be glued to the base and edges finished with thin metal or wood trim. These make quick, high-value gifts or craft-fair items that showcase the authentic metal look.