Features
- Easy install; Simply glue in place directly over existing drywall or plaster ceilings.
- No contractor needed; Panels are lightweight, flexible and easy to cut with a snip, scissors or utility knife for quick and easy installation.
- Includes one 12in x 12in sample
- Stylish and durable: Each panel is made of high quality PVC and is Class A fire rated; Tiles are water- and corrosion-resistant, great for kitchens or baths.
- 2ft x 4ft ceiling tiles overlap each panel for a clean, seamless look; Matching clean edge J-trim pieces also are available.
Specifications
| Color | Vintage Metal |
| Size | 12X12 Inch Sample |
Related Tools


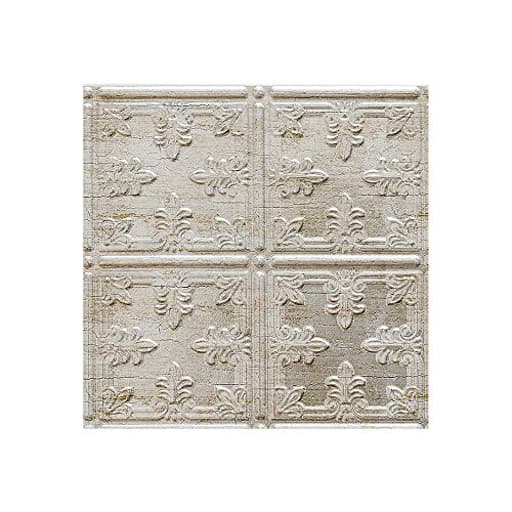
A 12×12 inch decorative vinyl glue-up ceiling panel sample in a vintage metal finish. Made of PVC and Class A fire rated, the panel is water- and corrosion-resistant and designed to be glued directly over existing drywall or plaster; it is lightweight, flexible, and can be cut with snips, scissors, or a utility knife for installation.
FASÄDE Traditional Style/Pattern 10 Decorative Vinyl Glue Up Ceiling Panel in Vintage Metal Review
Why I Tried This Panel
I was looking for a fast, low-mess way to refresh a small bathroom ceiling and test a backsplash idea without committing to heavy materials or a contractor. The Fasäde vinyl ceiling panel in the Vintage Metal finish caught my eye because it promised glue-up installation over existing drywall or plaster, simple cutting with basic tools, and a traditional stamped pattern that could echo tin without the weight or corrosion worries. I started with the 12×12-inch sample to check color, sheen, and pattern scale, then moved on to full-size panels for the actual install.
Design, Finish, and First Impressions
The Vintage Metal finish reads like a muted pewter with a soft sheen—more of a “brushed antique” look than bright chrome. From a few feet away, the pattern does a convincing job of suggesting pressed metal. Up close, you can tell it’s a high-quality PVC, but the finish avoids the overly glossy look that can make faux-metal tiles feel toy-like. The pattern has good depth and crispness, which helps catch the light and sell the texture.
My 12×12 sample felt slightly more rigid than some of the full-size panels I later used, but both cut cleanly and laid flat. That rigidity difference didn’t change the outcome, and the flexibility of the full-size panels actually made trimming around obstructions easier.
Installation Experience
The installation approach is refreshingly straightforward:
- Surface prep: I cleaned the ceiling with a degreaser, knocked down any high spots, and skim-filled a couple of deeper imperfections. PVC will telegraph significant bumps, so it’s worth getting the substrate reasonably flat.
- Layout: I dry-fit to center the pattern and avoid skinny slivers at edges. On ceilings especially, a balanced layout pays off visually.
- Cutting: A sharp utility knife with a metal straightedge worked for most cuts—score deeply and snap. Tin snips are great for curves and around fixtures. Scissors also work, but I found a knife delivers the cleanest edges.
- Adhesive: A high-tack, construction adhesive rated for PVC is the way to go. I applied beads about an inch in from the perimeter and in a loose zigzag through the field. Too much adhesive can create squeeze-out; too little risks poor contact. Painter’s tape temporarily held corners while the adhesive grabbed. On a vertical backsplash, a couple of strips of double-sided mounting tape plus adhesive helped keep pieces from sliding.
- Seams and edges: The full-size tiles overlap, which hides seams well. For perimeter terminations, J-trim is worth using—it gives a finished look and makes slight cuts disappear.
Start in the most visible area and work out. Press each panel evenly and roll with a J-roller or a wrapped block to remove air pockets. Wipe any adhesive squeeze-out immediately.
Fit and Finish
Once up, the pattern alignment is the make-or-break detail. With careful layout and the built-in overlap, I got tidy seams that you don’t notice unless you go looking. The Vintage Metal finish is consistent panel to panel, but like with any decorative surface, I recommend buying a little extra from the same lot and inspecting before installation.
One thing to watch: because these panels are lightweight and flexible, any edge that isn’t fully supported or properly trimmed can show slight waviness under raking light. A clean, square cut and either trim or a tight butt against a straight wall mitigate this.
Durability and Maintenance
In the bathroom test, condensation and the occasional splash didn’t faze the panels. They’re water- and corrosion-resistant, so no swelling or rusting. Cleaning is simple—mild soap and water; avoid abrasives and strong solvents that could mar the finish.
On a small backsplash section, the panel resisted everyday messes. I wouldn’t place it in direct line of a high-heat source, but for areas adjacent to a cooktop with proper clearance and ventilation, it held up fine in my use. It’s Class A fire rated, which speaks to flame spread, but it’s still PVC—keep it away from open flame or excessive radiant heat, and check local code if you’re considering it behind or near a range.
Scratch resistance is decent for a decorative panel. Keys or hard metals can mark it if you press; kitchen utensils brushing lightly didn’t cause issues. If you expect aggressive wear, real metal might be a better fit.
Where It Shines
- DIY ceiling refreshes: It’s tailor-made for covering tired drywall or plaster without a full skim coat. The overlap edges disguise joints, and the pattern adds character to small baths or entries.
- Accent walls and backsplashes: In modest heat zones and with proper trim, it offers a quick decorative upgrade. For renters or serial remodelers, using the sample size as a removable accent is a clever hack; double-sided foam tape held mine firmly on a painted tile without drilling.
- Tight timelines: With a utility knife, scissors, adhesive, and a free afternoon, you can transform a space. No special saws or ventilation fans required beyond the usual adhesive odor management.
Limitations and Caveats
- Heat proximity: It’s not a substitute for a noncombustible surface where code requires one. Maintain clearances around gas burners, ovens, and heaters.
- Lighting reveals everything: Under grazing light, substrate imperfections and slight panel waves become more apparent. Prep and careful adhesive application are key.
- Not indistinguishable from real metal up close: It’s a convincing looker at typical viewing distances; purists who want the tactile feel and cold touch of tin will spot the difference in hand.
- Occasional stamping variances: Inspect panels before installing. If you see any pattern misalignment or soft edges, exchange them before you glue.
Tips for a Cleaner Install
- Buy an extra 10–15% to account for offcuts and pattern matching.
- Plan your starting line with a laser or chalk line; slight drift compounds over a ceiling.
- Dry-fit around fixtures and cut slightly proud; it’s easier to shave than to fill.
- Use J-trim at edges and caulk transitions with a color-matched, paintable sealant for a finished look.
- Support pieces with painter’s tape while adhesive sets, then remove cleanly.
- Ventilate during and after installation to dissipate adhesive fumes.
Value
Compared with metal tiles or a full drywall skim and paint, this is a budget- and time-friendly option that lands squarely in the “good enough to impress” category. You avoid corrosion worries, you can cut it with household tools, and you can install it solo. While it won’t satisfy everyone chasing a historically exact tin ceiling, it hits an attractive middle ground of cost, convenience, and style.
The Bottom Line
I’m impressed with how much mileage you can get out of these panels for quick ceiling makeovers and selective wall accents. The Vintage Metal finish is tasteful and versatile, the glue-up process is approachable for first-time DIYers, and the overlap system delivers cleaner seams than I expected. You do need to respect the limitations—particularly heat proximity and the need for a reasonably flat substrate—but within those boundaries, the result looks sharp and holds up to everyday use.
Recommendation: I recommend the Fasäde vinyl ceiling panel for DIYers and homeowners seeking an affordable, low-mess upgrade with classic character. It’s especially well suited to bathrooms, powder rooms, hallways, and accent walls where moisture resistance and easy cleanup matter. If you need a truly authentic metal feel or are working directly adjacent to high heat, look elsewhere; otherwise, this strikes a smart balance of aesthetics, practicality, and cost.
Project Ideas
Business
DIY Ceiling Upgrade Kits
Assemble and sell small DIY kits for homeowners and renters that include multiple 12×12 panels, matching J-trim, adhesive suggestions, and step-by-step instructions. Offer style bundles (vintage metal, painted, distressed) and instructional videos. Market on Etsy, Instagram, and local hardware marketplaces to DIY-enthusiasts and landlords.
Upcycled Home Decor Product Line
Create a line of finished home decor items—mirrors, trays, coasters, cabinet fronts, and wall panels—made from cut and finished panels. Position products as lightweight, water-resistant alternatives to real metal. Sell through e-commerce platforms, craft fairs, and consignment in boutique home stores.
Boutique Installation Service for Short-Term Rentals
Offer a quick, cost-effective ceiling refresh service targeting Airbnb/property managers who want a dramatic upgrade without long downtime. Use glue-up panels to cover outdated ceilings fast. Package as a rapid-turnaround room refresh with optional painting and trim work, emphasizing fire rating and moisture resistance.
Workshops & Pop-up Classes
Host hands-on workshops teaching attendees how to make wall art, headboards, or cabinet fronts using the panels. Provide samples for students to take home and sell starter kits at the events. Partner with makerspaces, home stores, and community centers to build local brand awareness and recurring revenue.
Design-Professional Sample Packs
Curate and sell sample packs (including the 12×12 vintage metal sample) to interior designers, architects, and contractors. Include installation guides, trim options, and spec sheets (fire rating, moisture resistance). Offer volume discounts and quick-ship samples to help pros specify the product for larger projects.
Creative
Faux Tin Accent Wall
Glue up a grid of 12×12 panels to create a small faux-tin accent wall or backsplash. Use construction adhesive or a strong spray adhesive for a secure bond over drywall; trim edges with matching J-trim for a finished look. Tips: lightly sand seam edges and use a thin bead of caulk for a seamless finish. Can be distressed with metallic rubs or leafing for added vintage character.
Framed Decorative Wall Art
Cut the sample into geometric shapes or ornate medallions and mount them in deep frames to make dimensional wall art. Back panels with thin plywood or foam core, secure with contact cement or small brads, and add a hanging cleat. Use contrasting paint inside frames or a patina glaze to emphasize the embossed pattern.
Headboard or Bed Canopy Panels
Arrange multiple panels horizontally to create a DIY headboard or ceiling canopy over a bed. The lightweight PVC keeps installation easy — attach to a plywood backing and hang with French cleats. The water- and corrosion-resistant surface makes it ideal for humid bedrooms or beach houses. Edge with trim or rope lighting for a hotel-style finish.
Decorative Cabinet/Drawer Fronts
Cut panels to size and glue them to plain cabinet doors or drawer fronts for an instant style upgrade. Because the product is flexible and easy to cut with scissors or a utility knife, it fits curved or inset doors. Seal edges with small trim or metal L-channel for durability. Good for upcycling thrift-store furniture into statement pieces.
Chandelier Canopy & Ceiling Medallions
Use the sample to craft decorative ceiling medallions or lamp canopies. Cut a round or decorative shape, drill a central hole for wiring, and mount a painted plywood backing for strength. The Class A fire rating is reassuring for overhead lighting projects; keep exposed wiring clear of the PVC surface and follow electrical codes.