Features
- Easy install; Simply glue in place directly over existing drywall or plaster ceilings.
- No contractor needed; Panels are lightweight, flexible and easy to cut with a snip, scissors or utility knife for quick and easy installation.
- Includes one 12in x 12in sample
- Stylish and durable: Each panel is made of high quality PVC and is Class A fire rated; Tiles are water- and corrosion-resistant, great for kitchens or baths.
- 2ft x 4ft ceiling tiles overlap each panel for a clean, seamless look; Matching clean edge J-trim pieces also are available.
Specifications
| Color | Matte White |
| Size | 12X12 Inch Sample |
| Unit Count | 1 |


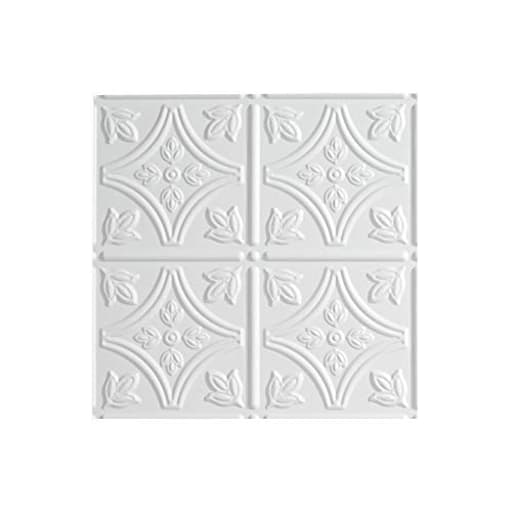
This 12 × 12 inch matte white PVC glue-up ceiling panel sample is designed to be glued directly over existing drywall or plaster to provide a decorative, finished ceiling surface. The panel is lightweight, flexible, and can be cut with snips, scissors, or a utility knife; it is Class A fire rated and resists water and corrosion for use in kitchens and bathrooms. Panels are designed to overlap for a seamless appearance, and matching J-trim pieces are available.
FASÄDE Traditional Style/Pattern 1 Decorative Vinyl Glue Up Ceiling Panel in Matte White Review
What this panel is—and isn’t
I started with the 12-by-12-inch sample of the Fasäde vinyl ceiling panel to see the pattern, sheen, and thickness in hand before committing to full-size panels. It’s important to understand that this sample is just that—a cut section meant to represent a larger 2-by-4-foot glue-up panel. The sample helped me judge the matte white finish and the crispness of the “traditional” pattern, but it isn’t a standalone tile for a project on its own. Once I was happy with the look, I ordered full panels and used them to refresh a dated ceiling and a short backsplash run behind a range.
These panels are flexible PVC with a Class A fire rating and are designed to glue directly over flat drywall or plaster. They’re water- and corrosion-resistant, which is why they’re often used in kitchens and baths. The edges are formed to overlap the next panel so seams can disappear if you install carefully. Fasäde also offers matching J-trim, which makes finishing exposed edges much easier and cleaner.
Planning and layout matter more than you think
On paper, this seems like a simple weekend upgrade, and in practice it can be—if you plan. The pattern repeat is pronounced enough that misalignment will show, so I spent a fair amount of time dry-fitting a few panels and snapping chalk lines to keep the pattern straight across the space. For a ceiling, I found it helpful to establish a centerline and work outward; for a backsplash, I measured from the most visible corner and arranged cuts where they’d be least noticeable.
My sample was useful beyond aesthetics; I used it to practice cuts and test paint. Matte white is clean and modern, but I wanted a softer tone for the backsplash. After a light scuff and a bonding primer, a satin spray finish adhered well to the PVC and looked factory-applied. If you’re planning to paint, test on the sample before committing.
Installation experience
Tools and prep:
- Utility knife with fresh blades, sharp snips, straightedge, and cutting mat
- Construction adhesive rated for PVC and interior panels
- Painter’s tape and a small J-roller (or a laminate seam roller)
- Silicone or paintable caulk for touch-ups
- J-trim for exposed edges
Cutting is straightforward: score with a knife along a straightedge and snap, or use snips for curves around fixtures. The panels are light enough to handle solo, but I preferred a helper for the ceiling to keep seams tight while adhesive grabs.
Adhesive is where you shouldn’t skimp. I applied a perimeter bead plus a grid of quarter-size dabs in the field of the panel, then pressed it into place and rolled the surface, especially at the overlaps. On the ceiling, painter’s tape across seams held everything steady while the adhesive set. On the backsplash, I also back-buttered the wall in a few areas that were slightly out of plane.
The overlapping edges are a smart design, but they’re not magic. On a dead-flat surface, seams fade nicely; on a wavy ceiling, you’ll still see minor transitions in raking light. For those spots, a thin bead of matching caulk feathered with a damp finger helped a lot. The J-trim finishes edges cleanly around openings and outside corners; measure twice and dry-fit those pieces because small gaps can telegraph.
From start to finish, the backsplash run took a couple of hours with two people; the ceiling took an afternoon, mostly due to layout and working around a light box. There’s no dust, no nails, and no special tools beyond what most DIYers have.
Fit, finish, and durability
Out of the box, the matte white finish is even, with a subtle sheen that hides small scuffs better than a high-gloss surface. The embossed pattern reads convincingly traditional without looking plastic-y from a normal viewing distance, especially once installed across a larger area. On the ceiling, the panels brighten the room and reflect light softly. As a backsplash, the raised motif adds texture without being fussy.
Cleanup is easy: a mild cleaner and a soft cloth handle splatter and dust. In the kitchen, normal cooking heat hasn’t been an issue for me. That said, like any PVC product, I wouldn’t place it where it would be exposed to direct, sustained heat from a burner or open flame; use common sense and follow clearance recommendations around appliances.
Over time, seams have stayed tight where the substrate is stable and adhesive coverage was generous. In one corner of the ceiling where the old plaster dips, a seam telegraphs slightly in morning light; if you have significant unevenness, consider shimming low spots or using a skim coat first.
Where it shines
- Quick, approachable facelift: If you have a tired ceiling or want a backsplash with pattern and depth, this gets you there fast without specialty tools or metalwork.
- Moisture-prone spaces: The PVC construction has been unfazed by humidity in a bath and routine wipe-downs in a kitchen.
- Paint-friendly: The matte surface takes a primer and topcoat well if you want a custom color. Testing on the sample took the guesswork out.
- Weight and handling: Working overhead is easier when panels are light, flexible, and cut cleanly with hand tools.
What to watch out for
- Sample versus tile: The 12-by-12 sample is a cut section for evaluation, not a ready-to-install tile. Budget and plan for full-size panels.
- Pattern alignment: Take time to lay out centerlines and dry-fit. Misaligned motifs will stand out more than with plain panels.
- Substrate flatness: These panels forgive small imperfections, but larger waves or out-of-square rooms will require shimming or selective caulking to keep seams tight and visually consistent.
- Adhesive consumption: You’ll use more adhesive than you think, particularly overhead. Buy extra so you can be generous at the overlaps and perimeters.
- Packaging quantities: Depending on where you source, panels and trims may come in multi-packs. If your project is close on coverage, account for overage to maintain pattern continuity.
Comparisons and alternatives
I’ve installed real tin panels and fiber-based ceiling tiles in the past. Tin delivers unmatched crispness and can be nailed to a grid or directly to furring, but it’s heavier, louder to work with, and less forgiving to cut. Fiber tiles are paintable and can hide irregular ceilings well in a drop ceiling, but they don’t hold up to moisture as gracefully. The Fasäde panels land in a sweet spot: convincing texture, water resistance, simple tools, and direct-glue installation. They won’t fool a purist up close, but across a ceiling or backsplash they read as an intentional design choice rather than a compromise.
Tips that saved me time
- Use the sample for everything: color mockups, paint tests, and practice cuts.
- Snap chalk lines parallel to your most visible edge and start there; hide cuts where they’re least conspicuous.
- Lightly sand and prime if you plan to paint, and finish pieces before installation to avoid masking seams later.
- Roll seams after pressing panels in place, and tape them while adhesive cures.
- Order a couple of extra panels to allow for pattern matching and inevitable miscuts around fixtures.
Who it’s for
If you’re a DIYer comfortable with a utility knife and a caulk tube and you want a fast, decorative upgrade in a kitchen, bath, hallway, or feature ceiling, this panel system is a good fit. If your substrate is significantly out of level or you want razor-sharp metal embossing and historical accuracy, you may prefer traditional tin with furring strips and mechanical fastening.
Recommendation
I recommend the Fasäde vinyl ceiling panel for homeowners looking for an easy, durable way to add classic detail to ceilings or backsplashes without the weight and fuss of metal. The combination of simple glue-up installation, water resistance, a credible traditional pattern, and paintability makes it a practical option for kitchens and baths. Just be mindful that the 12-by-12 piece is a sample for evaluation; plan layout carefully, buy sufficient adhesive, and use the J-trim for clean edges. With those considerations, the finished result looks cohesive and polished at a fraction of the effort and cost of more demanding alternatives.
Project Ideas
Business
Quick Ceiling Refresh Service
Offer a turnkey service to cover damaged or dated ceilings (popcorn, stains, minor cracks) using glue‑up PVC panels. Market it as a fast, lower-cost alternative to full drywall replacement—no major demolition, quick install, and easy cleanup. Package pricing per room with optional painting.
Custom Painted Panel Kits
Produce and sell ready-to-install kits: pre-cut panels, matching J‑trim, adhesive, and a few painted/finished samples. Target DIY homeowners, real estate stagers, and short-term rental owners who want a fast aesthetic upgrade without hiring a contractor.
Designer Sample Packs & Wholesale
Create curated sample packs or bulk lots for interior designers, architects, and contractors who need quick mockups. The 12×12 sample size is perfect for specifying finishes; offer multiple textures/painted finishes to upsell full-size panels.
DIY Workshops and Online Courses
Run local hands‑on workshops or paid online tutorials teaching installation, cutting techniques, finishing (metallic aging, stenciling), and edge-trim work. Sell accompanying starter kits (samples, adhesive, trim) and record the classes for passive income.
Etsy/Shopify Store for Finished Accent Panels
Sell single finished panels as wall art, mirror backs, or seasonal decor on Etsy or Shopify. Because the tiles are lightweight and durable, they ship easily and can be marketed as versatile décor—offer custom painting and sizes on commission.
Creative
Faux Tin Ceiling Mosaic
Use multiple 12×12 samples to assemble a faux tin ceiling. Overlap panels per the system, prime and paint with metallics and aging glaze to get an authentic antique look. Because the panels are lightweight and cuttable, you can fit around light fixtures and beams without special tools.
Waterproof Shower or Backsplash Accent
Create a durable, decorative accent wall in a shower, behind a tub, or as a kitchen backsplash. Panels are water- and corrosion-resistant and Class A fire rated, so they handle wet areas; trim with J‑trim for clean edges and glue directly over existing substrate for a fast refresh.
Modular Headboard Wall
Build a custom headboard by mounting a grid of panels behind the bed. Paint or stencil different panels for a mixed-pattern look, or add foam tape for a padded effect. The lightweight panels make installation easy and let you create a dramatic focal wall without structural work.
Framed Decorative Tile Art
Cut panels into rectangles, circles or geometric shapes and turn them into framed wall art or a gallery arrangement. Their smooth matte surface takes paint, decals, or vinyl well; because they're easy to cut and light, you can make large pieces and hang them with simple picture hardware.
Refreshed Cabinet & Furniture Facades
Adhere trimmed panels to cabinet doors, drawer fronts or the face of inexpensive furniture to give them a textured, upscale look. Finish with paint or metallic leaf and use J‑trim at edges for a professional appearance—great for renters or quick upcycles.