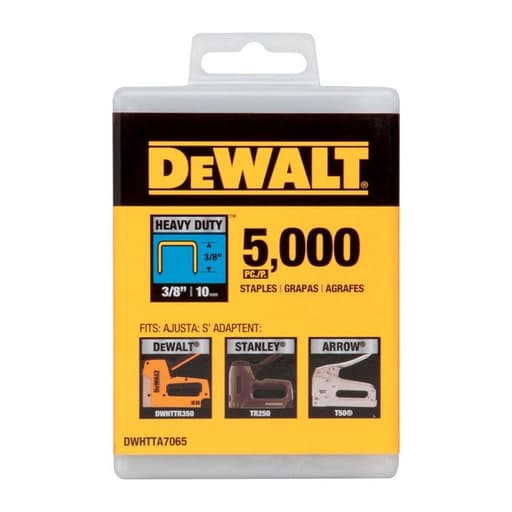
Features
- Compatible with most 3/8 in. crown staplers
- Intended use: insulation, upholstery, house wrap/vapor barrier, and screen
- Coated finish for interior applications only
- Chisel point to reduce material splitting
Specifications
| Finish | Coated |
| Head Type | Chisel Point |
| Crown Width (In) | 3/8 |
| Product Length (In) | 3/8 |
| Fastener Type / Gauge | 3/8 in. crown staples |
Staples sized for 3/8 in. crown staplers. Intended for fastening insulation, upholstery, house wrap/vapor barrier, and screen materials. Coated for interior use. Chisel point design helps reduce splitting of material.
DeWalt Heavy Duty 3/8 in. Crown Staples Review
A straightforward staple that does its job well
I spend a surprising amount of time thinking about staples. Not because I want to, but because nothing slows down insulation, house wrap, or upholstery work like fasteners that bend, jam, or tear through material. After running a few thousand of these DeWalt 3/8-in crown staples through a handful of tasks, I’m convinced they’re a reliable, no-drama choice for interior fastening where a 3/8-in crown is appropriate.
Fit and compatibility
These are standard 3/8-in crown staples with a 3/8-in leg length and a coated finish. I ran them in a DeWalt manual stapler, a compact electric stapler, and a hammer tacker that’s known to be a little picky. In each tool, the strips seated cleanly in the magazine and advanced without fuss. The strips are glued consistently—firm enough to survive bouncing around in a pouch, but not so rigid that the pusher fights them. Across multiple boxes, I didn’t encounter any “short” strips or oddball pieces that commonly cause feed issues.
The manufacturer notes compatibility with most 3/8-in crown staplers, and that aligns with my experience. If you have an older or off-brand tool, check the manual for crown/leg compatibility, but these fit every mainstream stapler and tacker I tried.
Driving performance and material behavior
A good staple should do two things: penetrate cleanly and hold without tearing. The chisel point on these staples makes a difference in both respects. In softwoods (pine furring, SPF studs), the legs bite with a crisp entry, and I saw fewer surface splits than I typically get from blunt-legged staples. That’s most noticeable when fastening close to an edge or on brittle trim stock used to tack up plastic or fabric barriers. On plywood and OSB, the legs tracked straight, and I didn’t see the common “one leg in, one leg out” syndrome unless I hit a void or a knot at a bad angle.
For the surfaces that actually matter—the materials you’re fastening—the staples hold without excessive tearing. On Kraft-faced insulation, the legs slip through the paper cleanly. On house wrap and poly vapor barrier, you’ll still want cap fasteners if you’re following strict spec or dealing with high wind exposure, but for interior membranes and temporary protection, these staples did not zipper or elongate holes as long as I kept the stapler’s nose square. On screen material and upholstery fabric, the 3/8-in leg length is a solid middle ground: long enough to grab into pine and poplar frames without poking through, short enough that you can get back out with a staple puller without destroying the substrate.
Applications I tested
- Insulation batts: Installed several rooms of R-13 and R-19 with face stapling and inset stapling. The staples seated flush with a manual stapler using moderate hand pressure. No shredding of the facer, and I didn’t have to double-up staples to prevent sag.
- House wrap and interior vapor barrier: For interior poly, these were trouble-free with both a manual stapler and a hammer tacker. For exterior wraps, they drive fine, but I’d pair them with caps or choose a dedicated cap stapler when code or conditions call for it.
- Upholstery/soft goods: Recovered a pair of shop stools and tacked canvas dust skirts. The legs clinched firmly into softwood frames and MDF without blow-through. When removing, the legs didn’t twist off or fragment—nice if you’re fussy about rework.
- Screen material: On cedar screen frames, the chisel point helped avoid splitting, especially near miters, and the crown width distributed pressure well.
Coating, corrosion, and where they belong
These staples have a coated finish and are intended for interior applications. The coating helps with drivability and offers basic corrosion resistance in conditioned spaces, but it’s not a substitute for stainless or hot-dipped fasteners. I wouldn’t use them in exterior exposures, coastal environments, or anywhere they’ll see moisture cycling (porch screens, exterior wraps left exposed for extended periods, crawl spaces with questionable vapor control). Indoors—basements, living spaces, conditioned attics—they’re right at home.
If you work on mixed interior/exterior scopes, it’s worth keeping a separate box of stainless staples to avoid cross-contamination. Visually, these have the familiar bright/finished look; they’re not marked as stainless.
Reliability and jam behavior
Staple jams often trace back to inconsistent leg length, malformed crowns, or brittle glue strips. I purposely ran these through a hammer tacker—arguably the most abusive way to feed staples—and didn’t experience misfeeds beyond the occasional bounce you get when striking a knot or the edge of a stud. In hand and electric staplers, the slide advanced smoothly. The staple wire seems well formed; legs are parallel, and crowns are square. If you do encounter a jam, clearing is straightforward because the legs don’t mushroom or flare unpredictably when partially driven.
For what it’s worth, the box packaging is practical for the shop: clearly labeled with size and type, and the internal sleeves protect the strips from kinking. The boxes aren’t moisture-proof; store them off concrete and away from damp to preserve the coating.
Compared to generics
Generic 3/8-in crown staples can be cheaper by a noticeable margin. The most common trade-off I see is variability: a few malformed staples in a strip are enough to stall a tacker and cost you time. With these, consistency is the selling point. The chisel points are uniform, the crown width is true 3/8 in., and the leg length is as marked. If you’re shooting a few dozen staples on a weekend project, you might not care. If you’re running a few thousand in insulation or barrier work, not clearing jams is worth more than the small premium.
Tips for best results
- Match length to substrate: 3/8-in legs are ideal for thin sheet goods, insulation facers, wrap, fabric, and screen frames. If you need deeper bite into framing or thick hardwoods, step up leg length rather than overdriving.
- Keep the nose square: A square nose prevents one-leg partial drives, especially on OSB edge grain and plywood veneers.
- Consider caps for membranes: For weather-resistive barriers and interior vapor control layers where tear resistance matters, pair with plastic caps or use a cap stapler when required.
- Store dry: The coating is for interior use. Keep the boxes dry to avoid surface oxidation that increases drive friction.
- Mind grain direction: When fastening near edges on softwoods, orient the crown perpendicular to the grain where possible; the chisel point helps, but good orientation further reduces splits.
What could be better
I’d love to see the same staple offered in a corrosion-resistant variant for damp interior locations and intermittent exterior exposure. A clearly printed corrosion rating on the box would help crews quickly confirm they’re using the right fastener for the environment. Additionally, more leg-length options under the same product line would make it simpler to standardize across tasks without changing brands.
Bottom line
These DeWalt 3/8-in crown staples are a solid, predictable choice for interior fastening tasks like insulation, upholstery, house wrap/vapor barrier, and screen work. The chisel point does its job—cleaner entries and fewer splits—and the strips feed consistently in both staplers and hammer tackers. They’re not for exterior exposure, and they’re not a replacement for cap fasteners where required, but within their lane they perform exactly as you’d want.
Recommendation: I recommend these staples for anyone doing regular interior fastening with 3/8-in crown staplers. They’re consistent, they drive cleanly, and they minimize jams—advantages that save time on repetitive tasks. If you need exterior-grade corrosion resistance, look for a stainless or specialty alternative; otherwise, these should be your go-to for day-in, day-out interior work.
Project Ideas
Business
Mobile Chair Reupholstery
Offer on-site dining chair seat and small upholstery refreshes. Use 3/8 in. crown staples to quickly secure batting and fabric to seat bases with minimal splitting, enabling fast turnaround and tidy results for residential and small commercial clients.
Acoustic Panel Fabrication
Produce and sell custom fabric-wrapped acoustic panels for podcasters, home theaters, and offices. The staples make stretching fabric tight over wood frames and insulation efficient, keeping production costs low and margins healthy.
Interior Vapor Barrier & Insulation Service
Specialize in stapling house wrap/vapor barrier and securing faced insulation in basements, garages, and remodels. The interior-coated staples suit these environments, and the chisel point helps prevent stud splitting for cleaner installs.
Screen Repair & Custom Wood Screen Frames
Set up a local service to repair torn window and door screens or build custom wooden screen panels. Staples let you fasten screen fabric cleanly to wood frames before trimming for a tight, professional fit.
Canvas and Fabric Stretching Service
Offer gallery-style canvas stretching and fabric-mounting for artists, photographers, and decorators. Use staples to secure material to stretcher bars, ensuring consistent tension and neat, finished edges at competitive prices.
Creative
Fabric-Wrapped Acoustic Wall Art
Build simple wood frames, add mineral wool or acoustic insulation, and stretch decorative fabric over the front, fastening it with 3/8 in. crown staples on the back. The chisel point helps prevent splitting the frame rails while you get crisp, tight fabric edges for artful sound absorption in living rooms, studios, or home theaters.
DIY Upholstered Headboard
Cut a plywood silhouette, add foam and batting, then wrap with upholstery fabric and secure with staples on the rear face. The staples’ chisel point reduces splitting along plywood edges, making it easier to get professional, tufted looks and clean corners for a custom bedroom centerpiece.
Folding Room Divider Panels
Create a series of narrow wood frames hinged together, then stretch fabric or cane webbing over each frame and staple it down. Use interior-rated coated staples for a light, modern divider that adds privacy and texture in studios or home offices.
Seasonal Window Insulation Inserts
Make lightweight frames sized to your window openings, wrap with clear shrink film or fabric over thin insulation, and staple on the back. Pop them into place during winter to reduce drafts, then store flat in warmer months.
Custom Indoor Screen Panels
Build wood frames to fit alcoves or shelves and staple screen material to create pet barriers, plant shelves with airflow, or minimalist room accents. The chisel point lets you staple near edges without splitting narrow stock.