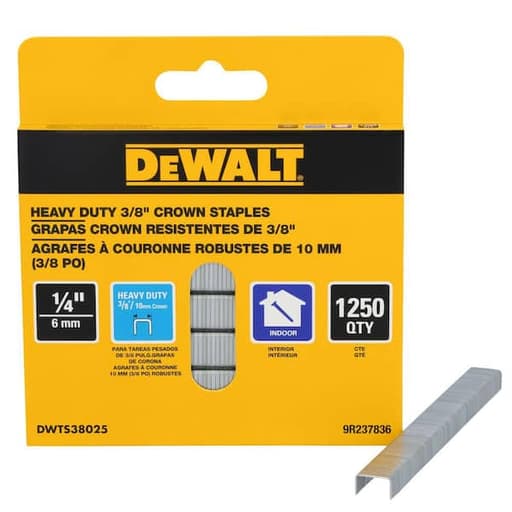
Features
- Designed for use with 3/8 in. crown staplers
- Suitable for insulation, upholstery, house wrap/vapor barrier, and screen applications
- Coated finish intended for interior use
- Chisel point to reduce splitting of material
- Fits most 3/8 in. crown staplers
Specifications
| Crown Width (In) | 3/8 |
| Fastener Type / Gauge | 3/8 inch staples |
| Finish | Coated |
| Head Type | Chisel point |
| Product Length (In) | 1/4 |
| Warranty | Not eligible for warranty |

3/8‑inch crown staples intended for use with compatible 3/8‑inch crown staplers. Appropriate for insulation, upholstery, house wrap/vapor barrier, and screen installations. Coated finish for interior use. Chisel point helps reduce splitting of materials.
DeWalt Heavy Duty 3/8 in. Crown Staples Review
Why I reached for these staples
A week of mixed interior jobs—hanging a vapor barrier in a basement, rehabbing a pair of dining chairs, and fixing a sagging window screen—gave me a good excuse to run DeWalt’s 3/8‑in. crown staples through a few different staplers. I’ve long believed that fasteners are as important as the tool driving them, and this batch reinforced that view. These are uncomplicated consumables, but consistency, point geometry, and coating make a noticeable difference once you start driving hundreds of them in a day.
What they are and what they fit
These are 3/8‑inch crown, 1/4‑inch leg staples with a coated finish and a chisel point. In plain terms:
- Crown: 3/8 inch wide, so they spread clamping force across a slightly larger area than narrow-crown staples.
- Leg length: 1/4 inch, which is conservative but appropriate for thin stock and layered membranes.
- Finish: A slick, coated surface intended for interior use—good for feeding and driving, not for wet or exterior conditions.
- Point: A chisel tip that helps reduce splitting and eases penetration in softwoods and screen frames.
They’re designed to fit most 3/8‑inch crown staplers. I ran them in a pneumatic stapler and a hammer tacker. The strips were dimensionally consistent and seated cleanly in each magazine without the “sawtoothing” you sometimes see with cheaper staples.
Setup, feeding, and jam behavior
Staple reliability starts with how they feed. These DeWalt staples arrived in straight, uniform strips that didn’t crumble when handled. That matters more than it sounds: warped strips or weak adhesive can shed staples in the magazine and set you up for misfeeds. Over roughly a thousand shots across the two tools, I didn’t have a single magazine-related jam.
In use, the coated finish helped them slide against the magazine rails and into the work. In the hammer tacker, I could feel a slightly lighter impact needed to bury them flush in spruce studs and pine blocking. With the pneumatic stapler set to a moderate pressure, I got consistent, flush drive without over-penetration.
Insulation and vapor barrier
For unfaced batt insulation and 6‑mil poly vapor barrier, the 1/4‑inch leg is right in the sweet spot. It’s long enough to catch solid wood reliably, short enough to avoid puckering or tearing the membranes when you cinch the crown. I stapled poly to kiln‑dried studs on 12–16‑inch spacing and only had two minor tears, both caused by me getting too close to a stud edge.
A quick tip: set your stapler to drive staples just flush, not deeply countersunk. With these staples, “flush but snug” held the poly flat without stretching. The 3/8‑inch crown spreads load better than narrow‑crown options, which helps keep lighter sheeting from tearing at the fastener.
House wrap and sheathing
I did a small indoor mockup with standard house wrap over OSB. These staples will physically hold wrap, but I wouldn’t use a 1/4‑inch leg or a bare crown for a full exterior job. Many wraps and jurisdictions call for cap fasteners or longer legs to resist wind uplift and to reduce tearing. If you’re sticking to interior-rated staples, treat these as a stopgap for temporary positioning or protected spaces. For exterior wrap, I’d reach for a cap stapler or a longer, corrosion-resistant staple.
Upholstery and shop fixtures
On upholstery, the 3/8‑inch crown is a friendly size for securing dust cover fabric, piping, or lightweight upholstery cloth to plywood frames. The coated finish helps them seat flush without snagging fibers. Into poplar and Baltic birch, the chisel point entered cleanly and the legs stayed true. For heavy webbing or thick stacks of fabric, though, 1/4‑inch legs are simply too short. That’s not a knock on these staples—just a reminder to match leg length to the job.
I also used them to tack canvas to a shop jig and to fix a loose back panel on a casework carcass. The wider crown held the edges flat without chewing up the material, which is exactly what I want from a general‑purpose 3/8‑inch crown.
Screen frames and light trim
Screen repairs are a good test of point geometry. Cedar and thin pine frames love to split with blunt points. The chisel point on these staples is genuinely helpful; I could tack screen cloth to a pine frame near the edge with minimal splitting. Angle the stapler slightly and avoid driving too close to end grain, and you’ll get clean results. After tensioning and trimming the screen, the staples stayed proud enough to grab without crushing the weave.
Penetration and holding power
Across softwood studs, plywood, and pine frames, I got predictable, straight drives. In knots or very hard latewood, the hammer tacker occasionally produced a cocked leg—common with short staples and manual tackers—yet the pneumatic stapler drove cleanly even in those denser spots. Holding power is appropriate for the length: great for membranes, light fabrics, screen, and shop tasks; not designed for structural loads or thick laminations.
The 3/8‑inch crown is a noticeable upgrade in holding compared with narrow-crown for these use cases. If you’re securing something that sees shear or peel forces—like house wrap in a gusty area—use more fasteners, add cap washers, or step up to a longer, exterior-rated staple.
Finish and corrosion resistance
The smooth, coated finish is a win for feeding and driving, and it reduces friction in the magazine. It is not a substitute for galvanization or stainless. These staples are for interior use; don’t expect them to hold up against moisture, treated lumber, or exterior exposure. Store them dry—like any coated staple, humidity can create surface oxidation that compromises feeding.
Limitations to keep in mind
- Leg length: At 1/4 inch, these excel at thin stock and membranes but are the wrong choice for thicker stacks, heavy upholstery webbing, or exterior sheathing. Have longer legs on hand for those tasks.
- Interior-only: The coating is not weather-rated. For outdoor projects, use galvanized or stainless staples instead.
- No cap: For house wrap or foam board where tear resistance matters, consider a cap stapler system.
None of these are flaws—they’re boundaries of the spec. As long as you choose them for the right jobs, they do exactly what they should.
Tips for best results
- Match air pressure so staples land flush, not buried. These drive cleanly at moderate pressure; overdriving tears membranes and deforms crowns.
- For membranes, keep staples 3/4 inch off edges and space them consistently. The wider crown helps, but technique still matters.
- On screen frames, angle the gun slightly and avoid end grain to reduce splitting, even with the chisel point.
- Periodically brush out your stapler magazine. The coated finish stays slick longer in a clean track.
- Verify your stapler’s crown spec. “Fits most” has been true in my use, but tolerances vary; a quick check saves headaches.
The bottom line
As a general‑purpose, interior 3/8‑inch crown with a 1/4‑inch leg, these DeWalt staples are dependable. They feed well, drive straight, and the chisel point meaningfully reduces splitting in the thin, finicky stock where short staples shine. They held vapor barrier cleanly, handled light upholstery work without snagging, and made screen repairs less fussy.
I recommend them for anyone who needs a reliable, interior-rated 3/8‑inch crown staple for membranes, light fabrics, screen frames, and shop utility tasks. Just pair them with the right tool, keep to interior applications, and reach for longer or weather‑rated staples when the job calls for it.
Project Ideas
Business
Mobile Reupholstery & Cushion Repair
Offer on-site refreshes for dining chairs, ottomans, benches, and office arms. Use 3/8 in. crown staples to work fast and clean on frames and plywood seats. Sell fabric options, foam upgrades, and seam/trim add-ons for higher average tickets.
Garage/Basement Insulation Micro-Installs
Specialize in small, quick-turn upgrades: staple-faced insulation and interior vapor barriers in garages, basements, and workshops. Flat-rate per stud bay, with upsells like door sweeps and pipe wrap. Market as a weekend thermal comfort boost.
Interior Fabric Walls & Acoustic Treatments
Design and install fabric-wrapped panels for home theaters, podcasts, and conference rooms. Staples secure fabric to furring strips or frames for a crisp edge. Offer consultations, custom prints, and maintenance plans for recurring revenue.
Event Backdrops & Photo Booth Flats
Build reusable flats and staple various fabrics or branded graphics for pop-ups, weddings, and trade shows. Provide delivery, setup, and strike. Keep an inventory of textures and colors to rapidly customize looks for clients.
Custom Covers & Screened Cabinetry
Fabricate radiator covers, media console doors, and closet panels with cane, rattan, or interior screen insets stapled from behind. Sell to interior designers and property managers seeking breathable, stylish upgrades with fast turnaround.
Creative
Acoustic Fabric Panels
Build 1x2 wood frames, fill with mineral wool or foam, wrap in breathable fabric, and secure the fabric to the back with 1/4 in. 3/8 in. crown staples. The chisel point reduces splitting on thin frame stock. Hang in a studio, office, or media room for better acoustics and a clean, custom look.
Custom Upholstered Headboard
Cut a plywood headboard shape, add foam and batting, then stretch your fabric and staple to the back side. The 3/8 in. crown grabs fabric and batting evenly without telegraphing through. Add optional tufting and mount with a French cleat for a boutique, hotel-style finish.
Radiator or Cabinet Screen Makeover
Build a simple frame to cover a radiator or refresh cabinet doors, then staple cane webbing, perforated metal mesh, or interior screen fabric from the back. The chisel point helps avoid splitting on narrow rails. Paint or stain the frame for a polished, breathable cover.
Fabric-Wrapped Room Divider
Create hinged pine frames and stretch canvas, linen, or printed fabric across each panel. Staple fabric on the back for a gallery-clean edge. This lightweight divider adds privacy and decor, and the interior-rated staples keep everything tight and neat.
Dining Chair Refresh
Strip old upholstery from dining seats, replace with high-density foam and batting, and staple new fabric to the underside. The 3/8 in. crown provides broad holding power for fabric edges and piping, making a quick, professional-looking update.