Features
- Positions crown molding vertically against the saw fence for nested cuts
- Includes two stops (one for each side of the blade)
- Adjustable stops with thumb-screw locking
- Strong steel construction for durability
- Compatible with several miter saw models
Specifications
| Color | Silver |
| Number Of Pieces | 2 |
| Product Height (In) | 4.5 |
| Product Length (In) | 3 |
| Product Width (In) | 6.5 |
| Product Weight (Lbs) | 1.75 |
| Product Weight (Oz) | 28 |
| Compatible With | DW703, DW706, DW708, DW712, DW715, DW716, DW717, DW718, DWS780 |
| Thumb Screw Slide Range | Up to 12 in (30.5 cm) from the fence |
| Warranty | 3 Year Limited Warranty; 1 Year Free Service; 90 Days Satisfaction Guaranteed |
Related Tools
Related Articles

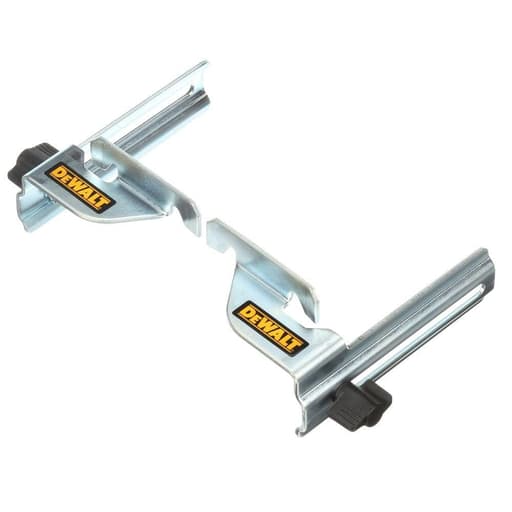
Two metal stops that position crown molding vertically against a miter saw fence to enable repeatable, nested cuts. Each kit contains a left and right stop that mount to the saw fence and are adjustable for molding width.
DeWalt Miter Saw Crown Stops Review
Why I added crown stops to my miter saw setup
Crown molding looks simple until you try to hold a heavy, awkward length of trim at the exact spring angle while dialing in a clean miter. I’ve used jigs, painter’s tape, and the classic “block screwed to the fence” trick. They work in a pinch, but none of them gave me the repeatability and confidence I wanted. That’s why I put a set of DeWalt crown stops on my saw. They’re a small upgrade with an outsized impact on speed and consistency for nested crown cuts.
What they are and how they mount
The crown stops are a pair of steel brackets—one for the left of the blade, one for the right—that bolt to your miter saw’s fence. Each has a slotted arm with a thumb screw so you can slide it to the exact depth your crown needs to sit at its spring angle, then lock it down. Once set, they create a fixed “nest” so the molding registers in the same position every time, vertically against the fence and table.
They’re compact (about 4.5 in tall, 6.5 in wide, and 3 in deep) but heavy-gauge steel, and the pair weighs roughly 1.75 lb. The thumb screws are chunky enough to tighten by hand without hunting for a wrench. Adjustments are straightforward: loosen, slide, square your stock, tighten. The slot provides generous travel; DeWalt rates the slide range up to 12 in, which easily covers narrow cove to wide-profile crown.
Compatibility is good across DeWalt’s lineup. They bolt onto pre-tapped holes on models including DW703, DW706, DW708, DW712, DW715, DW716, DW717, DW718, and the DWS780. I’ve used mine on a DWS780 12-in slider—installation took minutes with the included screws. If you’re running a different brand or an older saw without factory holes, expect to either skip them or carefully drill and tap your fence; I wouldn’t do that unless you’re comfortable with layout and aluminum.
DeWalt backs them with a 3-year limited warranty, 1 year of free service, and a 90-day satisfaction guarantee. For a simple accessory, that’s reassuring.
Setup: a five-minute calibration that pays off all day
Getting these stops dialed in is quick:
- Cut a short scrap of your crown.
- With the saw at 0° bevel, place the crown in the “nested” position—one edge against the table, the other against the fence—at its intended spring angle.
- Slide the left and right stops in until they just touch the back faces of the crown. You’re not clamping; you’re creating two consistent contact points.
- Snug the thumb screws, remove the piece, and re-seat it to confirm it nests without wobble.
- Make a test cut at 45° miter to verify the fit on a 90° corner.
From there, I like to scribe a light pencil mark on the fence at the stop edges. If I remove the stops for other work, it takes seconds to return them to the same setting.
Cutting performance and accuracy
The benefit is simple: once set, the crown’s spring angle is no longer something you wrestle by hand. You set bevel to 0°, swing the miter to your angle (typically 45° for standard inside/outside corners on a square room), and cut. Because the molding is indexed by the stops, the relationship between the fence, table, and crown is fixed. That means inside-left, inside-right, outside-left, outside-right—all of your paired miters—line up predictably as long as your measurements are accurate.
On the DWS780, I can batch cut four sides of a room quickly. The stops don’t flex, and they don’t creep. Even on larger crown, once I have outfeed support in place and a hand firmly on the work, the molding stays put. I’ve tried clamping to the fence on delicate profiles; the stops make that unnecessary in most cases, though on long runs I’ll still clamp to manage weight.
A few practical observations:
- Because the stops create a fixed register, you can flip and rotate pieces without rethinking the spring angle. That reduces mental gymnastics and mistakes.
- With factory detents and a sharp blade, miters come together cleaner. The stops won’t change your blade quality, but they stabilize the workpiece at the moment the teeth enter the cut, which helps avoid a slight chatter that can open a joint.
- They don’t interfere with dust collection, and I haven’t had issues with the guard or rail travel at common miter settings.
Ergonomics and durability
These are not delicate accessories. The steel is thick enough that I don’t worry about bending them in a crowded job box. The finish has held up to incidental knocks and sawdust grime. Threads on the thumb screws are smooth, and once tightened they don’t back off from vibration during normal use.
One nuance: the stops contact the back face of your crown. On painted stock, that’s usually fine. On stained or prefinished material, I’ll stick a strip of blue tape on the stop faces to ensure no scuffing—purely a caution; steel-on-wood hasn’t left marks in my experience, but better safe than sorry.
Limitations and quirks
No accessory is perfect, and a couple of things are worth knowing before you commit:
- They index, they don’t clamp. For long or heavy crown, you still need proper material support and good hand placement. The stops won’t prevent a bowed piece from trying to twist; they just give you a consistent reference.
- Extremely tall crown is ultimately limited by your saw’s vertical capacity, not the stops themselves. If your fence height or blade clearance is the bottleneck, the stops can’t change that.
- On some saws, a very steep bevel combined with large miter angles can bring the motor housing close to the stop. For nested crown, you’re at 0° bevel, so it’s a non-issue. But if you leave the stops on for other compound cuts, you might need to slide or remove one to gain clearance.
- If your saw isn’t on the compatibility list, don’t assume a universal fit. Drilling a fence is possible but not advisable for every user or saw.
None of these are dealbreakers for crown work; they’re just the practical bounds of what a simple stop can and can’t do.
Compared to DIY solutions
I’ve built wooden crown jigs that clamp to the fence. They work—but they’re bulky, they can interfere with bevel travel, and they’re never as quick to adjust for a different profile. Painter’s tape and pencil lines help, but you’re relying on hand pressure to maintain the angle, which slows you down and introduces variability. The crown stops hit a sweet spot: they’re compact, dead simple, and return to a known setting in seconds.
Everyday use on site
A typical workflow for me is to rough cut long pieces, install a support stand, set the stops with the actual crown stock, and then measure-and-cut all four corners of a room in sequence. Having the stops set means I can focus on length and miter orientation rather than micromanaging the spring angle. For coped inside corners, they’re still handy; I’ll cut the initial 45° as a guide for coping with a saw or grinder, and the clean, consistent cheek angle makes coping faster.
When a job throws me a non-standard spring angle, the stops earn their keep. I’ll nest the odd profile against the fence, slide the stops until the piece sits perfectly without rocking, and lock them down. That lets me run “miter-only” cuts without pulling out charts or reconfiguring to the flat method.
The bottom line
If you cut crown even a few times a year, these crown stops are a small, smart upgrade that trades improvisation for repeatability. They’re sturdy steel, quick to set, and purpose-built for nested crown. On compatible DeWalt saws—DW703, DW706, DW708, DW712, DW715, DW716, DW717, DW718, and DWS780—they bolt up cleanly and stay out of the way. They won’t turn a small saw into a tall-capacity machine or eliminate the need for support on long stock, but they will eliminate the fussy part of holding the spring angle by hand.
Recommendation: I recommend these crown stops. They’re durable, fast to adjust, and they remove a major source of error in crown work. If your saw is on the compatibility list, installation is painless, and the time you save on every room’s worth of molding more than justifies adding them to your kit. If your saw isn’t compatible and you’re not comfortable modifying your fence, consider a DIY jig—but if you can mount these properly, they’re the cleaner, more reliable solution.
Project Ideas
Business
Crown-Only Installation Service
Offer a specialized, fast-turn crown molding installation package priced per linear foot or per room. The crown stops speed up nested cuts and reduce rework, allowing competitive pricing and higher daily output. Market add-ons like caulking/paint and LED cove lighting.
Pre-Mitered Corner Kits
Produce and sell ready-to-install inside/outside corner assemblies for popular crown profiles. Homeowners butt straight runs into your pre-mitered corners for a pro look without complex cuts. The stops ensure every kit is consistent across batches.
Tool Rental + DIY Crown Bundle
Rent out a miter saw equipped with the crown stops, plus an angle finder, setup blocks, and a quick-start guide. Offer weekend bundles with a small consumables kit (glue, nails, filler). Ideal for DIYers who want pro results without buying gear.
Trim Carpentry Workshops
Host paid in-person or online classes on crown installation, covering nested vs. flat cuts, coping, and scarf joints. Use the stops to demonstrate repeatability and sell class tool bundles or affiliate-linked kits for extra revenue.
Builder and Realtor Partnerships
Create fixed-price crown packages (e.g., entry, dining, primary suite) for spec homes or pre-sale refreshes. With the stops, your crew can produce uniform, high-quality results quickly across multiple properties, making you a reliable go-to vendor.
Creative
Coffered Ceiling with Crown Inset
Build a grid of ceiling beams and line the inside perimeter of each coffer with small-profile crown molding. The crown stops let you nest the crown vertically for perfect, repeatable inside/outside miters around dozens of squares. Use the adjustable stops to dial in different crown widths for main rooms vs. hallways.
Crown-Framed Mirror Wall
Create a statement mirror wall by framing large mirror panels with crown molding instead of flat casing. Nested cuts with the stops keep every corner tight and consistent, even on long runs. Paint or gild the crown for a classic hotel-style look.
Cornice Box Valances
Build lightweight wall-mounted cornice boxes wrapped with crown molding to finish window treatments or bed canopies. The stops make repeatable 45° outside miters for multiple matching valances. Add LED strip lighting behind the crown for a soft glow.
Floating Mantel and Shelf Package
Construct floating shelves and a mantel with an integrated crown light rail under the front edge. Using the stops, cut precise returns and scarf joints so long runs look seamless. Ideal for media walls and built-ins with under-shelf lighting.
Column and Beam Wraps
Box in structural posts or faux beams and finish with crown at the top for a traditional capital look. The dual stops help you batch identical pieces so every column matches. Great for porches, stair landings, or kitchen islands.