Features
- Pro Grade stainless steel trowel
- Versatile square notched design for spreading thinset and mastic
- Ergonomic Rubber Grip Comfort Handle
- Longer shank for durability
- Lifetime Warranty
Related Tools

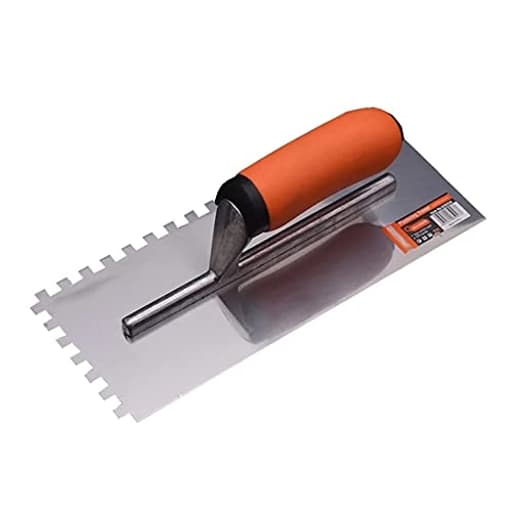
This stainless steel square-notched trowel has an 11" x 4 3/4" blade with 1/4" x 1/4" x 1/4" notches for spreading thinset and mastic evenly. It has an ergonomic rubber grip, a longer shank for increased durability, and is covered by a lifetime warranty.
Edward Tools Squared Notch Tile and Flooring Trowel - 1/4” X 1/4” X 1/4” Pro Grade Stainless Steel Trowel - Ergonomic Rubber Grip Comfort Handle - Spread Evenly Thinset/Mastic - 11” x 4 3/4” Blade Review
First impressions and test jobs
I put the Edward Tools trowel to work on two weekend jobs: a ceramic backsplash and a small bathroom floor in porcelain. Both are bread‑and‑butter tasks for a 1/4 x 1/4 x 1/4 square‑notch, and they made for a good shake‑down of build, comfort, and consistency. Out of the package, the stainless blade was flat, the notches were uniform, and the handle felt secure without being bulky. Nothing flashy—just the right basics.
Why a 1/4-inch square-notch still matters
A 1/4-inch square-notch is a versatile profile. It’s ideal for many ceramics and smaller porcelains on flat substrates, where you want consistent ridges that collapse cleanly without excessive squeeze-out. For backsplashes, shower walls (with thinset, not mastic, in wet zones), and typical 8x8 to 12x12 floors, this notch size often hits the mark. It won’t be the right choice for every tile—large format planks or deeply lugged backs need more mortar and a bigger notch—but it’s an everyday workhorse. That’s the role this trowel fills.
Build and ergonomics
Blade: Stainless steel, 11 x 4-3/4 inches. The blade arrived true and stayed flat under load, which is critical to keeping ridges even and coverage predictable. Stainless resists rust and holds its edge better than the bargain carbon-steel trowels that tend to pit quickly.
Notches: The 1/4-inch square notches were cut cleanly and evenly. The corners of the blade are just slightly relieved, which helps reduce gouging in fresh mortar when you flip or reposition the tool.
Shank: The longer shank gives you a bit more knuckle clearance and better leverage when pulling mortar. It also kept flex to a minimum; I didn’t notice chatter or “wag” in the blade even when I leaned into it on the floor.
Handle: The rubber grip is comfortable and slightly tacky, which helps control. The profile supports a relaxed, neutral wrist angle whether you’re pulling toward you or sweeping laterally across a backsplash.
In hand, the trowel is balanced. Some stainless models feel top-heavy; this one does not. It’s an easy all-day tool for a DIYer and won’t feel out of place in a pro kit.
In use: thinset and mastic
I ran polymer-modified thinset on the bathroom floor and Type 1 mastic on the dry backsplash area. With thinset, the trowel left tight, consistent ridges at a predictable 45-degree angle. A quick lift-and-check under a few 12x12s showed coverage in the high 80s on a flat substrate without back-buttering; with a light back-butter on the tile, coverage jumped into the 95% range where I want it for a small-format floor.
With mastic, the notches delivered clean ribbons that stayed open long enough to set tiles without skinning prematurely. The rubber grip helped here—when you’re working at shoulder height and reaching, a secure handle translates to straighter, more even pulls.
One note: on older, less-than-flat subfloors, you’ll still want to tune coverage with back-buttering or consider a bigger notch. The trowel can’t compensate for significant substrate irregularities.
Coverage, ridges, and tile sizes
Best matches: 3x6 to 12x12 ceramic and porcelain; mosaics with a mesh that doesn’t load up excessively; backsplash work on flat drywall or cement board.
Borderline cases: 12x24 porcelain on a very flat substrate can be coaxed into spec with careful combing and back-buttering, but a 3/8-inch or 1/2-inch notch is more efficient.
Not recommended: Large-format planks, heavily lugged backs, or tiles with deep relief patterns—go bigger.
Ridge formation was clean. I got minimal ridge slump even with a slightly looser mix, which speaks to the blade’s flatness and notch accuracy. Ridges collapsed uniformly with a good beating in, leaving even transfer and minimal voids.
Cleaning and maintenance
Stainless makes a difference at cleanup time. Between batches, I dropped the trowel in a water bucket and the blade wiped clean with a stiff nylon brush. The rubber handle holds onto mortar a bit more than wood or polished plastic; a pass with the brush right away solved it, but if you let it cure, you’ll be picking at it. The takeaway: rinse early, often, and don’t let thinset set up on the grip.
After a week in a humid garage, there was no orange bloom or spotting on the blade or shank. The edge stayed square; the notches didn’t mushroom or burr up after scraping against tile edges and spacers.
Maintenance tips:
- Keep a dedicated brush in your water bucket and hit the handle before the mortar skins.
- If you end up with a thinset film, a brief soak and a light vinegar scrub will lift it—rinse thoroughly afterward.
- Store the trowel dry to keep the handle from developing a lingering cement haze.
Durability and longevity
The longer shank matters. It reduces blade flex when you’re pressing hard to flatten ridges, and it isolates the handle from twist. I didn’t feel the typical “hinge” sensation you get on cheaper stamped trowels where the handle and blade seem to move independently. The welds and rivets felt tight, with no squeak or give.
Over several sessions, the blade didn’t warp. That’s important: even a slight cup or twist telegraphs into uneven ridges and inconsistent coverage. Here, the stainless stayed true.
What I’d change
Handle cleanup: The rubber grip is comfortable, but it does grab onto mortar more than a varnished wood handle. Not a deal-breaker—just be diligent about cleaning before cure.
Size imprinting: The blade is clearly notched, but I like trowels that have the notch size permanently stamped on the blade face. That’s a convenience issue when you’ve got multiple trowels in the bucket.
These are minor nits; functionally, the trowel does its job well.
Value and warranty
This sits in the “pro grade without the pro‑price tax” space. Stainless blade, accurate notches, comfortable handle, and a longer shank make it a solid value for daily use. The lifetime warranty is nice to have. In practice, good trowels fail from wear, not defects, but a warranty signals the manufacturer is confident in the build.
Who it’s for
DIYers taking on a bathroom floor, laundry room, or kitchen backsplash who want one trowel that covers most of those bases.
Pros who need a dependable 1/4-inch square-notch for everyday ceramic and smaller porcelain and prefer stainless for rust resistance.
Anyone who’s tired of carbon-steel blades rusting the moment you miss one cleanup session.
If your work leans heavily toward large-format tile, keep this in the bucket for small-format runs and grab a 3/8-inch or 1/2-inch square-notch as your primary.
Practical usage tips
Comb in one direction and collapse ridges by sliding the tile perpendicular to the ridges; it improves air release and coverage.
Hold a consistent 45-degree trowel angle to maintain even ridge height.
Lift and check every few tiles to confirm coverage; adjust with back-buttering as needed.
Don’t use mastic in wet areas; stick to thinset for showers and floors.
Recommendation
I recommend the Edward Tools trowel. It’s flat, the notches are true, the longer shank adds useful stiffness and clearance, and the rubber grip makes for steady, low‑fatigue pulls. In real‑world use, it lays down consistent ridges that translate to reliable coverage on the tile sizes this notch is meant for. Stainless construction keeps rust at bay and simplifies maintenance. The only real tradeoff is that the rubber handle demands prompt cleaning, but that’s a habit you should have anyway.
If you need a go‑to 1/4-inch square-notch for ceramic and small to mid‑size porcelain, this one earns its spot in the tool bag. For larger format work, pair it with a bigger notch and keep this as your versatile, everyday trowel.
Project Ideas
Business
Micro Tile-Install Service
Offer a focused service for small tile jobs (backsplashes, shower floors, repair patches) marketed to homeowners, landlords, and short-term rental hosts. The trowel’s 1/4" notch is ideal for standard subway and mosaic tiles; promote fast turnaround, clean work, and the professional finish achieved with pro-grade tools and lifetime-warrantied equipment.
DIY Tile Kits + Virtual Coaching
Create and sell DIY backsplash or mosaic kits that include pre-measured tile packs, thinset instructions, and a recommended tools list featuring your trowel. Add optional live or recorded coaching sessions teaching notch selection, thinset spread technique, and grout finishing. Kits lower the barrier for homeowners and generate recurring sales.
Workshops & Hands-On Classes
Run in-person or pop-up workshops teaching tile-laying basics (surface prep, trowel technique, layout, grouting). Use the ergonomic trowel as the recommended tool during classes and offer branded units for sale. Workshops attract hobbyists, interior designers, and Airbnb owners wanting upgrades, and can be monetized through ticket sales and tool/kits upsells.
Fix-and-Freshen Grout Service
Specialize in grout repair, regrouting, and thinset re-bedding for tiles that have popped or shifted. Market to realtors and property managers who need quick cosmetic fixes. Highlight how a proper 1/4" mortar bed laid with a pro-grade trowel prevents repeat issues—use before/after photos and offer maintenance contracts for recurring revenue.
Creative
Mini Mosaic Stepping Stones
Use the square-notched trowel to spread a thin, even bed of concrete or thinset in a shallow mold, then press colorful tile scraps, glass, or ceramic pieces into the surface to create custom stepping stones. The 1/4" notches help you control mortar depth for consistent adhesion; the ergonomic handle reduces fatigue while working multiple molds. Finish with sealant for outdoor use.
Textured Cement Planters
Form small batch cement planters and use the trowel to apply and texture a thin veneer of cement or plaster over a base mold. The notched blade creates a repeatable ridge pattern you can keep or smooth for a rustic look; use the shank strength to scrape/shape edges and the grip for comfortable, precise work. Add tile inlays before curing for a decorative touch.
Tile-Inlay Furniture Panels
Refresh tabletops, cabinet doors, or drawer fronts by embedding tile panels into a thinset bed spread with the trowel. The square notches create a uniform mortar bed for flat-tile adhesion so your inlay sits flush. Combine full tiles and mosaics for contrast, grout once set, then seal for a durable decorative surface.
Wall Art Reliefs with Thinset Texture
Create sculptural wall panels by applying layers of thinset or joint compound on a plywood or mesh backing using the trowel to build texture and pattern. The 1/4" notches give a modern grid texture; after curing paint or metallic-leaf the surface for gallery-style wall art with strong, tactile lines.