Features
- double-faced mallet with non-slip rubber grip help absorb vibration. Constructed of cast iron with bright chrome plating, the hammer is equipped with the hardness of 90±5 HAS. Double-faced solid rubber head delivers a softened, positive strike. The mallet head is 1-3/8 inch in diameter. The length of whole mallet is 10.3inch
- pull bar is designed with enhanced strength.Made from premium A3 steel with matt coating.The soft pads on the back can well protect the floor from scratch.The length of the pull bar is 10.5inch, thickness is 3mm
- the tapping block made from polypropylene with a handle that will knock your hand at work. We improved the structure and made a new design, making this product more sturdy and practical. The approximate size of the block body is 9.4 inch x 2.4inch x 1inch
- tapping block with easy to grip handle. You can rap the splicing floor planks directly without mallet.And you can also use it with mallet, it is more powerful and faster to finish installation work
- comes with 40 pieces plastic spacers which are designed with non-slip slots. The approximate size of the spacer is 2.3inch x 1.2inch
Specifications
| Color | Orange |
| Size | 43-Piece |
| Unit Count | 1 |
Related Tools


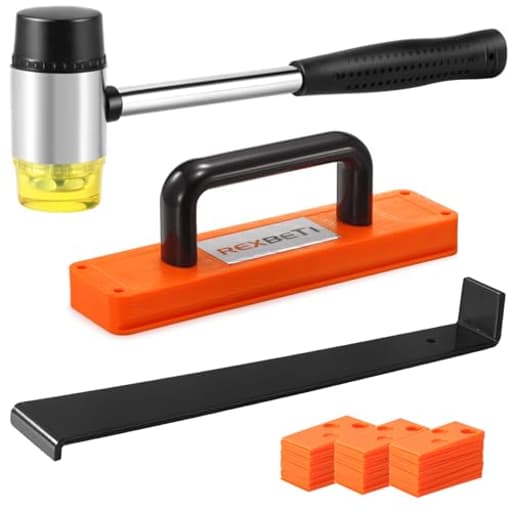
A 43-piece laminate and LVP flooring installation kit containing a double-faced cast-iron mallet with chrome plating and solid rubber heads (10.3 in overall, 1-3/8 in head), an A3-steel pull bar with protective pads (10.5 in, 3 mm), a reinforced polypropylene tapping block with handle (approx. 9.4 × 2.4 × 1 in), and 40 plastic spacers with non-slip slots (approx. 2.3 × 1.2 in). The tools are intended to align, tap, and secure planks during installation while protecting edges and maintaining consistent expansion gaps.
REXBETI Laminate Wood Flooring Installation Kit, LVP Installation Kit, Vinyl Flooring Tools - Tapping Block with Handle, Pull Bar, Double-Faced Mallet and Spacers Review
Why I reached for this kit
I laid two rooms of click‑lock LVP and a small hallway of laminate recently and wanted a kit that covered the basics without hauling a pro cart of specialty tools. The Rexbeti flooring kit has the three things you actually use on a floating floor—tapping block, pull bar, and a dual‑face mallet—plus a pile of spacers. After a few days of installation, cuts, recuts, and a fair amount of tapping, here’s how it held up and where it makes the most sense.
What’s in the box and how it feels in hand
- Mallet: A compact, double‑faced rubber mallet with a cast‑iron core and chrome plating. The head is 1‑3/8 inches in diameter and the overall length is about 10.3 inches. The handle has a grippy rubber sleeve that keeps it secure even with dusty hands. The rubber faces are on the firm side (good for transferring energy; less bounce).
- Pull bar: A 10.5‑inch A3 steel bar, 3 mm thick, with soft pads on the back face so you’re not gouging finished flooring or base. The hook profile is conventional, with enough bite to grab plank edges reliably.
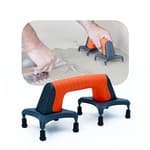
- Tapping block: Reinforced polypropylene with a full‑length handle. It’s roughly 9.4 by 2.4 by 1 inches—a low profile that makes it easy to position at the plank edge.
- Spacers: Forty plastic spacers with non‑slip slots. They’re wedge‑style, so you can pair/stack them to hit your expansion gap target.
Out of the box, everything feels appropriately stout for laminate and LVP. The block isn’t meant to be pretty—it’s sacrificial by design—and the pull bar has a decent coating that kept rust at bay during my project.
On the floor: performance and technique
The kit’s usefulness comes down to how cleanly it helps you seat joints without damaging edges. Here’s how each piece performed.
Mallet: The two rubber faces delivered a firm strike without marring click edges or powdering the block. For aligning long seams on LVP, it had enough mass to glide boards into place with a few measured taps. On stubborn short ends, I sometimes wanted more weight; a heavier dead‑blow makes those lock in faster. That said, for most laminate/LVP it’s the right balance—compact, controlled, and less tiring over hours of work.
Tapping block: The handle is the differentiator. You can grab and position the block while keeping fingers clear of the strike zone, and in tight areas you can “rap” the handle with your palm for micro‑adjustments without hauling the mallet back up. Alignment is key: keep the block flat so its groove profile sits fully on the tongue; if the block tilts, you can bruise a delicate edge. Used correctly, it saved me from a lot of edge rash and made long seams snug without overdriving.
Pull bar: Essential for end‑of‑row seating and under‑toe‑kick work. The soft backing pads prevented scratches, and the 3 mm thickness was sufficient for both 4 mm LVP and 8–10 mm laminate. The hook shape engaged plank ends well without deforming them, and the bar didn’t mushroom when struck. If you’re installing very dense engineered wood, you may appreciate a thicker, heavier pull bar, but for floating floors this did everything I needed.
Spacers: The non‑slip slots are a small but welcome detail. They stayed put against painted drywall and rough concrete, and the wedge‑pairing makes dialing in your expansion gap simple. For larger rooms, you’ll still find yourself reusing and leapfrogging spacers, but 40 pieces is a generous starting point.
Durability over a real project
I installed roughly 450 square feet across three spaces. The mallet faces scuffed as expected but didn’t loosen or chunk apart. The handle sleeve never twisted, even with sweaty hands. The tapping block accumulated dings on the strike side—again, by design—but the working edge that contacts the plank stayed true enough to keep using. The pull bar picked up surface marks but didn’t bend or dish. In short: the kit held up through the job with life left for another room.
If you’re a contractor installing floors weekly, you’ll eventually want a heavier mallet and a thicker, longer pull bar for speed and abuse. For DIY and occasional use, the balance of weight and durability here makes sense.
Ergonomics and user experience
- The mallet’s short length gives good control around door jambs and radiators, and helps you avoid ricocheting off baseboards.
- The block’s handle keeps your fingers safe and speeds repositioning. In repetitive tapping, that matters more than you’d think.
- The pull bar’s padding lets you work confidently close to finished faces. Its length is a good compromise between leverage and tight‑space maneuverability.
My only ergonomic gripe is that the block’s low profile can be a small target if you like taking full swings. That’s solvable by keeping your strikes measured and flat or by stepping up to a heavier mallet for fewer hits.
Where it shines, and where it doesn’t
Shines:
- Floating laminate and LVP installs where clean edges and controlled taps matter.
- First‑time or occasional installers who want a matched set that works out of the box.
- Tight spaces—closets, under cabinets—thanks to the compact mallet and padded pull bar.
Doesn’t shine:
- Dense engineered wood or solid hardwood where more mass and thicker steel speed the job.
- Installers who prefer a dead‑blow mallet to reduce bounce and increase energy transfer on stubborn joints.
Practical tips from the install
- Keep the tapping block perfectly flat on the floor. If it rides up, you can nick a tongue.
- Use the mallet’s faces intentionally: one for block strikes, one for the pull bar. Rotating faces distributes wear and keeps the striking surfaces flatter longer.
- Pair spacers as wedges at each wall joint and at doorways. Don’t skimp—consistent expansion gaps prevent the dreaded mid‑room buckle.
- For the final board in a row, set the pull bar so the padded face bears against the plank, not drywall or base, then take steady, square hits.
Value and alternatives
For the price of a single pro‑grade pull bar, you’re getting a full, cohesive kit. The materials—A3 steel bar, reinforced polypropylene block, cast‑iron mallet core—are appropriate for laminate and LVP, and the spacers save an extra trip to the store. You can absolutely assemble a “better” setup piece by piece (dead‑blow mallet, thick pull bar, sacrificial maple block), but the cost climbs quickly and the gains mainly show up on tougher materials or high‑volume work.
What I’d change
- Offer a heavier mallet option or include a small dead‑blow head as a second face to improve energy transfer on short‑end locks.
- Increase the tapping block’s strike height slightly or add a replaceable strike cap to extend its life and broaden the target area.
- Throw in a few more spacers for large rooms. Forty is generous; sixty would minimize leapfrogging.
Who should buy it
- DIYers installing click‑lock LVP or laminate in one to three rooms.
- Homeowners who want a compact set that prevents accidental damage to edges and finished faces.
- Pros who need a backup or homeowner‑grade kit for punch‑list adjustments.
The bottom line
The Rexbeti flooring kit covers the fundamentals with thoughtful touches—a grippy, compact mallet; a padded pull bar that protects finishes; a handled tapping block that keeps fingers safe; and a generous pile of non‑slip spacers. It’s not a heavy‑duty, every‑day‑on‑site setup, but it doesn’t pretend to be. For laminate and LVP, it provides the control and protection you need to get tight seams and clean edges without improvising with a steel hammer and a scrap of wood.
Recommendation: I recommend this kit for DIY and occasional installers working with floating laminate or LVP. It delivers the right tools to do the job cleanly, it holds up through a multi‑room project, and it’s priced sensibly. If you routinely install dense engineered planks or want to maximize speed with fewer hits, plan on adding a heavier mallet and perhaps a thicker pull bar—but as a starter set for most residential floating floors, this kit is exactly what you need.
Project Ideas
Business
Small-Room Installation Service
Offer fast, affordable installs for single rooms, closets, or entryways targeting landlords, Airbnbs, and busy homeowners. The compact 43-piece kit is portable and lets a solo installer complete jobs quickly. Price by room size, offer add-ons (trim, transitions), and advertise quick turnaround.
Hands-On DIY Workshops
Run weekend classes teaching homeowners how to install LVP/laminate. Supply each attendee with a kit (included in ticket price) and a printed/QR-coded how-to guide. Revenue streams: ticket sales, kit markup, and follow-up paid consults or in-home finishing services.
Real-Estate Flip & Repair Service
Partner with real estate agents and property flippers to provide quick floor repairs and cosmetic upgrades before showings. Use the kit to replace damaged planks, re-seat loose boards, and ensure expansion gaps are correct. Offer bundled emergency-call or same-day service for premium pricing.
Branded Installation Kits for Retailers
Buy kits wholesale, rebrand with your logo and a custom instruction booklet, and sell them in local flooring shops or online alongside flooring products. Include value-added content (video link, trimming templates) and offer volume discounts to independent retailers or contractors.
Content & Affiliate Business
Create short how-to videos and social posts demonstrating pro tips (using the mallet, pull bar, and spacers). Monetize via YouTube, affiliate links to flooring and tools, sponsored content, and digital courses. Offer downloadable job-estimators and virtual consulting to turn viewers into paid clients.
Creative
Geometric Plank Wall Art
Cut LVP/laminate planks into triangles and trapezoids and assemble them into a large geometric wall panel. Use the tapping block and rubber mallet to seat and align each joint without damaging edges; the pull bar helps snug tight seams in compact areas. Finish with a clear matte sealant and mount as a statement headboard or entryway art piece.
Floating Shelves from Leftover Planks
Build durable floating shelves by laminating several planks to a plywood substrate. Use the tapping block to align seams during assembly and the pull bar to clamp planks flush while adhesive sets. Incorporate the plastic spacers as built-in rear ventilation/expansion slots so the shelf surface remains stable over time.
Accent Headboard Panel
Create a patterned headboard by installing planks vertically or in a chevron pattern on an MDF backer. Use the mallet’s soft faces to tap planks into place without marring, and spacers along the perimeter to maintain uniform reveal gaps for a professional look. Mount to the bed frame or wall for instant room upgrade.
Rustic Coffee Table Top
Make a coffee table top by bonding planks to a solid substrate, trimming edges, and applying a protective finish. Use the tapping block and mallet to close seams while adhesive cures; the pull bar is handy for pulling the final plank tight at the edge. Add hairpin or reclaimed wood legs for character.
Plank Coasters, Trivets and Serving Boards
Use offcuts to craft sets of coasters or trivets. Trim pieces to size, glue-up if needed, and use the tapping block to keep seams flush. The spacers’ non-slip slots can be repurposed as anti-slip inserts glued to the underside, turning offcuts into giftable, functional items.