Features
- 🛠️Adjustable Design for Multiple Siding Sizes: Suitable for 5/16 Inch, 3/8-Inch, 7/16-Inch and more board, the tool is highly versatile, designed to accommodate siding thicknesses from 9-15mm and widths between 5-8 inches. It ensures flexibility to handle various types of siding materials and sizes, making it suitable for different projects.
- 🙂Efficient & Time-Saving: The siding tool increases installation speed by up to 50%, making the process quicker and more efficient, especially for single-person operations. This eliminates the need for complex layout calculations, streamlining the overall installation process.
- 📏Outstanding Gripping Power: The tool features a robust grip that can securely support siding up to 16 feet long, providing even spacing and leveling. This ensures accurate, consistent results during the installation of exterior walls, without any shifting or misalignment.
- 🛡️Durable & Sturdy Construction: Made from high-strength aluminum alloy, the tool is built for long-lasting performance. It resists deformation and wear, with a surface anodized for corrosion resistance. This durability ensures a reliable, long-term tool for multiple installations.
- 🎁Practical Gifts: Looking for gifts for men who enjoy DIY projects? Look no further! Our siding installation tools are a practical and thoughtful choice for any handyman or DIY enthusiast.
- 🛠️User-Friendly & Practical: (Please refer to the description above for detailed usage steps) Designed for easy, single-person use, this tool simplifies siding installation by securely clamping and supporting the siding. The adjustable grips and included gauge tool ensure precise measurements, reducing errors and helping both DIY enthusiasts and professionals achieve flawless results.
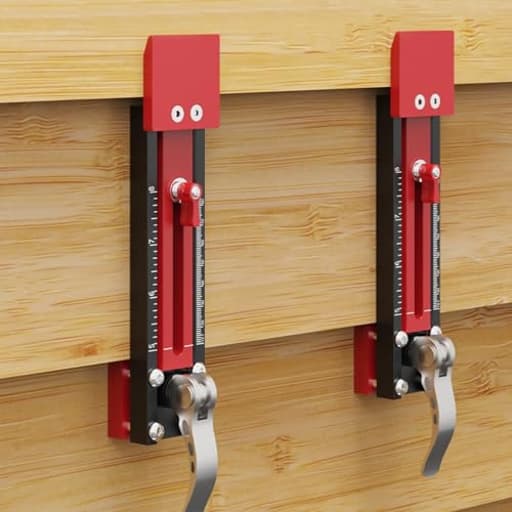
- Include 2 PCS Gauge Installation Tool. They’re securely fastened to the wall panel and easy to adjust.made efficient and accurate. The siding mounting kit includes all essential tools needed for a quick and easy installation. Perfect for DIY home improvements or professional contractors. Upgrade your home's exterior with confidence using this quality siding installation kit.
- ---HOW TO USE: STEP1: Adjust the Siding Reveal Size to your desired measurements. STEP2: Clamp the Siding Tools on both sides of the board to secure it in place. STEP3: Support the Next Row of siding by positioning it on top of the tools. STEP4: Nail the Siding into place and repeat the process for each subsequent row.
Specifications
| Color | red |
| Unit Count | 2 |
Related Tools

Adjustable siding gauge tools for fiber cement and similar siding, accommodating board thicknesses of 5/16, 3/8, and 7/16 inch (9–15 mm) and widths of 5–8 inches. Made from anodized aluminum alloy, the kit includes two installation gauges that clamp and support siding up to 16 feet to maintain consistent reveal and leveling for single-person installation.
TOURACE 2 Upgraded Siding Tool for Hardie Plank (5/16, 3/8, 7/16 Inch), TOURACE Siding Gauge Tools, Home Sidings Removal & Repair Kit, Fiber Cement Hardie Board Hangers, House Sidingg Installation Holder Review
Why I reached for these gauges
Hanging fiber‑cement lap siding solo is a balancing act: one hand on the board, one hand on the nailer, and a third hand you never seem to have to keep the reveal consistent. The TOURACE siding gauges promised to be that missing hand, so I put them to work on a repair that turned into a short run of new installs—mostly 7.25-inch Hardie planks at 5/16-inch thickness, in 12–16-foot lengths.
What they are
This is a pair of adjustable aluminum gauges that clamp onto the last course of siding, creating a ledge that supports the next board while you fasten it. They cover common fiber‑cement thicknesses (5/16, 3/8, 7/16 inch, roughly 9–15 mm) and accommodate reveals between 5 and 8 inches. The bodies are anodized aluminum (red) with a simple knob-and-slide setup for setting the reveal, and lined jaws to protect and grip the material.
Setup and first impressions
Out of the box, the gauges are lightweight and compact. The adjustment scales are easy to read, and the clamping action is intuitive. Before I started, I did a quick tune-up:
- Checked every screw and pivot for tightness.
- Set both reveals with a story pole and confirmed they matched.
- Wiped the jaw liners clean.
That preflight check saved me time. A couple of the small machine screws weren’t snug from the factory; once tightened and dabbed with blue threadlocker, they stayed put throughout the day.
In use: speed and solo capability
On long boards, these gauges do what you want: they free your hands and keep courses aligned. With a 15-foot plank, I set one gauge near each end, lifted the board onto the ledges, and had both hands available to fine-tune the butt joints before nailing. My overall pace improved noticeably—especially on solo runs—because I could work steadily without constantly pulling a tape and juggling shims.
They also help with consistency. Once both gauges are set to the same reveal, each course stacks predictably. I still spot-check with a 4-foot level every few courses (old habits), but the lines came out straight without much fuss.
Gripping power and real-world limits
TOURACE claims the gauges can support up to a 16-foot plank, and on flat, clean material they can. However, fiber‑cement dust and minor surface texture can undermine the grip. On older boards with chalky surfaces, I saw occasional slippage if I didn’t snug the clamp firmly. A few tips that made a difference:
- Keep the jaw liners dust‑free. A quick brush before each set helps.
- Don’t over-torque the clamp; too much pressure can push the plank out slightly. Moderate, even pressure works best.
- On 16-footers, use a prop or stand at midspan if the board has any bow or if there’s wind. The gauges hold the ends; they don’t prevent midspan sag.
For slick or painted surfaces, adding a thin layer of high‑friction material to the liners (I used 1 mm silicone rubber with spray adhesive) improved reliability and protected the finish.
Adjustability and accuracy
The 5–8 inch reveal range covers the most common lap patterns; if you run wider exposures, you’ll need a different tool. The slide mechanism is straightforward: set, lock, repeat. Both gauges matched measurements precisely when I took care to set them against the same reference. For best results:
- Use a story pole marked with your reveal to set both gauges.
- Reset and recheck every 3–4 courses to catch minor drift.
- Confirm reveals at butt joints and around window/door heads, where precision matters most.
Build quality and durability
The aluminum bodies themselves are solid and shrugged off jobsite knocks. The weak link is the small hardware and the grippy liner. Over a few days of use:
- A couple of screws loosened until I threadlocked them. They never backed out again after that.
- The liner material wore faster than I expected, especially when dust built up. It didn’t disintegrate, but it lost bite. Swapping to a silicone or EPDM pad made the tool more predictable and longer‑lasting.
I also noticed that if the clamp is overtightened, the tensioning screw can push the tool’s body slightly off the plane of the siding, creating a hairline gap behind the next course. The solution was simple: ease back on torque and keep the liners clean so I didn’t have to crank the clamp to get grip.
Everyday workflow with the gauges
My workflow settled into a reliable rhythm:
- Clean the previous course where the clamps will sit.
- Set both gauges to the story pole’s mark and lightly clamp them—just enough to hold.
- Lift the new board onto the ledges; center the course marks and check overlap at joints.
- Tack near the ends, then pull the clamps and complete fastening.
- Recheck the reveal every few courses.
This approach delivered straight lines and reduced fatigue. It also gave me the confidence to move quicker without sacrificing accuracy.
Where they shine—and where they don’t
Strengths:
- Solo installs. You can truly hang long fiber‑cement courses by yourself without improvised props.
- Consistent reveals within the 5–8 inch range, with quick adjustments.
- Lightweight and compact; easy to stash on a belt or in a pouch.
Trade‑offs:
- Out‑of‑box QC can be inconsistent. Expect to tighten fasteners and consider threadlocker.
- The stock liner material wears and can slip on dusty or painted surfaces; upgrading pads is worth it.
- Clamp geometry is sensitive to over‑tightening; too much force can shift the plane of the board slightly.
Compatibility notes
These gauges are happiest with fiber‑cement and other rigid lap boards within the listed thickness range (5/16 to 7/16 inch). I wouldn’t use them on soft wood species or vinyl—both for grip reliability and risk of surface damage. If you’re working with prefinished fiber‑cement, take the extra step of adding protective, high‑friction pads.
Tips to get the most from them
- Do a fastener audit before first use. Tighten every screw; add blue threadlocker to pivots and set screws.
- Replace or augment the liners with silicone or EPDM rubber for better grip and longevity.
- Use a story pole to set reveals and keep you honest around openings and transitions.
- Clean the jaw liners frequently; fiber‑cement dust is like ball bearings.
- For long runs, support the board at midspan if it has any crown or you’re working in gusty conditions.
Value and alternatives
These gauges hit an attractive price point compared to pro‑grade options. With a little setup and a couple of inexpensive tweaks, they’ll deliver most of what the premium tools do for occasional users. If you install siding day in and day out, there are sturdier gauges with bombproof hardware and longer‑lasting liners—but you’ll pay more for them.
Bottom line
The TOURACE siding gauges make solo lap‑siding work faster and more controlled, and they do it with a simple, familiar design. They’re not perfect: the small hardware needs attention out of the box, and the stock grip pads wear quickly and can slip on dusty surfaces. But the aluminum bodies are tough, the adjustments are accurate within their range, and with a couple of straightforward tweaks (threadlocker and better liners), they become dependable helpers.
Recommendation: I recommend these gauges for DIYers and light‑duty pros who want an affordable way to improve speed and consistency on fiber‑cement installs, and who are comfortable doing a little setup and maintenance. If you need a tool that’s flawless out of the box and ready for daily jobsite abuse, consider spending more on a heavier‑duty gauge. For everyone else, especially working solo, these will earn their spot in the pouch.
Project Ideas
Business
One-Person Siding Installation Service
Start a solo contractor service focused on small-to-medium siding jobs, repairs, and accent installs where a full crew is unnecessary. Market fast turnarounds and lower labor rates thanks to the siding gauge that enables single-person installs; price jobs per linear foot or per panel and offer emergency patch-ups for storm damage.
Mobile Siding Repair & Patch Service
Operate a mobile unit that offers quick on-site repairs, board replacements, and reveal corrections for homeowners and property managers. Use the tool to speed up installs and guarantee consistent reveals; upsell matching paint, caulking, and preventative maintenance packages to increase average ticket size.
Productized DIY Siding Kit + Video Course
Bundle the siding gauge with essential fasteners, a simple jig/template, and a step-by-step video course teaching single-person installation for homeowners. Sell online or through local hardware stores; include templates for common reveal patterns and offer premium one-on-one video coaching for an extra fee.
Trades Training Workshops
Host half-day workshops for DIYers, handyman businesses, and apprentices teaching efficient, single-person siding installation techniques using the gauge. Charge per attendee and provide a discounted tool kit as part of the class; partner with supply stores for cross-promotion and lead generation.
Tool Rental or Subscription for Contractors
Create a rental or subscription service supplying siding gauges and complementary tools to small contractors and DIYers who need them intermittently. Offer day/week rates and a damage-insurance option; include quick-start guides and pre-set gauge settings for common board sizes to reduce user error and complaints.
Creative
Two-tone Accent Exterior Wall
Create a striking exterior feature by combining two siding colors or textures with a defined reveal pattern. Use the siding gauge to maintain perfectly even reveals and level rows while alternating colors or board widths; the tool's adjustable thickness settings let you mix fiber cement with thinner trim pieces. Result is a clean, modern accent wall that looks pro-grade even when installed by one person.
Weatherproof Raised Planter Cladding
Build durable outdoor planter boxes or raised beds and finish them with fiber cement panels for low-maintenance, rot-resistant cladding. The siding gauges support long panels and ensure consistent reveal spacing around corners and trim, helping you get straight lines and tight joints that resist water infiltration. This is ideal for front-porch installations or rooftop gardens where longevity matters.
Decorative Shed or Tiny House Facade
Give a shed or tiny house a high-end exterior using staggered or mixed-reveal siding layouts. The gauges make single-person installs practical: clamp, level, and nail each row quickly, even with 16-foot panels. Try mixing horizontal and vertical runs or adding a soffit detail for visual interest while keeping installation consistent.
Interior Shiplap Feature Wall (Fiber Cement or Composite)
Use the tool indoors to install shiplap-style feature walls in kitchens, bathrooms, or basements where moisture resistance is needed. The adjustable thickness and secure clamping let you register and space boards evenly without a second pair of hands, producing a tight, professional look that withstands humidity.
Custom Outdoor Kitchen or Fireplace Surround
Clad an outdoor kitchen island, outdoor fireplace, or bbq surround with fiber cement siding for a durable, cohesive look. The siding gauge keeps long panels level across wide spans and helps you maintain perfectly straight horizontal lines for stone tops or mantels to sit against. Combine with contrasting trim to elevate the finished product.