Features
- 𝗢𝗻𝗲 𝗦𝗶𝘇𝗲 𝗙𝗶𝘁𝘀 𝗔𝗹𝗹 - This upgraded siding tool adapts to various siding thicknesses, including 5/16", 3/8", and 7/16"
- 𝗔𝗱𝗷𝘂𝘀𝘁𝗮𝗯𝗹𝗲 𝗢𝘃𝗲𝗿𝗹𝗮𝗽 𝗣𝗿𝗲𝗰𝗶𝘀𝗶𝗼𝗻 - These siding gauge achieve precise siding reveals with 1/4" increments for gaps ranging from 4" to 8"
- 𝗘𝗮𝘀𝘆 𝘁𝗼 𝗨𝘀𝗲 - Upgraded siding board hanger tools, easy and smooth siding insertion and removal without any boards getting stuck
- 𝗪𝗶𝗱𝗲 𝗔𝗽𝗽𝗹𝗶𝗰𝗮𝗻𝘁 - This adjustable siding gauge tools accommodate siding widths from 4" to 8.25" and lengths up to 6 feet
- 𝗦𝘂𝗽𝗲𝗿𝗶𝗼𝗿 𝗘𝗳𝗳𝗶𝗰𝗶𝗲𝗻𝗰𝘆 - Efficient siding gauge tool, single-handedly handle double the workload, boosting efficiency by 200%
- 𝗚𝗿𝗲𝗮𝘁 𝗳𝗼𝗿 𝗣𝗿𝗲-𝗣𝗮𝗶𝗻𝘁𝗲𝗱 𝗦𝗶𝗱𝗶𝗻𝗴 𝗕𝗼𝗮𝗿𝗱 - With polycarbonate body and rubber pad, these lap siding installation tools won't damage your siding
Specifications
| Color | green |
| Unit Count | 2 |
Related Tools
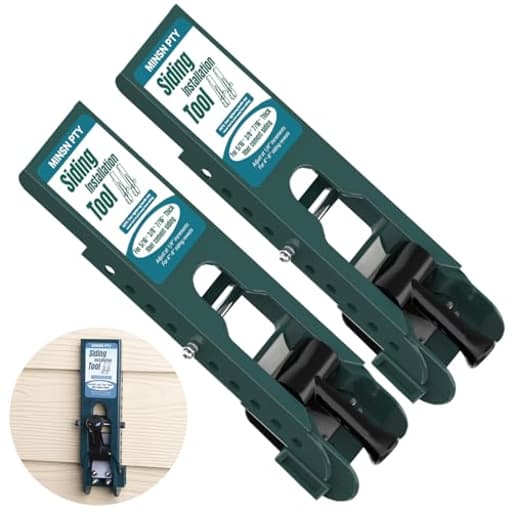
Pair of adjustable polycarbonate siding gauges for installing fiber cement lap siding in 5/16", 3/8", and 7/16" thicknesses. They set reveals in 1/4" increments for lap exposures from 4" to 8", accommodate siding widths 4" to 8.25" and lengths up to 6 ft, and include rubber pads to protect pre-painted boards while allowing smooth insertion and removal.
MINSN PTY Upgraded Siding Installation Tools for 5/16-Inch, 3/8-Inch, 7/16-Inch Fiber Cement Lap Siding - Gauge With Adjustable Reveals, Polycarbonate Body, 2 Packs Review
What it is and why I reached for it
I spent a weekend hanging fiber-cement lap siding and wanted a way to keep reveals consistent without juggling a tape, level, and a helper on every course. The MINSN siding gauges are a lightweight, polycarbonate pair that clamp onto the previous course and hold the next board at a set reveal. They handle common board thicknesses (5/16, 3/8, and 7/16) via built-in adapters and let you index reveals from 4 to 8 inches in 1/4-inch steps. The promise is simple: faster, straighter courses with one person.
Setup and adjustment
Out of the box, the pair is configured for 5/16-inch boards, which matches most fiber-cement lap products I use. Two adapters are included for 3/8 and 7/16 boards; swapping them is straightforward and doesn’t require tools. I appreciate that the adapters don’t feel like an afterthought—they seat positively and don’t rattle loose while you move up and down the wall.
Setting the reveal is equally simple. The stop indexes in 1/4-inch increments between 4 and 8 inches. The marks are clear, and the stop locks securely, so once I set 7-inch exposure for 8-1/4-inch boards, I didn’t need to babysit that setting again. That alone saves time compared to homemade blocks or ad-hoc spacers.
A quick habit to build: after setting a new reveal, check the first course or two with a tape and your level to confirm you’re actually getting the exposure you expect. The gauges were accurate in my hands, but squaring that up early saves headaches, especially on walls with less-than-perfect sheathing.
On the wall: performance and workflow
With the reveal set and the proper thickness adapter installed, I clipped each gauge over the edge of the previous course. The rubberized pads kept the tool from scuffing pre-painted planks, and the polycarbonate bodies slid freely without catching or scraping. Because the tools are light, getting them positioned with one hand is easy, which matters on ladders.
For boards up to about 6 feet—the length the manufacturer calls out—the pair holds the next course securely and in plane. You drop the new plank onto the stops, shift it to your layout marks, and nail off. It’s a repeatable rhythm: move the pair up, hang, align, nail; move again. Working solo, I covered wall sections notably faster than with wedges or temporary cleats, and reveal consistency was better.
For longer boards (10–16 feet), physics comes into play. Two gauges at mid-span will hold a long plank, but you’ll fight sag and bow if you rely only on this pair. My workaround was simple:
- Add a third support (another pair or a temporary deadman prop) near the far end.
- Tack a temporary nail at the layout line on one end to catch the board while you align the other.
- Keep the gauges near stud locations so the act of nailing locks the board before any slip can occur.
Used this way, I comfortably handled 12-footers alone and 16-footers with a bit of planning.
A note on clamping pressure
One quirk showed up early: over-tightening the gauge on the lower course can actually pull the tool away from the wall face, opening a gap that lets the next plank slip past the stop. The fix is counterintuitive—clamp snug, not gorilla-tight. With moderate pressure, the pads grip, the tool sits flat, and the stop does its job. If the wall is wavy or the lower course isn’t nailed tight near the gauge, you’re more likely to see movement, so nail placement matters too.
I kept a small brush in my pouch to knock dust off the contact pads occasionally. Clean pads grip better and reduce the temptation to over-tighten.
Accuracy and reveal control
Over multiple courses, the gauges maintained reveals that matched my setup—7 inches landed at 7 inches course after course. On long runs, it’s still smart practice to put a level on the course every few rows. If you start from a dead-level starter strip and your studs are true, the system keeps things aligned, but corners and window trims deserve a periodic check regardless of the tool you use.
The 1/4-inch indexing is a nice balance of flexibility and simplicity. Most manufacturers’ recommended exposures fall within the 4 to 8-inch range, and being able to bump up or down a quarter inch helps when you’re balancing reveal to hit a clean finish at the soffit or skirt board.
Build, ergonomics, and finish protection
The polycarbonate bodies and rubber pads are the story here. The tools feel light and slightly “plasticky” in the hand, but that’s more a perception than a weakness. The light weight reduces arm fatigue as you shuttle them up the wall, and I didn’t notice any deflection that affected reveal accuracy. The pads genuinely helped on pre-finished boards—I saw no rub marks or paint transfer after a day’s work.
A side benefit of the translucent material is visibility; I could see layout lines and fasteners beneath and around the tool without dancing my head around it. The release action is smooth, and I never had a board get stuck in the tool during removal, which keeps the workflow moving.
Limitations and best practices
- Length guidance is real: The pair is ideal for boards up to 6 feet. For longer runs, budget for additional supports or a second pair.
- Clamp with intention: Snug is better than tight. Over-clamping can cause the tool to lift off the wall and compromise the stop.
- Keep surfaces clean: Dust and fiber-cement residue reduce friction. Clean contact points help prevent slippage.
- Place nails smartly: Nail the new course near the gauges first to “lock” the board in before moving along the span.
- Check level periodically: Even with consistent reveals, walls aren’t always perfect. A quick level check every few courses keeps your line true.
Who it’s for
- Solo installers and small crews who need to move quickly without sacrificing consistency.
- DIYers tackling a shed, garage, or an addition where a second set of hands isn’t guaranteed.
- Pros who want a light, non-marring gauge for pre-painted fiber-cement and appreciate the 1/4-inch reveal indexing.
If you typically install long, heavy planks in windy conditions, you’ll get the most out of these with either a second pair or a helper, especially when working above the first story.
Pros and cons
Pros:
- Quick, repeatable reveals in 1/4-inch steps from 4 to 8 inches
- Adapters for 5/16, 3/8, and 7/16-inch boards included
- Light, easy one-handed handling; smooth board insertion and removal
- Rubber pads protect pre-painted finishes
- Enables true one-person installation for shorter runs
Cons:
- Two-gauge setup is best suited to boards up to about 6 feet
- Over-tightening can create a gap and allow slippage
- Polycarbonate feel may not inspire confidence at first (though performance was solid)
The bottom line
The MINSN siding gauges did exactly what I wanted them to do: speed up installation while keeping reveals consistent, all without an extra set of hands. They’re simple to set up, gentle on finished material, and accurate enough to trust once you validate your first couple of courses. Their limitations are manageable and mostly tied to technique (don’t over-clamp) and job setup (use extra support on long boards).
Recommendation: I recommend these for anyone installing fiber-cement lap siding, especially solo operators and small crews. They shine on projects with shorter board lengths and still earn their keep on longer runs when paired with a deadman or an extra set. If your work involves exclusively 12–16-foot boards on tall elevations, plan to add another pair—this pair alone won’t replace good jobsite support. For everyone else, they’re an efficient, non-marring, and refreshingly simple way to make siding go faster and look better.
Project Ideas
Business
Mobile Siding Installation Service
Start a small service specializing in high-quality lap siding touch-ups, accent installations, and small façades for homeowners and boutiques. Use the adjustable gauges to guarantee repeatable reveals and protect pre-painted boards—sell the premium precision and paint-safe handling as a differentiator to local contractors and designers.
Hands-on Workshop Series
Run half-day workshops for DIYers and interior designers teaching proper lap siding techniques, reveal selection, and finishing. Provide each attendee a rental gauge during class and offer a discount on tool purchases. Workshops create recurring revenue and a local referral pipeline for installation jobs.
Tool Rental & Jobsite Kit
Create a rental offering for the adjustable gauges bundled with clamps, a small set of shims, and a quick-reference reveal chart. Market to contractors and weekend warriors who need professional accuracy for a few days. Add insured delivery/pickup for an extra fee to increase margins.
Content Channel + Affiliate Sales
Produce short how-to videos and reels showing faster, paint-safe siding installs using the gauges: reveal selection, mixing thicknesses, and speed tips. Monetize through affiliate links to the product, sell downloadable reveal templates, and offer sponsored content for complementary tools (saws, fasteners, sealants).
Premium Siding Accessory Line
Design and sell complementary accessories: magnetic reveal guides, laser alignment attachment, padded carrying case, or custom-sized rubber pads for delicate finishes. Bundle accessories with the core gauge as a 'pro kit' aimed at contractors and high-end renovators to increase average order value.
Creative
Decorative Shiplap Accent Wall
Use the adjustable siding gauges to set consistent reveals while installing lightweight fiber cement or reclaimed wood boards as an indoor shiplap accent wall. The rubber pads protect finished surfaces, so you can work with pre-painted or stained boards and achieve even 1/4" increments for a neat, modern look.
Outdoor Planter Facade
Build raised planter boxes or planter faces wrapped in lap siding for a luxe exterior look. The gauges make it fast to set uniform exposures across multiple boards (4"–8"), keeping corners and seams consistent for a pro finish even on curved or stepped facade shapes.
Custom Headboards & Wall Art
Create headboards and large-scale wall art panels by layering lap-style boards and using the gauge to maintain precise spacing. The tool’s ability to handle different thicknesses lets you mix materials (cement board, thin plywood, or composite) while preserving a consistent reveal pattern for striking geometric designs.
Portable Photo Backdrops
Build modular 4'–6' backdrop panels clad with lap siding for photography or event rentals. The adjustable gauge speeds repeated, identical installs so you can produce multiple matching panels quickly; rubber pads avoid marring paint for repeated use and transport.
Accent Ceiling Planking
Use the siding gauges for running lap-style planks across vaulted or flat ceilings. The tool keeps reveal spacing uniform over long runs (accommodates boards up to 6 ft) and lets you single-handedly hold and seat boards while fastening, making ceiling work faster and less awkward.