
Features
- 【Package Include】 630-7755 Full Kit x 1 Pack, all replacement seals and hardware, only prepare need screwdriver, pliers or wrench
- 【Replacement】Replaces no longer made parts kits 630-7964 and 630-7754, for use with Mansfield Style 300,400,500 Series,also compaible with Prier 300,400,408 Series
- 【Durable Construction】Made of reliable materials for long life, quality replacement parts
- 【Easy Installed】Easy to install with just a screwdriver, wearing gloves during installation is safer
- 【After Sales】We will provide you with excellent quality products. If you have any questions or are not satisfied, please contact us
Specifications
| Color | Multicolor |
| Unit Count | 1 |
Related Tools
Full repair kit for wall hydrant faucets that provides replacement seals and hardware needed to service and rebuild the valve. Components are made from durable materials and install using common hand tools such as a screwdriver, pliers, or wrench; wearing gloves is recommended during installation.
ARYEIELLSOW 1 PACK 630-7755 Wall Hydrant Service Repair Kit Compatible With Mansfield Prier Faucet 300, 400 and 500 Series Wall Hydrant Review
Why I reached for this kit
A slow drip at the spout and a faint weep from the handle on a frost‑free wall hydrant is the kind of nuisance that can waste water all season. Rather than replace the entire faucet, I tried the 630‑7755 repair kit to see if I could rebuild the valve in place. I was after a kit that covered the common Mansfield styles (300/400/500) and Prier equivalents without sending me on a hunt for one obscure washer. This one promised broad compatibility and an install with basic hand tools. That’s exactly the experience I had—mostly.
What you actually get
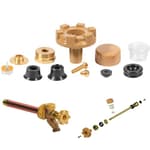
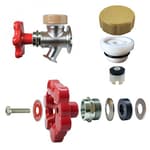
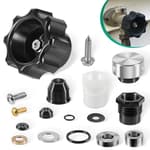
The 630‑7755 kit is a full assortment of seals, packings, washers, and small hardware meant to refresh the stem and packing assembly on freeze‑resistant wall hydrants. It includes:
- Multiple stem/end washers for different series
- Graphite packing for the handle/packing nut
- O‑rings and bonnet/packing seals
- A mix of screws and small hardware
- Left‑hand and right‑hand options to suit the various model orientations
It’s more parts than you’ll use on a single hydrant, and that’s the point: the kit aims to cover the popular Mansfield 300/400/500 series and compatible Prier models (including certain 300/400/408 variants). I appreciated having options on the bench so I could match old to new without guessing.
Build quality is generally good for a universal kit. The graphite packing is a standout—it’s the right choice for stopping a handle seep without overtightening. Some of the softer packing rings are on the delicate side; if you’re heavy‑handed with the packing nut, you can deform or nick them. Take your time, lube threads lightly, and snug rather than crank.
Compatibility and fit
I rebuilt a Mansfield‑style 400 with this kit and had everything I needed to stop both the spout drip (stem washer) and the handle weep (graphite packing). I also refreshed an older Mansfield 300 where the stem washer swap and packing did the trick, but I had to pay closer attention to left‑hand vs right‑hand parts during reassembly.
On a late‑1990s Prier 400‑series hydrant, I ran into a minor hiccup: the specific flat end washer required by that stem variant wasn’t an exact match from the assortment. The fix was simple—I grabbed a common flat washer locally to complete the job and used the rest of the 630‑7755 parts without issue. Chalk that up to the reality that Prier has produced a lot of small variations over the years; most are covered, a few might need a single commodity washer.
Bottom line: if you correctly identify your series and match old parts to new, you’ll likely find what you need in this kit. It’s an excellent fit for Mansfield 300/400/500 and many Prier 300/400/408 hydrants. If your hydrant has a very specific end‑washer dimension, be prepared to source that one piece.
Installation: straightforward if you prep
The install itself is well within DIY range. Here’s what worked for me:
- Tools: screwdriver, adjustable wrench, pliers, a small pick, and gloves. A dab of silicone grease helps.
- Shut off the water, open the hydrant to relieve pressure, and let it drain.
- Back up the hydrant body with a wrench inside if accessible so you’re not twisting supply piping while you loosen the stem/bonnet assembly.
- Remove the handle and packing nut, then withdraw the stem.
- Lay the parts out in order and photograph the assembly as you go—this helps with left‑hand vs right‑hand orientation.
- Replace the stem/end washer and screw, the packing/packing nut seal, and any O‑rings that match your originals.
- Reassemble, snug the packing nut, turn on water, and fine‑tune the packing nut until the handle turns smoothly without seepage.
Start to finish—including clean‑up and a quick flush of debris from the line—the first job took me about 40 minutes. The second was closer to 25. The biggest time saver was keeping the old parts on the bench so I could visually match them to the kit.
Performance and durability after the rebuild
Functionally, the improvement is immediate. The spout drip stopped as soon as the new stem washer made contact, and the graphite packing sealed the handle without the gritty feel you get when you overtighten old packing. The hydrant opened and closed smoothly, and freeze‑resistant functionality was unchanged (as it should be—the kit doesn’t alter the body or seat).
Weeks later, both hydrants were still dry at the handle and tight at the spout. I did go back once to give the packing nut a light nudge; new packing can settle slightly. No signs of premature wear so far.
Documentation and ease of use
The included instruction sheet covers multiple series and has helpful diagrams, but the type is small and the illustrations are cramped. If your eyesight or workspace lighting isn’t great, plan to supplement with a quick schematic from the manufacturer’s website or a brief video for your exact series. The kit assumes you’ll identify and match your parts rather than follow a single, model‑specific flow.
A practical tip: mark the stem orientation before removal and keep parts in order on a cloth. It’s easy to mix up a left‑handed component and spend time retracing your steps.
What this kit will—and won’t—fix
- Will fix: drips from the spout caused by a worn end washer; weeping from the handle/packing nut; minor weeps at bonnet seals; general stem/packing refresh on Mansfield 300/400/500 and many Prier 300/400/408 styles.
- Won’t fix: a damaged or pitted valve seat inside the hydrant body. If the seat is nicked or corroded, a new washer won’t seal perfectly. You’ll need to reface the seat (if the design allows) or replace the hydrant. Likewise, cracked castings or severely corroded stems are outside the scope of any seal kit.
Value and alternatives
Compared to OEM kits, this universal set is cost‑effective and broadly applicable. You’ll typically use 10–30% of what’s in the bag for a given repair, but that flexibility is the value proposition. The leftover parts are useful spares if you maintain multiple hydrants or have both Mansfield and Prier styles on the property.
If you know your exact model and prefer a one‑to‑one match with fewer variables, a model‑specific OEM kit remains the easiest route. For mixed inventories or uncertain series numbers, the 630‑7755 kit strikes the right balance of coverage and price.
Tips to get it right the first time
- Confirm your series (300/400/500) and brand before you start; measure the existing end washer.
- Photograph each stage of disassembly.
- Don’t overtighten the packing nut; use graphite packing and sneak up on the seal.
- If the spout still drips after a new washer and screw, inspect the valve seat with a flashlight before you blame the parts.
- Consider keeping a small assortment of common flat washers on hand; it can save a trip if your stem needs a specific size the kit doesn’t include.
- Back up the supply line with a second wrench to avoid stressing interior plumbing.
Pros and cons
Pros:
- Broad compatibility with Mansfield and Prier series
- Includes left‑ and right‑hand components and graphite packing
- Installs with basic tools in under an hour
- Cost‑effective versus replacing the hydrant
Cons:
- Instructions are small and generic; online diagrams help
- Some packing components are easy to damage if overtightened
- A few Prier variants may need a specific end washer not exactly matched in the kit
- Not a solution for damaged valve seats
Recommendation
I recommend the 630‑7755 repair kit for homeowners and maintenance pros looking to refresh Mansfield 300/400/500 and many Prier 300/400/408 wall hydrants without replacing the entire unit. It’s a practical, budget‑friendly assortment that covers the most likely failure points—spout drips and handle weeps—and installs with common tools. Be realistic about what a seal kit can do: it won’t fix a bad seat, and a small subset of Prier stems may need a specific flat washer sourced separately. If you’re comfortable matching old parts to new and taking a measured approach to packing adjustment, this kit is an easy win that restores function and stops the drip.
Project Ideas
Business
Mobile Wall Hydrant Repair Service
Start a local service that visits homes, farms, and commercial properties to repair outdoor wall hydrants using stocked 630-7755 kits. Offer seasonal tune-ups (pre-freeze winterization, spring commissioning), emergency repairs, and flat-rate pricing. Market to landlords, property managers, landscapers, and rural customers.
DIY Kit Bundles with Video Training
Package the 630-7755 kit with branded instructions, a short step-by-step repair video, and basic hand tools. Sell these bundles online or through local hardware stores. Upsell video call troubleshooting or a one-on-one virtual coaching session for customers who want guided help.
Maintenance Subscription for Property Managers
Offer subscription contracts to property managers, HOAs, and small municipalities for scheduled hydrant inspections and parts replacement. Include periodic delivery of replacement kits (seasonal), priority service, and bundled pricing to lock recurring revenue and reduce emergency callouts.
Hands-on Repair Workshops
Host short, paid workshops teaching homeowners and handymen how to service Mansfield/Prier wall hydrants using the kit. Provide each attendee a kit to take home, plus printed cheat-sheets and Q&A. Partner with community centers, hardware stores, or maker spaces to reach DIY audiences and sell additional kits onsite.
Creative
Vintage Faucet Restoration
Use the 630-7755 kit to fully rebuild an old Mansfield/Prier wall hydrant and turn it into a restored, functional piece. After replacing seals and hardware, polish or patina the exterior, remount it on a decorative wood or tile backboard, and use it as a working outdoor spigot or indoor conversation piece (mudroom sink, potting bench). Document the before/after process for a portfolio or gift.
Mini Outdoor Fountain
Repurpose the rebuilt hydrant stem and seals to create a leak-free mini fountain. Mount the hydrant head on a stone or metal base, add a small submersible pump and reservoir, and use the kit's seals and hardware to ensure watertight connections. Finish with pebbles and succulents around the base for a low-maintenance garden accent.
Steampunk Wall Hook & Key Rack
Use metal parts from the repair kit (bolts, washers, stems) and a replaced hydrant handle to craft a steampunk-style wall hook rack. Attach parts to a reclaimed wood plank, combine with brass fittings and distressed paint, and seal for durability. Functional as a coat/key rack or decorative hardware display.
DIY Garden Irrigation Valve
Build a simple, durable garden water control station by installing the repaired hydrant into a custom mounting block or planter. Use the kit’s seals for reliable shutoff and attach hoses or drip lines to feed raised beds. This creates a neat, fixable irrigation point that blends with garden aesthetics and makes seasonal winterizing easier.