Features
- Widely Fitment -- Directly replaces for part number 630-8500. Faucet Repair Kit fits for Prier 300/400/500 Series Mansfield Style Hydrants, for Diamond 300/400 Series Wall Hydrants.
- Stem, Vacuum Breaker and Handle Repair -- 630-8500 kit comes with instructions and all the parts you need to repair the wall hydrant, easy to repair with no special tools required, making it easy to maintain your faucet and fix common leaks and breaks.
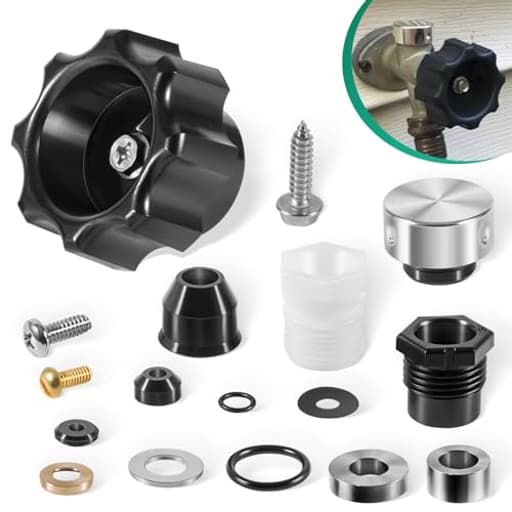
- Package Includes -- Complete Kit Includes 630-7500 Vacuum Breaker Repair Kit (plunger assembly, bonnet and cap), 630-7965 Handle & Screw Kit (replacement handle with stainless steel self-tapping screw), 630-7755 Service Repair Kit (bibb screw, bibb washer, cage washer, BFP washer, stem end O-ring, washer, packing for right & left hand packing nut, right & left hand thread packing nut, O-ring for right hand packing nut, backflow check valve, seat washer replacement kit).
- Superior Material -- Made of High-Quality Steel, Aluminum Alloy, Rubber, Plastic and Graphite. Anti-corrosion, wear-resistant, anti-oxidation, anti-rust, sturdy and durable. High-Grade Components that Meet or Exceed OEM Specifications.
- Satisfaction Guarantee -- Yoursme aims to provide excellent products and best service for customers. You can simply return it if you are not satisfied with the product. We support 12 month warranty.
Specifications
| Color | Black |
| Unit Count | 18 |
Related Tools
A complete service repair kit for Mansfield-style wall hydrants compatible with Prier 300/400/500 and Diamond 300/400 series, intended to replace internal components and restore operation of leaking or damaged wall faucets. The kit includes a vacuum breaker (plunger assembly, bonnet and cap), replacement handle with stainless steel screw, and a service assortment of bibb screw, washers, O-rings, packing, packing nuts, backflow check valve and seat washer components made from steel, aluminum alloy, rubber, plastic and graphite; typical repairs require no special tools.
Yoursme 630-8500 Wall Hydrant Complete Service Repair Kit Replaces for Prier 300, 400 & 500 Series Mansfield Style Hydrants for Diamond 300 & 400 Series Wall Hydrants Review
A dripping wall hydrant is one of those chores that can linger until winter reminds you why it matters. I finally tackled mine with the Yoursme repair kit, and after living with the results for a few weeks, I’ve got a clear sense of where this kit shines—and where it asks for a little finesse.
What’s in the box
The Yoursme hydrant repair kit is a comprehensive bundle aimed at Mansfield-style hydrants under the Prier 300/400/500 and Diamond 300/400 umbrellas. In practical terms, it covers three big areas of failure:
- Stem and seat sealing (bibb screw, seat washer, stem-end O-ring, cage/BFP washers)
- Packing and packing nuts for both right- and left-hand thread stems
- Anti-siphon (vacuum breaker) rebuild with plunger assembly, bonnet, and cap
- A new handle with a stainless self-tapping screw
Materials are a mix of steel, aluminum alloy, rubber, plastic, and graphite. It’s all pretty standard for outdoor hydrant guts, but I appreciated that the vacuum breaker components didn’t feel brittle and the handle’s screw is stainless.
Compatibility and identifying your hydrant
This kit targets “Mansfield style,” which in practice covers a big swath of Prier and Diamond hydrants. The quickest checks before you buy:
- Series number often stamped on the flange or body (300/400/500 for Prier; 300/400 for Diamond)
- Right-hand vs left-hand thread on the stem/packing (the kit includes both sides of packing hardware)
- Anti-siphon cap type (if yours has a bonnet and cap on the spout, the included vacuum breaker parts will likely match)
If you’re uncertain about thread direction, note how the stem backs out when closing. The inclusion of both packing nuts and packings is a thoughtful touch, but you still want to be sure you’re changing like for like.
Installation experience
The repair is straightforward, and you don’t need specialty tools. I used:
- Adjustable wrench or deep socket for packing nuts and bonnet
- Screwdriver for handle and bibb screw
- Needle-nose pliers for small washers
- Non-petroleum silicone grease for O-rings and packing
My steps on a Prier 400 went as follows:
- Shut off the supply inside the house and open the hydrant to relieve pressure.
- Remove the handle and packing nut, then pull the stem assembly.
- Replace the seat washer and stem-end O-ring, add a dab of silicone grease, and snug the bibb screw.
- Install the appropriate packing and packing nut (right- or left-hand as originally fitted). I greased the packing lightly.
- Rebuild the vacuum breaker on the spout: plunger assembly in, bonnet snug, plastic cap hand-tight plus a small tweak. Overtightening the plastic is a common cause of cracking and weeping.
- Reassemble, turn on supply, and test for leaks with the hydrant closed and open.
From start to finish, it took about 25 minutes, including a quick cleanup of the brass seat with a cotton swab and flashlight inspection. No special tricks required. The instructions included are basic but sufficient—exploded diagrams would be nice, yet the part layout is logical.
Performance after repair
Two problems drove me to the kit: a slow drip at the nozzle and a weep from behind the handle. After the rebuild, both were resolved. Closing effort is slightly firmer than before (new packing will do that), and the handle turns smoothly without chatter. I didn’t experience any seepage through the vacuum breaker under normal use, and the anti-siphon function passed a simple backflow test with a vacuum gauge on the hose line.
One note: cold weather exposed a common quirk. If you don’t seat the stem with reasonable hand force, a worn seat in the body will sometimes show residual drip. This isn’t the kit’s fault; it’s the reality of older hydrants. On mine, a firm close stopped it completely. My spouse found the close effort acceptable, but lighter hands may notice the difference until the packing beds in.
Build quality and fit of components
- Seat washer and O-rings: The sizes included matched my Prier 400, and the rubber felt appropriately firm, not spongy. It’s not premium OEM rubber, but it’s not bargain-bin either. I’d still grease O-rings lightly to prevent tearing during assembly.
- Packing and nuts: Good fit, no cross-threading, and no slop at the stem. The dual-thread support is a strong value add.
- Vacuum breaker: The plunger assembly and bonnet fit precisely; the cap tightened cleanly without stress whitening. As with any plastic bonnet/cap, use moderate torque and check for a flat, clean sealing surface in the spout.
- Handle and screw: The handle is serviceable and sturdy enough; the stainless screw is a nice touch in a wet location.
I had a handful of small parts left over after the main repair, which is exactly how a “complete” kit should feel—you get options without a scavenger hunt.
What could be better
- Documentation could better highlight thread direction and packing selection, as well as a quick troubleshooting chart for common post-repair leaks (e.g., vacuum breaker weep vs packing leak).
- Including a slightly thicker alternative O-ring for the stem and a spare seat washer wouldn’t hurt. Hydrants with worn bores sometimes seal better with a hair more O-ring compression.
- The plastic anti-siphon cap is typical for the category; a more robust cap would add confidence, though it would raise cost.
Tips for a first-time DIYer
- Identify your hydrant series and thread direction before disassembly. Snap a phone photo of the packing area for reference.
- Inspect the brass seat inside the body. If it’s pitted, consider a seat resurfacing tool or be prepared for firmer closing force. No repair kit can compensate for a deeply damaged seat.
- Use silicone plumber’s grease on O-rings and packing. Do not use petroleum grease.
- When rebuilding the vacuum breaker, clean the spout recess and confirm the plunger orientation matches what you removed.
- Don’t overtighten plastic components. “Snug plus a nudge” is enough.
- If you still see a drip after reassembly, close the hydrant firmly once or twice to help the new washer take a set. Persistent weeping behind the handle points to packing; at the spout, recheck the seat washer and O-ring.
Value and alternatives
Against cherry-picking OEM parts, the Yoursme kit is attractively priced given how much it includes: a full vacuum breaker rebuild, packing for both thread orientations, and a complete set of washers and O-rings, plus a new handle. If you’re certain you only need a single OEM washer, you can save a few dollars piecemeal. But for most homeowners facing an aging hydrant with multiple wear points, the all-in-one approach is efficient and avoids return trips to the store.
I also like the sustainability angle: you’re restoring a good brass body rather than replacing the entire hydrant. The included 12-month warranty and simple return promise are reassuring for a repair-grade purchase.
Who it’s for
- Homeowners with Prier 300/400/500 or Diamond 300/400 wall hydrants who want to stop common leaks without replacing the body
- DIYers who prefer a single kit over sourcing individual OEM parts
- Property managers maintaining multiple similar hydrants; the spare small parts are handy across repairs
Who might consider alternatives:
- If your hydrant’s internal seat is severely pitted or the body is cracked, no kit will save it—replace the hydrant.
- If you want a guaranteed one-to-one OEM match for every rubber component and your time is more valuable than the cost, OEM-specific kits remain the gold standard.
The bottom line
The Yoursme repair kit did exactly what I needed on a Prier 400: it stopped leaks at the spout and behind the handle, refreshed the vacuum breaker, and tightened up the feel of an old stem. The install is approachable, the fit is generally solid, and the parts selection covers the real-world variables of Mansfield-style hydrants without sending you back to the store.
It’s not magic—hydrants with worn seats or questionable bores may demand a firmer close or a touch of troubleshooting, and I’d love to see slightly richer documentation and a thicker optional O-ring in the box. But as a practical, cost-effective way to extend the life of a good wall hydrant, this kit earns its keep.
Recommendation: I recommend the Yoursme repair kit for most Prier 300/400/500 and Diamond 300/400 hydrant repairs. It’s a well-rounded, DIY-friendly package that solves the common failure points at a fair price. If your hydrant body is in poor condition or you insist on OEM-only rubber, look elsewhere; otherwise, this kit is a smart, time-saving fix.
Project Ideas
Business
Mobile Wall-Hydrant Repair Service
Offer a same-day call service for leaking or damaged exterior wall hydrants using this complete kit. Market to homeowners, landscapers and property managers as a quick fix requiring no special tools. Revenue model: service fee + parts; seasonal promotions before freeze/thaw cycles.
Preventive Maintenance Contracts for Properties
Sell annual or seasonal maintenance packages to landlords, HOAs and commercial sites: scheduled inspections and proactive replacement of vacuum breakers, seats and packing using these kits to prevent leaks and freeze damage. Contracts create recurring revenue and reduce emergency callouts.
DIY Repair Video Course + Kit Bundle
Produce short, clear video tutorials showing step-by-step replacement on Prier and Diamond series hydrants using this kit. Sell bundled packages (kit + printed quick-guide + access code to videos) through an online store or Amazon listing. Upsell remote troubleshooting/phone support.
White-Label Wholesale Maintenance Kits
Buy kits in bulk (or bundle additional common parts) and repackage them under a branded label targeted at landscapers, pool companies and building maintenance teams. Offer tiered bundles (basic repair, pro kit with extras) and volume discounts for regular buyers.
Upcycled Product Line for Retail
Use surplus or lightly used kit parts to craft a branded line of upcycled home goods (hooks, lamps, jewelry). Sell on Etsy, at farmers' markets, and through local boutiques emphasizing sustainability and industrial design. Combine with storytelling (‘repaired, not replaced’) to command higher margins.
Creative
Spigot Steampunk Jewelry
Turn small metal parts (handles, stainless screw, packing nuts, O-rings and tiny washers) into pendants, cufflinks and bracelets with an industrial look. Clean and patina the metal, thread O-rings as accents, solder or epoxy small parts to jewelry backs, and finish with a clear seal. Low-cost, high-margin craft for markets and online shops.
Mini Wall-Hydrant Succulent Planters
Use the vacuum-breaker bonnet/cap and larger metal pieces as miniature wall-mounted planters for tiny succulents or air plants. Drill a drainage hole if needed, mount to reclaimed wood or tile, use the handle as a decorative hanger or mini spigot ornament. Great for garden markets, gift bundles, or home décor photoshoots.
Industrial Hook & Towel Rack
Create coat/towel/hose racks by mounting replacement handles and packing-nut bases to a wooden plank or metal bar. Use the strong metal handle as the hook and the packing nuts as collars for a professional finish. Paint or powder-coat the board, add rubber washers to protect surfaces. Functional, durable, and appealing to farmhouse/industrial décor buyers.
Hydrant Candle Holders & Small Lamps
Assemble metal pieces (plunger assembly, stem parts, washers) into weighted candle holders or miniature lamp stands. Use graphite/plastic parts as insulating spacers, fit a tea-light cup or small Edison bulb on top, and finish wiring/finials for safe tabletop lamps. These make distinctive home-decor items for craft fairs.
Plumbing Teaching Kit for Makerspaces
Repackage the components into hands-on training kits for hobbyists and school makerspaces: include a cutaway hydrant mock-up, the vacuum breaker, seat washers, O-rings and a step-by-step exercise sheet. Great for workshops teaching basic plumbing skills, leak diagnosis and parts identification.