
Features
- ⭐【Professional Point Wood Dril Bits 】- Cabinet hardware jig set comes with 3 different sizes of Point Wood Dril, 3mm/4mm/5mm respectively, meeting different installation requirements. Pro-woodworking tools are more durable, Top with pointed tip ,won't jitter. Indispensable accessory to install knob/handle/pull.
- ⭐【Metric + Imperial Scale】- Contains metric imperial double sizes. Super high-definition tick board marks made of ABS, and the ruler is made from stainless steel. Ensure the jig’s premium durability, high corrosion resistance, high strength.
- ⭐【Detachable & Portable】- Cabinet hardware installation template quick-release '' drill guide'' sliders can be split into small parts by taking a small Space to easily carry. The storage bag we present will solve all your troubles of carrying.
- ⭐【Time Saver Quick Drilling】- Cabinet hardware template tool a full day of measuring and re-measuring. Set it up once and use it repeatedly with no further measurements, A good accessory, and helper for woodwork or DIY. The installation efficiency is greatly improved.
- ⭐【Jig Widely Application】- Cabinet hardware jig is ideal for installing pulls or handles and knobs on DRAWERS, CABINETS, DOOR and so on. Works on any cabinet door stile and rails including shaker doors & recessed drawer fronts. We offer 24-hour after-sales customer service, Feel free to contact us if you have any questions.
Related Tools
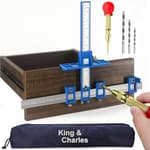

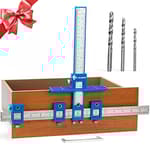
A cabinet hardware jig with a detachable ABS template and a stainless-steel ruler that provides metric and imperial scales and quick-release sliders to guide drilling for handles, pulls, and knobs. The set includes three pointed wood drill bits (3 mm, 4 mm, 5 mm) and a storage bag, and is suitable for installing hardware on drawers, cabinet doors, stiles, rails, shaker doors, and recessed drawer fronts.
King&Charles Cabinet Hardware Jig, King&Charles Cabinet Handle Jig with 3pcs Point Wood Drils Bits, Use for Handles Pulls Knobs on Drawers/Doors, Wood Drilling Dowelling Guide Set. Review
Why this jig earned a spot in my install kit
I’ve installed enough cabinet hardware to know the two ways a day can go: calm and repeatable, or tense and error-prone. The King&Charles jig consistently pushed my days toward the first category. It’s a straightforward, modular template with a stainless steel rule, clear metric/imperial markings, and quick-release sliders that make dialing in spacing and offsets fast. It’s not a premium, metal-bushed, jobsite-tank of a jig—but for most install runs, it delivers clean, consistent results with minimal fuss.
Design and build
The core template is ABS with a stainless steel ruler running through it. The plastic doesn’t feel flimsy; it’s stiff enough to stay flat under clamping pressure and doesn’t flex when you register it against a stile or drawer edge. The metal ruler lends rigidity and, more importantly, keeps the markings sharp and easy to read in both metric and imperial. I appreciated the dual scales—jumping between 3 mm increments for Euro hardware and 3/16–1/4 in. for U.S. pulls is simple.
The quick-release sliders are the star of the design. They move smoothly, lock down positively, and break down for storage. I could strip the jig into a compact bundle and drop it into the included bag without playing Tetris in the tool chest.
There’s no hardened drill bushing—this is a layout/guide template rather than a “drill-through-the-jig” system. That’s a fair trade at this price and weight, but it does mean technique matters (more on that below).
Included in the kit are three brad-point wood bits (3, 4, and 5 mm). They’re sharp out of the bag, and the brad tips help stay on center. For most modern pulls and knobs, the 5 mm bit will be your workhorse. If you’re working with 8-32 screws and prefer a tighter 3/16 in. hole, stick your favorite 3/16 in. brad-point in the drill; the jig accommodates it without issue.
Setup and calibration
My setup routine went like this:
1) Determine centerlines and handle spacing on a test board.
2) Set the jig’s horizontal spacing with the sliders to match the pull’s hole-to-hole dimension.
3) Set vertical offset from the edge (for knobs) or from rail/stile reference points (for pulls).
4) Lock everything down, confirm metric/imperial alignment, and do a test drill on scrap.
I recommend a dry run—two holes in scrap can save a door. Once dialed in, I could move through a bank of drawers without re-measuring. The sliders stayed put between pieces; I didn’t experience drift unless I bumped a knob while moving too quickly.
A small quirk to note: the molded face has a shallow shoulder near one edge. Make sure you’re registering the correct, flat face against the door or drawer edge. On my first pass I caught myself referencing off that shoulder, which adds an unintended offset. Once you’re aware of it, it’s easy to avoid.
In use: accuracy and speed
On a typical kitchen—shaker doors, mix of knobs and 128 mm pulls—the jig kept my hole positions consistent within about half a millimeter across the run. That’s well within tolerance for hardware to sit square and symmetrical, and it’s what makes a kitchen read “professionally installed.”
Because there are no drill bushings, you are the bushing. Two habits made a big difference:
- Use a backer board clamped behind the work to prevent blowout as the brad-point exits.
- Keep the drill perpendicular. A small torpedo level on the drill body or a second set of eyes helps if you’re new to this.
I often used the jig to mark with an awl through the guide holes and then removed it to drill. The brad-point found the awl divot and I didn’t risk rubbing the plastic. Drilling directly through the jig worked fine too, but marking first preserves the tool and reduces accidental ovalizing of the guide holes over time.
Versatility on different door/drawer styles
The King&Charles jig is particularly comfortable on:
- Shaker doors: Register off the stile, set consistent vertical height relative to the rail, and you’re off.
- Frameless cabinet doors: Reference from the door edge with the same repeatability.
- Recessed drawer fronts: The face of the template sits flat; set your centerline and spacing and clamp where necessary.
- Wide drawers with long pulls: The sliders handled common 96 mm and 128 mm spacings easily; for longer spans, take an extra second to confirm the left/right symmetry of the scale before drilling.
The metric and imperial scales meant I wasn’t converting on the fly for European-spec hardware. I also appreciated that the template can be flipped and mirrored without creating measurement confusion—the ruler markings and stop faces are intuitive once you’ve set it up once or twice.
Included bits and drilling performance
The included brad-point bits are a thoughtful touch. The 5 mm bit produced clean holes with minimal tear-out when paired with a backer board. The tips track well and reduce “walk,” especially important when you’re drilling through paint or lacquer. If you’re installing soft metal or vintage hardware with tighter screws, keep a 3/16 in. bit handy. Either way, I recommend using a stop collar or a wrap of painter’s tape to prevent punching into the cabinet box.
Portability and storage
Breaking the jig down takes seconds. The quick-release sliders pop off, and everything tucks into the supplied bag alongside the three bits. For anyone moving between rooms or jobs, that grab-and-go convenience is excellent. The bag isn’t ruggedized, but it keeps parts together and the ruler protected from scratches that can obscure fine marks.
Durability and limitations
After several installs, the ABS showed faint witness marks at the guide holes, which is expected without bushings. Nothing affected accuracy, but it’s a reminder to either mark through the jig or drill with a light touch. The locking knobs held their tension, and the stainless rule didn’t show corrosion despite shop humidity.
Where this jig is less at home is in high-volume, daily contractor use. If you’re punching hundreds of holes a week, a fully metal, bushed jig will last longer and tolerate more abuse. Also, because the jig relies on your drill alignment, it won’t correct for a sloppy grip or a dull bit. Technique still matters.
Tips for best results
- Always test on scrap that matches door thickness and finish.
- Mark with an awl through the template; then drill.
- Clamp a backer board behind the exit side to prevent blowout.
- Use a drill stop or tape flag to control depth.
- Confirm you’re referencing the correct flat face of the jig against the edge—don’t ride the molded shoulder.
- Double-check left/right mirroring on doors to avoid “handedness” mistakes.
Value
For the price, the King&Charles jig delivers strong value: fast setup, reliable repeatability, dual scales, and a compact kit with usable bits. It’s more capable than a homemade MDF template and less fussy than measuring by tape and square for every hole. Its compromises—plastic body and lack of bushings—are sensible for its target user: DIYers and pros who need an accurate, portable jig for occasional to moderate use.
Who it’s for
- DIY homeowners installing their first (or fifth) kitchen or bath.
- Finish carpenters and handymakers who want a compact, repeatable jig without hauling a heavy, metal system.
- Woodworkers fitting hardware to shop cabinets, jigs, or furniture pieces.
If you need a jig to live in a truck and survive daily worksite abuse, look at metal-bushed alternatives. Otherwise, this one will likely cover your needs with less setup time and weight.
Recommendation
I recommend the King&Charles jig. It’s accurate, quick to set up, and flexible enough to handle doors, drawers, shaker stiles, and recessed fronts with equal ease. The stainless ruler and clear dual scales make measurements simple, the sliders hold reliably, and the included brad-point bits are actually useful. Just be mindful of the reference face, protect your exit holes with a backer board, and either mark first or drill with a light touch to extend the jig’s life. For most installs, it turns a tense measuring exercise into a smooth, repeatable workflow—and that’s exactly what a hardware jig should do.
Project Ideas
Business
Mobile Cabinet Hardware Installation Service
Offer an on-site service installing new cabinet hardware for homeowners, rental property managers, and realtors. The jig lets you work quickly and accurately in tight spaces, reducing labour time and errors. Revenue model: charge per-cabinet or flat-rate kitchen packages, upsell hardware and filler/repair work, and partner with local hardware stores for referrals. Market via local Facebook groups, Nextdoor, and partnerships with staging companies.
Pre-drilled DIY Kits Sold Online
Create and sell kits that include pre-drilled drawer fronts or pre-marked templates for common hole centers, plus matched screws and mounting instructions. Use the jig in your workshop to produce consistent, quality-ready pieces. Sell through Etsy or Shopify with product variations for popular centers (64 mm, 96 mm, etc.), and include short installation videos. Price tiers: basic kit, premium hardware bundle, and custom drill-center requests.
Workshops & Pop-up DIY Events
Run small-group classes teaching homeowners and hobbyists how to upgrade cabinetry using the jig. Sessions can cover measuring, drilling, filling old holes, and finishing techniques. Charge per seat and sell starter packs (jig + bits + 2–3 sample pulls) at the event. Partner with community makerspaces, local hardware stores, or craft fairs to attract attendees; record tutorials to use as lead magnets for future paid courses.
B2B Service for Contractors and Remodelers
Position yourself as a subcontractor who specializes in precise hardware installation for builders and cabinet makers. Use the jig to deliver repeatable results across large-volume projects, reducing callbacks for misaligned hardware. Offer package pricing per unit or per hour and provide options for on-site teams to be trained on the jig. Benefits to clients: faster finish timelines, consistent aesthetics, and fewer punch-list items.
Accessory Bundles & Consumable Subscription
Create a product bundle combining the jig, a set of premium pointed drill bits, a carry/storage bag, and a selection of popular handles. Offer a low-cost entry bundle and upsell a subscription for replacement drill bits, small hardware assortments, and new template plates for unusual layouts. Use how-to videos and a strong product page to convert DIYers; subscriptions increase recurring revenue and keep customers coming back for refreshes and new projects.
Creative
Custom Drawer Face Makeovers
Refresh a whole set of kitchen or bathroom drawers by replacing old hardware with coordinated new pulls and knobs. Use the jig's quick-release sliders and ruler to mark identical hole centers across every drawer face, then drill clean, jitter-free holes using the pointed 3/4/5 mm bits. Try mixing horizontal and vertical pulls or offsetting handles for a modern look. Tips: fill old holes with dowels and wood glue before sanding, and keep a test scrap to verify bit size and screw length before drilling actual drawer fronts.
Built-in Jewelry & Accessory Drawer Inserts
Make velvet-lined jewelry drawers with perfectly spaced peg rows for rings, necklaces, and bracelets. Use the jig to drill evenly spaced holes for small wooden pegs or brass pins so necklaces hang without tangling. The metric and imperial scales let you match international peg sizes; the detachable template makes it easy to set up for different drawer widths. Add foam or fabric liners glued over the drilled base for a finished, luxurious look.
Upcycled Furniture Hardware Refresh
Turn thrift-store finds into showroom pieces by reconfiguring hardware placements. Use the jig to accurately locate new handle centers when replacing vintage knobs with modern pulls, or to add a row of knobs to a dresser for a unique look. The stainless-steel ruler helps when working with nonstandard drawer depths or recessed fronts. Combine with wood filler and stain-matching techniques to hide old holes and give each piece a cohesive, updated appearance.
Modular Kitchen Wall & Utensil Rack
Create a custom wall-mounted utensil system using cabinet pulls and pegs as hangers. Mount horizontal rails on the wall and use the jig to drill consistent hole spacing into the rails for hooks, handles, or dowels. Configure modules for mugs, utensils, and spice baskets that can be rearranged. The portability of the template makes it easy to pre-drill multiple rails in your workshop before installation.
Artful Handle Pattern Installations
Design cabinets where hardware becomes the focal pattern across multiple doors — staggered rows, alternating orientations, or a continuous diagonal line. Use the jig to replicate precise hole spacing and alignments across each door so the final pattern reads as intentional and professional. This project highlights the jig's time-saving repeatability and is great for statement kitchens, built-ins, or custom furniture commissions.