Features
- ⭐【King&Charles Unique Kit】- In order to avoid drilling directly with an electric drill will cause the jig to shake, we provide an "Automatic Center Punch". Use jig finded the location, you just need to use the "hole punch" to directly punch the small holes, and then use the electric drill to punch the big holes on have already been punched small holes. It is a very ingenious way by King&Charles. Perfect suit, Only need to buy once, In one step.
- ⭐【Punch & 3 Point Wood Bits 】- Set extra include metal punch + 3 sizes of Point Wood bits。AUTOMATIC PUNCH is constructed from heavy-duty metal to resist against corrosion. Pro-WOODWORKING BITS is 3mm/4mm/5mm can meeting different installation requirements. Bits top with pointed tip ,keep won't jitter when drilling.
- ⭐【Cabinet Hardware Jig】- Contains metric + imperial double Scale sizes. Super high-definition tick board marks made of ABS, and the ruler is made from stainless steel. Ensure the jig’s premium durability, high corrosion resistance, high strength.
- ⭐【Detachable & Portable】- Cabinet hardware installation template quick-release '' drill guide'' sliders can be split into small parts by taking a small Space to easily carry. The storage bag we present will solve all your troubles of carrying.
- ⭐【Good Hepler】- Set it up once and use it repeatedly with no further measurements, A good accessory set, and helper for woodwork or DIY. The installation efficiency is greatly improved. This is a complete set, and only one set is needed to meet the installation requirements
- ⭐【Widely Application】- Cabinet hardware jig is ideal for installing pulls or handles and knobs on DRAWERS, CABINETS, DOOR and so on. Works on any cabinet door stile and rails including shaker doors & recessed drawer fronts.
Related Tools

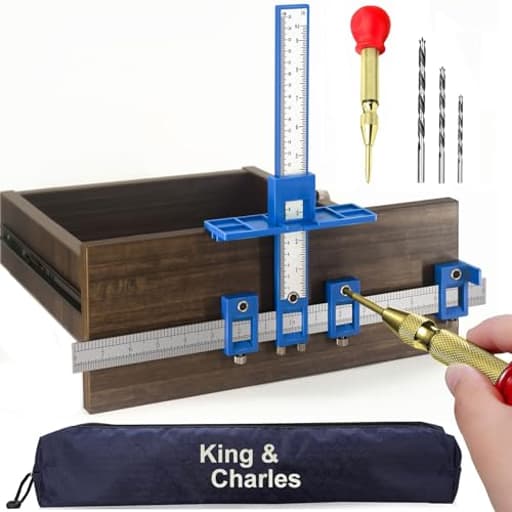
This cabinet hardware jig is a detachable drilling guide and dowelling template for accurately locating and installing handles, pulls, and knobs on drawers, cabinets, and doors. It includes an automatic center punch for making starter dimples, three pointed wood bits (3, 4, 5 mm), metric and imperial scales on ABS and stainless steel components, a quick-release drill guide, and a storage bag for transport.
King&Charles Cabinet Hardware Jig, King&Charles Cabinet Handle Jig + Automatic Hole Punch + Point Drill Bits, Use for Handles Knobs Pulls on Drawers/Doors, Wood Drilling Dowelling Guide Set. Review
Why this jig earned a spot in my kit
Installing cabinet hardware is one of those tasks that looks simple but gets unforgiving fast. A millimeter off on a pull and you’ll see it every day. I picked up the King&Charles jig to streamline a multi-room hardware install—drawers, cabinet doors, a couple of recessed fronts—and it did exactly what a good jig should: made me faster without sacrificing accuracy. It’s not a premium, all-metal, jobsite tank, but for home and light pro use, it hits a very sensible sweet spot.
What’s in the kit
The package is more complete than most in this price range. You get:
- The jig with an ABS body and a stainless steel ruler
- Quick-release drill guide sliders
- Dual metric/imperial scales
- A metal automatic center punch
- Three brad-point wood bits (3, 4, and 5 mm)
- A storage bag that actually fits everything
The standout is the automatic center punch. It’s not an afterthought accessory—it’s an integral part of how this jig is best used. More on that below.
Setup and calibration
Out of the bag, assembly took me under ten minutes. The sliding drill guide and fences are intuitive: set your handle’s center-to-center spacing, square the fence to the cabinet edge, and lock everything with the thumb knobs.
A few tips that improved my results immediately:
- Ignore any urge to trust printed scales blindly. They’re clear and legible, but I still verify with a steel rule or calipers—especially for common sizes like 96 mm, 128 mm, and 160 mm.
- Do a dry run on a scrap or a taped-off piece of MDF. I keep a “test drawer” board in the shop specifically for this.
- Set a consistent reference (e.g., measure from the drawer’s top edge for all drawers). Consistency beats perfection when you’re trying to match a room full of fronts.
In use: workflow that works
Here’s the routine that got me clean, repeatable results:
- Mark a centerline on the drawer front or stile with light pencil or tape.
- Set the jig’s fence so the drill guide is square and on your centerline.
- Adjust the drill guide to your handle’s hole spacing. Lock the sliders.
- Use the automatic center punch through the drill bushings to dimple each hole location. Two firm clicks per hole on hard woods like maple; one click on softer woods.
- Drill a pilot with the 3 mm bit through the punched dimple.
- Open to final size with the 5 mm bit (or your preferred size—more on that below).
- Lightly break the edges with a countersink or by spinning the bit by hand to avoid raised fibers.
- Test-fit the handle before moving the jig.
The punch-first approach is the unsung hero here. If you’ve ever had a brad-point bit skate or found the jig shift under drill pressure, punching first makes the whole process calmer and more controlled.
Accuracy and repeatability
Once dialed in, the jig holds tolerances well enough for visible, side-by-side drawers. I was comfortable installing long pulls on wide drawers without fear of subtle racking. That said, a couple of things are worth watching:
- Retighten the sliders and fence periodically. Quick-release hardware is fast, but it does benefit from a check every few pieces.
- Apply even pressure against the fence and keep one hand stabilizing the jig while punching. It’s light enough that a nudge can move it if you’re careless.
- For doors with variable stile widths or shaker rails, recheck your vertical offset when you switch orientations (horizontal on drawers vs. vertical on doors).
In other words: the jig is accurate; your technique determines how accurate.
The included bits and hole sizes
The three included brad-point bits are a nice touch. The 3 mm is ideal for pilots, the 4 mm is handy for European M4 screws in solid wood, and the 5 mm creates a clean clearance hole for most common cabinet hardware.
If you’re using 8-32 machine screws (very common in the U.S.), a 3/16" bit is technically closer to ideal than 5 mm, but the 5 mm works just fine as a clearance hole and won’t affect the install. The brad points help keep the holes crisp with minimal tear-out. For face-veneered plywood, I still recommend tape on the exit side or a backer block.
Build quality and ergonomics
The core body is ABS with a stainless steel ruler, and that’s a sensible pairing here. The ABS plate has crisp, high-contrast markings and doesn’t ding your finished fronts if you bump it. The stainless ruler is straight and stays that way. The drill guide sliders have enough meat to them that I didn’t experience flex during normal use.
Is it bombproof? No. If you’re tossing this into a work van daily, an all-metal jig will be more forgiving to abuse. But with basic care, nothing about it feels flimsy. The locking knobs are easy to grip, and the overall weight is light enough that you won’t fight it during vertical door work.
Portability and storage
The detachable components and included bag are genuinely useful. I broke the jig down to toss it in a tool bag, and reassembly didn’t cost me much time. If you’re moving between rooms or projects, this is far more convenient than lugging a bulky one-piece jig.
Versatility on different fronts
I used it on:
- Standard overlay cabinet doors (vertical knobs and pulls)
- Shaker-style rails (watch your vertical offset to avoid hitting panel recesses)
- Drawer fronts from narrow bathroom drawers to wide kitchen banks
The jig’s fence and sliders accommodate both single-hole knobs and multi-hole pulls easily. For extra-long pulls, I suggest drilling one side, test-fitting the handle with a screw, then drilling the second hole off that fixed reference—belt and suspenders, but it’s foolproof.
Technique tips that pay off
- Mark centerlines—don’t rely solely on edges that might not be perfectly parallel.
- Use the punch for every hole, even with brad points.
- Pilot first, then open. Cleaner holes, less wander.
- Blue tape the face and back of veneered panels.
- Keep a spare 3/16" bit if you prefer imperial sizing for 8-32 screws.
- For stacked drawers, build a simple spacer block to set consistent vertical offsets without remeasuring.
Where it fits in the market
There are heavier, fully machined jigs that are faster to adjust and harder to knock out of square, and there are cheaper plastic templates that are barely better than guessing. This jig lands right in the practical center: more precise and configurable than throwaway templates, much more affordable than pro-grade metal systems. For a homeowner or a handy person outfitting a kitchen, bath, or built-ins, that’s exactly the right place to be.
Pros
- Thoughtful kit: automatic center punch and brad-point bits included
- Dual scales and clear markings; easy to read
- Quick adjustments with sliders; good repeatability
- Portable, with a useful storage bag
- Gentle on finished fronts thanks to the ABS body
- Strong value for the capability
Cons
- Not an all-metal build; requires attention to keep everything locked down
- Scales are good, but I still verify measurements—best practice with any jig
- Included bits top out at 5 mm; you may want a 3/16" bit for 8-32 screws
Recommendation
I recommend the King&Charles jig for anyone installing cabinet hardware from scratch or updating a full room’s worth of doors and drawers. It’s accurate when used with care, the punch-first workflow keeps holes where they belong, and the kit is complete enough that you can start immediately without extra purchases. If you install hardware daily and your tools live a hard life, an all-metal jig will be more durable long-term. For DIYers, small shops, and remodelers who want consistent, professional-looking results at a sensible price, this jig is an easy yes.
Project Ideas
Business
Boutique Hardware Line + Ready-to-Drill Kits
Design and produce a small-batch line of decorative pulls and knobs (wood, brass, leather-wrapped). Package each product with a one-page jig template that shows exact placement marks for common drawer heights and door stiles, plus a suggested drill bit size. Revenue channels: Etsy, Shopify, local craft fairs. Margins: aim for 3–5× material/labor costs; offer premium limited-edition runs. Use the jig during prototyping to ensure hole locations match standard sizes.
Mobile Handle Installation Service
Offer on-site cabinet hardware installation for homeowners and contractors who want fast, flawless handle and knob placement. Price per piece (e.g., $6–$12 per handle) or by job (kitchen package: $X for up to 30 doors/drawers). Sell add-ons: new hardware sourcing, quick refinishing, and removal/disposal of old hardware. Use the jig for speed and consistency; advertise local Facebook groups, Nextdoor, and partnerships with cabinet retailers.
DIY Workshops & Kits
Run half-day workshops teaching homeowners how to replace cabinet hardware and refinish cabinet doors. Include a take-home kit: a basic jig, a set of pilot bits, a small punch, and a template card. Revenue from class fees plus kit sales. Market via community centers, maker spaces, and Instagram. Workshops build trust and create repeat customers for hardware sales or installation referrals.
Cabinet Refurbish & Flip Service
Buy worn cabinetry (estate sales, Craigslist), refinish or repaint, and fit new hardware precisely using the jig—then resell as refreshed units or offer kitchen refresh services. Typical profit comes from low acquisition cost + value-adding refinish/hardware replacement. Offer tiered packages (budget, mid, premium) and showcase before/after photos on social channels to attract homeowners and realtors.
B2B Precision Drilling Service for Small Cabinet Makers
Partner with independent cabinet makers or carpenters who want consistent hardware placement but lack time or equipment. Offer a service to pre-drill hardware holes in batches (drop-off or mobile service) and optionally supply pre-marked templates and jigs on consignment. Pricing model: per-piece drilling fee with volume discounts; recurring monthly contracts for steady shops. Emphasize accuracy and time savings in sales pitches.
Creative
Upcycled Drawer Pull Gallery
Turn old drawers into wall art or shelving by refacing drawer fronts and installing a mix-and-match set of knobs and pulls. Use the jig to standardize hole spacing and ensure perfectly straight rows across multiple drawers. Variations: paint drawer faces in a gradient, swap vintage/modern hardware for eclectic looks, or mount several drawer fronts as a modular wall display. Materials: reclaimed drawers/plywood, assorted hardware, paint/stain, mounting cleats.
Mini Jewelry & Keepsake Boxes
Make a series of small wooden boxes with perfectly centered knobs or pulls for lids. The jig ensures repeatable placement on dozens of boxes (great for gift sets or markets). Add felt lining, engraving or brass corner accents. Step tip: use the automatic center punch for spotless starter dimples so small bits don’t wander when drilling thin stock.
Shelf-and-Handle Multi-Functional Rack
Build floating shelves with attached cabinet pulls used as towel hooks, mug racks, or necklace hangers. The jig helps you line up handles across the shelf face and underside for a clean, professional look. Offer themed sets (kitchen mug rack, entryway key/towel rack) and finish options (stained, painted, distressed).
Personalized Children's Toy Chest
Create toy chests or dressers with name plates and child-safe knobs placed precisely using the jig. Add painted characters, rounded corners, and non-toxic finishes. Because handles are aligned and consistent, multi-drawer chests look high-end—great for gifts or nursery decor.
Modular Storage Cube System
Design stackable storage cubes with uniform handle placement to create a cohesive furniture system. Use the jig to ensure every cube’s drawer front lines up perfectly when cubes are combined in different layouts. Sell singles or sets in different wood species and finishes; include hardware upgrade options (leather pulls, brass knobs).