Features
- VERSATILE HEATING MAT: The Heatwave Electric Floor Heating Mat covers up to 15 square feet, making it ideal for small to medium-sized rooms. Our electric floor heating system works under various flooring materials like tile, laminate, and carpet, including heated flooring systems for tile. With a 15 ft cold lead included, it delivers even warmth, making it the perfect heated floor system for your home.
- EASY INSTALLATION: Our mat floor heater features an adhesive backing for quick and easy installation, so you don’t need any professional help. Designed to fit under various floors, this radiant floor heating system is suitable for heated tile floor kits or under tile floor heating systems. With a reversible design, it adapts to any room shape, providing comfort with minimal effort.
- PROGRAMMABLE THERMOSTAT: The included 7-day/4-event programmable thermostat lets you schedule your heating preferences for your electric radiant floor heating system. It offers customizable comfort, ensuring your heated floor system is ready when you need it. It supports both 120/240V and controls up to 15 Amps, great for electric floor heating.
- SAFE AND ENERGY EFFICIENT: With built-in GFCI protection, HEATWAVE in floor heating system is safe for wet areas. The electric radiant floor heating efficiently warms your floors, helping you save on energy by reducing the need for traditional heating methods. It's an energy-saving solution that makes sure your radiant floor heating works safely and effectively, no matter the weather.
- IDEAL FOR MULTIPLE FLOOR TYPES: Whether you're installing it under tile, laminate, or vinyl, the Heatwave Electric Floor Heating Mat is the ideal heated floor kit. Our underfloor heating system provides even and comfortable warmth, whether it's for your heated bathroom floor kit or your heated floor mats for bathroom. It’s a great way to bring comfort to any room with a radiant floor heating mat.
Specifications
| Color | White |
| Size | 40 Square Foot |
Related Tools
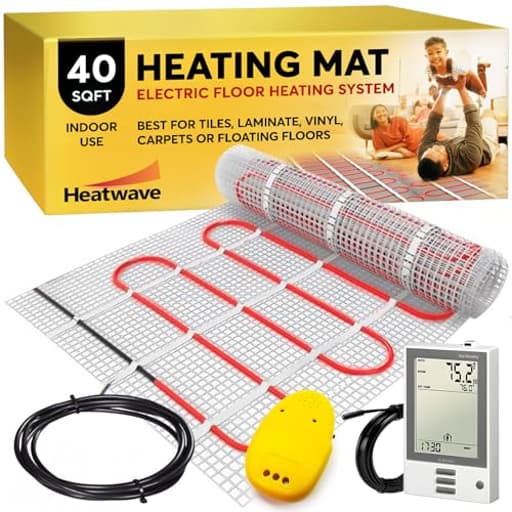
An electric underfloor heating system designed to provide radiant heat to tile, laminate, and vinyl floors over a 40 sq ft area, operating at 120 V and 480 W (4 A). The kit includes an adhesive-backed heating mat with a cold lead, built-in GFCI protection for use in wet areas, and a 7-day/4-event programmable thermostat for scheduled temperature control.
HEATWAVE Electric Floor Heating System for Tile 40 sqft 120V 4Amps 480Watts-Heated Flooring System for Bathroom Floor Heating Kit Underfloor Comfort Heat 7Day/4Event Programmable GFCI Thermostat by Heatwave Review
I installed Heatwave’s 40‑sq‑ft underfloor heating kit in a small bathroom remodel to add some much‑needed morning comfort. It’s a straightforward package—adhesive mesh mat, 15‑ft cold lead, floor sensor, and a 7‑day/4‑event programmable thermostat with built‑in GFCI—all designed to run at 120 V and about 480 W (roughly 4 A). After living with it through a winter, here’s how it actually performs, what’s easy, what can trip you up, and who I think will be happiest with it.
What you get and the basics
- Coverage: 40 sq ft of heating area
- Power density: about 12 W/sq ft (480 W total)
- Voltage/current: 120 V, ~4 A
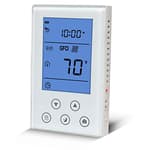
- Thermostat: 7‑day/4‑event programmable, supports 120/240 V up to 15 A, built‑in GFCI
- Mat: mesh with adhesive backing; reversible layout; 15‑ft cold lead
At 12 W/sq ft, it’s tuned as a floor warmer rather than a primary heat source, especially on a slab or in colder climates. Under tile and stone, it delivers a very even, pleasant warmth that takes the edge off cold floors without creating hot spots.
Planning and layout
The mat’s reversible mesh and the ability to cut the mesh (never the heating wire) make it adaptable to typical bathroom footprints. The key is careful planning. I started by mapping the room and marking no‑heat zones: under the vanity and toilet, within a few inches of the toilet flange, and away from floor penetrations. I dry‑fitted the mat and cut the mesh to snake the cable where I wanted coverage while maintaining the manufacturer’s wire spacing.
A few planning tips that paid off:
- Keep the floor sensor centered between two adjacent heating runs and away from exterior walls or direct sunlight.
- Plan a thermal break if possible. On a cold slab or over an uninsulated space, use an insulating backer board or an uncoupling/insulation membrane rated for heat. It noticeably improves warm‑up time and reduces energy loss.
- Confirm your circuit: 4 A isn’t much, but dedicate a GFCI‑protected circuit per local code. The thermostat includes GFCI, which simplifies compliance in wet areas.
Installation experience
The adhesive backing helps, but I still consider mechanical and spot‑adhesive fastening essential. Mesh can lift when you trowel thinset or pour self‑leveling underlayment. I secured every turn and any raised sections of mesh with hot‑glue dabs and a few staples outside of any heated wire path (staples through mesh only, never through the wire). That kept the cable flat during embedment.
Two approaches work:
- Directly embedding in thinset under tile (what I did): lighter build‑up, fast workflow, excellent heat transfer. Use a flat trowel to pre‑fill over the wires, then comb your notches and set tile.
- Encasing in a primered self‑leveling underlayment: creates a perfectly flat surface for tiling or LVP/laminate installs. The caveat is buoyancy—the mesh wants to float. Aggressive pre‑bonding/gluing is mandatory.
Throughout the process, I tested the mat’s resistance against the nameplate values, and I used a simple continuity alarm while working. It’s an extra box on the floor, but it immediately alerts you if you nick a wire so you can stop and avoid burying a problem. The kit’s cold lead is long enough to reach the wall box without splices, and the jacket handled troweling abuse well.
Overall, the install is within reach for a confident DIYer comfortable with tile and basic electrical work. If you’re newer to either, budget time for layout and protection of the cable, or consider professional install. The manual is clear and methodical; follow it to the letter.
Thermostat and controls
The thermostat is utilitarian but capable. Scheduling is 7‑day with up to four events per day, and it supports both room‑ and floor‑sensing modes. For tile, I prefer floor‑sensor mode to hold a specific floor temperature regardless of room swings. It pairs cleanly with the included sensor and has built‑in GFCI, which is handy in a bathroom.
What it’s not: connected. There’s no Wi‑Fi, app, or voice control. If you value those, you’ll need a third‑party smart stat that supports floor sensors and GFCI requirements, or you can live with simple but reliable scheduling here.
One practical note: test the GFCI and sensor before closing up the wall box. It’s a 30‑second check that can save a trip back later.
Performance and comfort
Under porcelain tile on a wood subfloor with an insulating backer board, warm‑up from cold takes around 45–60 minutes to feel warm underfoot and a couple of hours to reach a steady target around the low‑80s F. On a slab or under thicker toppings, expect slower response. That’s inherent to radiant mass heating, not a flaw of the kit.
Once at temperature, heat is even and consistent with no zebra stripes. It’s quiet, invisible, and very satisfying on cold mornings. The 12 W/sq ft density keeps surface temps comfortable and safe for most floor coverings. If you’re installing under LVP or laminate, respect the flooring manufacturer’s maximum temperature (commonly 80–85°F) and use floor‑sensor control mode with a cap.
Could it heat the entire room by itself? In a tight, well‑insulated bathroom, it might; but I treat it as a comfort layer. It reduces the temptation to crank central heating just to warm tile, which is where the real day‑to‑day benefit shows.
Energy use and operating strategy
At 480 W, leaving it on continuously would be modestly costly over a month. I had good results scheduling:
- Pre‑heat 60–90 minutes before the morning routine
- Hold a lower “background” floor setpoint during the day
- Nudge back up for evening showers
Cycle time is long, so pre‑heat matters. If your space loses heat quickly (slab, exterior exposure), consider a constant low setpoint to avoid repeated long warm‑ups.
Safety and durability considerations
The thermostat’s integral GFCI adds a layer of protection that’s appropriate for wet areas. Wiring and terminations are robust, and the cold‑lead transition is well made. Still, radiant mats are unforgiving of voids: air pockets around a cable can cause localized overheating. The cure is prevention:
- Fully embed the cable; don’t leave ridges or gaps under turns
- Bond the mesh so it cannot float during pour or troweling
- Keep proper coverage and spacing; never cross or bunch the wire
- Protect the cable during other trades’ work
If you ever suspect damage, it’s far easier to fix before tile goes down. Once buried, any repair is invasive.
Where it shines, and where it doesn’t
What I liked
- Predictable, even warmth with a sensible 12 W/sq ft output
- Clear instructions and a generous 15‑ft cold lead
- Built‑in GFCI thermostat with flexible 7‑day scheduling
- Reversible mat layout makes odd rooms workable
- Good value for a basic, reliable comfort upgrade
What gave me pause
- Mesh can lift in self‑leveling compounds without thorough anchoring
- Warm‑up is deliberate, especially on slabs or over thick toppings
- No smart features; the thermostat is basic
- As with all mats, install quality is make‑or‑break for longevity
Who it’s for
- Bathroom remodelers who want a warm tile experience without overhauling HVAC
- DIYers comfortable with tile work who can follow careful layout and testing procedures
- Owners on wood subfloors or insulated assemblies; it works on slab, but plan for slower response or add insulation
- People who prefer simple schedules over app‑based controls
If you’re looking to heat a large, drafty space or expect rapid, on‑demand heat, a higher‑density system, additional insulation, or a different heating approach may suit better.
Recommendation
I recommend the Heatwave underfloor heating kit for anyone seeking a dependable floor‑warming solution under tile or stone, especially in small to medium bathrooms. It’s thoughtfully packaged, the thermostat is straightforward and safe for wet areas, and the mat delivers even, comfortable heat once properly embedded. Installation demands care—anchoring the mesh, testing resistance during each step, and planning the layout—but if you take that seriously, the result is a low‑profile luxury that makes cold mornings far more pleasant. For slab installs or non‑tile surfaces, add the right insulation and respect flooring temperature limits, and you’ll get the best from this system.
Project Ideas
Business
Specialty Heated-Floor Install Service
Offer turnkey installations for small rooms (bathrooms, mudrooms, entryways) using 40 sq ft mat kits. Package services: site assessment, mat placement, tile/vinyl installation, thermostat setup and user programming. Market to homeowners doing mid-size remodels as an affordable comfort upgrade. Include a safety checklist and offer electrician hookups or partner with licensed electricians for compliance.
Boutique Heated Pet Products
Create a line of custom heated pet beds, benches and small crates built around the heating mat. Use attractive hardwood frames and removable covers, and include the programmable thermostat pre‑set for safe animal temperatures. Monetize with different size offerings, accessories (washable liners), and extended-warranty/service plans for thermostats and GFCI checks.
Event & Pop‑Up Heated Flooring Rental
Rent modular heated-floor sections to outdoor vendors, market stalls, wedding tents and winter pop-ups that need small heated zones. Provide quick-install adhesive mats, battery-friendly or generator power options, programmable thermostats and setup/teardown service. Offer seasonal contracts and emergency support to handle weather or power issues.
Trade Partnerships & Bundled Remodel Offers
Partner with tile contractors, bathroom remodelers and interior designers to bundle radiant mats into remodel quotes. Offer training sessions to tradespeople on easy mat installation and thermostat programming so they can upsell heated floors. Provide volume pricing and an installation guide co‑branded with partners to streamline adoption.
DIY Workshops and Pre‑Cut Kits
Run paid workshops and sell curated DIY kits for common projects (bathroom patch, pet nook, seed bench) that include the mat, thermostat, basic mounting supplies and step‑by‑step instructions. Teach safe installation practices, programming the 7‑day thermostat and code basics. Upsell on-site follow-up inspections or electrician referral services for homeowners who want full compliance.
Creative
Cozy Bathroom Tile Upgrade
Use the 40 sq ft adhesive heating mat under new tile or vinyl in a small bathroom or powder room to create a warm, luxury floor. Combine with the included 7‑day/4‑event programmable thermostat to preheat before mornings. Design tip: create a heated zone in front of the vanity and shower entrance (leave space around fixtures), and finish with slip‑resistant tiles or a decorative mosaic overlay. Safety note: follow the kit instructions and GFCI wiring; consult an electrician for permanent hookups.
Heated Pet Nook
Build a raised wooden frame with an insulated base and top it with a tile or vinyl surface. Mount the heating mat beneath the surface to create a cozy, even-warmth bed for senior pets or puppies. Use the thermostat set to a safe, low temperature and integrate a removable, washable cushion on top. This keeps animals comfortable without exposed cords and turns the mat into a durable, attractive pet station.
Seedling Germination Bench
Create a propagation bench for seed starting by mounting the heating mat under a waterproof shelf or tray area in a greenhouse or indoor grow space. The mat gently warms seed trays and speeds germination and root development. Pair with the programmable thermostat to simulate day/night soil temps. Use moisture barriers and GFCI protection since humidity and water are present.
Heated Mudroom/Entry Mosaic
Transform an entryway or mudroom by laying the mat under a decorative tile mosaic that covers high-traffic areas where people remove shoes. The radiant warmth helps dry wet shoes and prevents cold floors. Offer reversible or segmented mat layout to fit irregular spaces and create patterned heated zones for both function and visual impact.
Ceramic/Clay Work Bench Warmer
Install the mat under a tiled section of a potter’s bench or sculpting table to keep clay at a workable consistency during colder months. The gentle radiant heat prevents rapid drying and reducing cracks in small works-in-progress. Keep the thermostat at a consistent, moderate temp and protect the heating mat from spills with a durable, waterproof surface layer.