Features
- Step on Warmth with Floor Heating Mat: Heated flooring system for tile provide maximized warmth to keep the floor warm no matter how cold it gets and it comes in various sizes to suit your needs covering 10 to 100 sq.ft.! Who wouldn't enjoy the comfort of a radiant in-floor heating system in their home when the weather gets cooler?
- Easy to Install: The heated floor mats for indoor use can be easily installed under tile, stone, wood, or laminate flooring .Simply use Warm Heating Mat to unroll and secure your Electric Under Floor Heating Mat to the subfloor, apply a thin layer of mortar, and install the floor.Easily cut the in floor heating mat to fit any odd corners and smaller spaces.
- Technology Information:60 Sqft (20"wide x 36.6ft long). Voltage: 120, Amps: 6, Watts: 120 @ 12w/sqft. One piece 60 sq.ft. floor heater consists of a heating cable secured with heating tape onto a fiber-glass mesh. The flexible design of our heating wires allows it to be easily installed in a variety of different flooring types, such as tile, stone and hardwood.
- Indoor Use :The Fully Self-adhesive Floor Heat Heating System is ideal for room renovations, bathroom remodeling. Can be used for humid application, but not for installation in pool and spa areas, nor outdoor use. It works in almost any rectangular space. A must-have product for tile floors!
- Safe and Value for Money:The radiant floor heating kits has high safety and is not easy to be damaged. Under Tile Heating Mat can be used for more than 20 years based on correct installation methods and completion of all test requirements.
Specifications
| Size | 60 Sq.ft. |
Related Tools

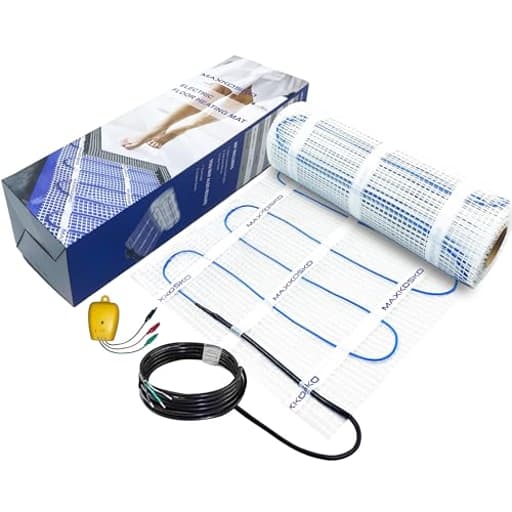
This 60 sq ft electric underfloor heating mat is a 120 V, 6 A radiant heating system that provides about 12 W/ft² (≈720 W total) for installation under tile, stone, wood or laminate floors. The kit uses a heating cable secured to a self-adhesive fiberglass mesh mat that is unrolled and fixed to the subfloor, can be trimmed for irregular areas, includes an alarm/monitor cable, and is intended for indoor and humid-room use but not for outdoor, pool, or spa installations.
MAXKOSKO 60sq.ft. Electric Floor Heat Mat Kit, 120V Underfloor Radiant Heating System for Tile,Stone and Laminate Indoor Use with Alarm Cable Monitor. Review
Why I chose this mat and where I put it
I added the MAXKOSKO floor heating mat during a bathroom remodel with one simple goal: take the chill off tile in the morning. The 60 sq ft size suited a small bath with a serpentine layout around the vanity, toilet, and shower threshold. This mat is a 120V, roughly 720W system (12 W/sq ft) bonded to a self-adhesive fiberglass mesh. It doesn’t include a thermostat, which kept the price down, but you’ll need to budget for a compatible 120V, floor-sensing thermostat with GFCI.
Planning the layout
The roll is 20 inches wide and a hair over 36 feet long. Planning matters more than in most DIY jobs because you cannot cut the heating cable—only the mesh. I sketched the room, marked no-heat zones (under the vanity and toilet footprint), and plotted a serpentine path with consistent spacing. A few tips from my install:
- Leave a straight path for the “cold lead” to the thermostat box before you start sticking the mat down.
- Keep cables at least a few inches from walls and plumbing penetrations.
- Never cross or bunch the heating wire, and avoid placing it under fixed cabinets or where you’ll drill.
- If you’re on a slab or over an unheated crawl, consider an insulation board under the mat; it reduces heat loss and improves responsiveness.
Installation experience
The mesh comes lightly tacky. On a clean, primed plywood subfloor, it was sticky enough to hold its shape while I fine-tuned the layout. I cut the mesh (not the cable) at turns to rotate sections and fill irregular areas. The included continuity alarm is simple but genuinely useful: you clip it to the leads and it beeps instantly if the cable gets nicked during troweling. I ran resistance checks with a multimeter before, during, and after embedding; my readings matched the factory tag and remained stable through the install.
There are two embedding approaches that both work:
- Thinset only: Press the mat into a skim coat, then trowel a second coat to fully cover the wire and set tile.
- Self-leveling underlayment: Pour about 3/8 inch to encapsulate the mat, then tile on top.
I chose a light self-level pour because it protects the cable and makes tiling easier with a flatter surface. For laminate or engineered wood, encapsulation is even more helpful—it creates a smooth, protected surface and avoids hot spots. Just follow the flooring manufacturer’s radiant-heat guidelines and temperature limits.
Controls and compatibility
Since there’s no thermostat in the box, I paired the mat with a standard 120V, floor-sensing thermostat (15A rating with built-in GFCI). I installed the thermostat’s floor sensor between two runs of heating wire, about 6 to 12 inches into the heated area, not touching the cable. That placement matters: if the sensor sits too close to a wire or in a draft, it can misread and lead to a too-cool or too-hot floor.
Programming was straightforward. A morning preheat schedule brings the surface up before we wake, and an eco setpoint keeps things mild during the day.
Heating performance
Output matters for expectations. At 12 W/sq ft, this mat is squarely in “comfort heat” territory under tile. In my bath (conditioned space with plywood subfloor), warm-up is noticeable within 30 to 45 minutes and fully comfortable by the 60- to 90-minute mark. With the room around 68°F:
- Tile surface stabilized near 80–84°F at a moderate setpoint, which feels pleasantly warm under bare feet.
- Runtime is modest; once the mass is warm, the thermostat cycles to maintain temp.
On a concrete slab without insulation, you’ll likely need higher floor setpoints and longer warm-up—insulation board under the mat pays dividends there. Under laminate or engineered wood, most manufacturers cap floor temps around 81°F. The mat can still take the edge off, but expect subtler warmth compared to tile.
Could it be primary heat? In a small, well-insulated bathroom—maybe. In most cases, treat it as supplemental comfort heat. If you need faster response or more output, a 15 W/sq ft system is a better fit; just note you’d be stepping outside this kit.
Build quality and safety
The cable jacket, cold lead splice, and mesh adhered cleanly and felt robust. The light adhesive is enough to position sections, but it’s not a glue; plan on pressing it into your skim coat promptly. The continuity alarm did its job and gave me peace of mind while working over the wires. As always, I recommend:
- Use a GFCI thermostat or a GFCI-protected circuit.
- Verify resistance at three stages (pre-install, after embed, after tile).
- Follow local electrical code and have a licensed electrician make the final connections if you’re not qualified.
Energy use and circuit considerations
At 720W, the mat draws about 6A on a 120V circuit. That’s well within a typical 15A circuit, but account for whatever else shares the line. For operating cost, figure roughly 0.72 kWh per hour of runtime. In my case, the bathroom runs a couple of hours in the morning and briefly in the evening; at $0.14/kWh that’s under $0.30 per day in winter.
Where it shines
- Bathrooms, laundry rooms, mudrooms—anywhere tile meets bare feet.
- Retrofits where you want comfort heat without reworking ducts or hydronics.
- Installers who prefer the speed of mesh mats over loose cable.
What could be better
- No thermostat in the box. It keeps price down and gives you choice, but it’s one more thing to source.
- Fixed 12 W/sq ft output. Great for comfort, but not ideal if you need primary heat or rapid warm-up on a cold slab.
- Adhesive is “light.” It holds a layout, but primer and a prompt skim coat make life easier.
Practical tips from the install
- Dry-fit the entire layout before peeling the backing. Mark turn points with painter’s tape.
- Use a margin trowel over cables to avoid nicking them, and keep a metal straightedge handy to guide your trowel.
- Encapsulate with a thin self-level pour if you’re new to tiling; it reduces lippage and stress.
- Place the floor sensor midway between wires, not over them, and route it in its own conduit if possible.
- Avoid running the mat under permanent fixtures, and keep at least 6 inches from toilet flanges.
The bottom line
The MAXKOSKO heating mat does exactly what I want a bathroom radiant system to do: deliver consistent, quiet, and comfortable warmth under tile without complicating the remodel. Installation is approachable for a careful DIYer, the continuity alarm is a thoughtful inclusion, and the 60 sq ft size is versatile for small to mid-sized spaces. The 12 W/sq ft output is tuned for comfort rather than whole-room heat, so plan accordingly—add insulation on slabs, manage expectations under laminate, and choose a good floor-sensing thermostat.
Recommendation: I recommend this mat for homeowners and pros looking for a budget-friendly, reliable comfort-heat solution under tile, stone, or laminate in indoor spaces. It’s a solid value with straightforward installation and dependable performance. If you need primary heating in a cold room or very fast warm-up on a slab, consider insulation and/or a higher-output system; otherwise, this mat hits a sweet spot for everyday comfort.
Project Ideas
Business
Specialty Heated-Floor Installation Service
Offer a focused installation service for bathrooms, mudrooms, and small kitchens using the 60 sq.ft. mat as a standard product for projects up to ~60 sq.ft. Package includes site assessment, subfloor prep, mat installation, thin-set/tile work, thermostat hookup by a licensed electrician, and post-install testing. Pricing model: flat-rate installation plus materials markup; upsell warranties, tile selection, and expedited scheduling. Target remodels, vacation-rental owners, and aging-in-place clients.
Heated Pet Comfort Product Line
Develop modular heated pet platforms or recessable dog-bed bases using the mat inside a custom birch or MDF frame with removable cushions. Sell as DIY kits (pre-cut mat areas, wiring instructions, thermostat recommendations) and done-for-you installations. Market to veterinarians, pet boutiques, and online pet-owner communities. Revenue streams: product kits, installation, and replacement cushions/accessories.
Boutique Airbnb/Rental Upgrade Package
Create a curated upgrade package for short-term rental hosts: install heated floors in one bathroom or entry area, stage with photos, and provide listing copy that emphasizes guest comfort and luxury. Offer financing-friendly pricing that treats the install as an amenity upgrade with projected occupancy/ADR improvements. Package add-ons: professional photography, signage in the unit, and a maintenance check before peak season.
Seasonal Comfort Service & Maintenance Plan
Sell an annual service plan: pre-winter inspection, thermostat reprogramming, alarm/monitor cable testing, and a small-issue repair allowance. For installations you perform, include remote thermostat setup and seasonal reminders. Charge a fixed subscription fee and offer priority scheduling. This turns one-time installs into recurring revenue and builds trust for future renovation referrals.
Creative
Heated Spa-Style Bathroom Tile Makeover
Remove old tile or install over a prepared subfloor and unroll the 60 sq.ft. mat under new tile or natural stone in a master bath or powder room. Pair with a programmable thermostat and floor sensor for comfort and energy savings; use thin-set mortar over the mesh, tile as usual. Design tip: create a warm-step zone in front of the shower and vanity by arranging tile patterns that highlight the heated area. Safety note: have an electrician connect the mat to the thermostat and test the alarm/monitor cable before finishing.
Heated Pet Lounge
Build a cozy built-in pet platform (bench or recessed floor nook) and install a segment of the heated mat under tile, waterproof vinyl, or thin hardwood veneer. Top with removable, washable cushioning or a tiled surface with a low lip so pets feel safe. This keeps senior or short-coated pets comfortable without bulky heating pads. Emphasize the mat's indoor and humid-room rating, and keep wiring enclosed with a thermostat or simple on/off control.
Warm Entry/Mudroom Mosaic
Transform a small entry or mudroom (under 60 sq.ft.) into a warm welcome by installing the mat under decorative tile or a custom pebble mosaic. Lay the mat to create a heated zone where people stand to remove shoes. Add a durable grout and a low-profile threshold for clean transitions. This project is great for winter climates — highlight easy maintenance and comfort when presenting as a gift or seasonal upgrade.
Indoor Greenhouse Seed Bench Heater
Create an indoor seed-starting bench with the mat mounted under a water-resistant work surface or tile-lined bench top to provide gentle bottom heat for seedlings. The kit’s humid-room rating makes it suitable for greenhouse-like rooms or enclosed sunrooms. Use a low-temp thermostat with a floor sensor to keep soil trays at consistent root-zone temps while conserving energy. Make the bench modular so you can remove trays and access wiring safely.