Features
- Use to repaint or refurbish interior appliances like refrigerators, laundry machines and more
- Epoxy formula dries to a smooth, hard enamel finish
- Dries enough to be handled in 5-9 hours and covers between 60-120 sq. ft. per can
- Durable epoxy withstands washing and everyday wear
- Creates the look and shine of a smooth epoxy finish
- Specialty Appliance
- Formulated for Metal Surfaces
- Refinishing Exterior Appliances
- Not for use on objects exposed to heat (stovetops, oven interiors, etc)
- Superior abrasion and scratch-resistance
Specifications
| Color | White |
| Size | 32 Fl Oz (Pack of 1) |
| Unit Count | 1 |
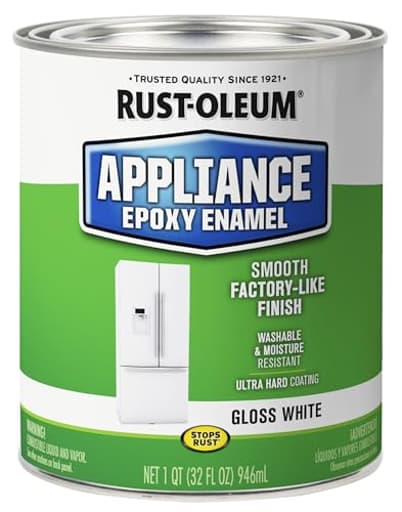
Epoxy appliance paint formulated to refinish interior metal appliances such as refrigerators and laundry machines, producing a glossy white, hard enamel finish. The 32 fl oz can covers about 60–120 sq ft, dries to be handled in 5–9 hours, resists abrasion and washing, and is not intended for surfaces exposed to heat (stovetops, oven interiors).
Rust-Oleum 241168 Specialty Appliance Epoxy Paint, Quart, Gloss White 32 Fl Oz Review
A no-drama way to make tired appliances look new again
I reached for Rust-Oleum’s appliance epoxy after staring at a perfectly functional but very tired refrigerator and washer. The goal was simple: a hard, glossy white finish that wouldn’t look like “paint,” would tolerate cleaning, and wouldn’t chip every time a magnet or laundry basket rubbed against it. This epoxy enamel hit those marks better than I expected, with a few caveats worth planning for.
What it is (and what it isn’t)
This is a quart (32 fl oz) of oil-based epoxy enamel designed for metal appliance exteriors—think refrigerators, freezers, washers, and dryers. It lays down a bright glossy white and cures into a hard shell that resists abrasion and routine washing. The can’s coverage estimate of 60–120 square feet rang true in my use; a full-size fridge and matching washer took well under half a can for two coats. Dry-to-handle happens in roughly 5–9 hours, though I got the best results letting coats sit overnight.
Important boundaries:
- Not for high-heat surfaces: no stovetops, oven interiors, or heat-exposed panels.
- Formulated for metal. It can bond to other materials with the right prep, but that’s off-label territory.
Surface prep makes or breaks the finish
If you want a “factory-like” look, prep like a factory would. My workflow:
1. Degrease thoroughly. I used a household degreaser followed by a rinse with clean water and a wipe-down with mineral spirits to kill any residual oils.
2. Scuff-sand to degloss. 180–220 grit is ideal. You’re not removing material, just breaking the sheen so the epoxy can bite.
3. Address rust. I sanded to bright metal, spot-filled pitting with a metal-compatible filler where needed, and feathered edges. If rust is extensive, a rust-inhibitive primer under the epoxy is smart.
4. Mask aggressively. The epoxy levels well and will happily glue gaskets, hinges, and trim if you let it.
5. Dust control. A quick tack-cloth wipe before painting helps keep lint out of the glossy finish.
This paint is thick out of the can and separates noticeably. Stir longer than feels necessary; I gave it a solid 3–5 minutes, scraping the bottom until the mix looked uniformly creamy. If you crack the lid and it seems soupy or stratified, that’s normal—just mix thoroughly.
Application: rollers win, brushes assist, patience pays
I got the smoothest finish with a high-density foam roller for panels and a quality natural-bristle brush for edges and cut-ins. The epoxy self-levels, so light pressure and steady passes beat going back to “fix” things as it starts to set.
What worked well:
- Thin, even coats. Two light coats looked better than one heavy coat. Heavy passes risk sags that are painful to sand out on a glossy surface.
- Roll vertically on doors and horizontally on side panels to minimize visible texture. The paint’s leveling knocks down most roller stipple.
- Feather overlaps while the film is wet. If a section tacks up, leave it and address imperfections between coats.
I allowed roughly 24 hours between coats even though it’s handle-dry sooner. That longer window noticeably improved leveling and reduced the chance of imprinting from accidental touches.
Cleanup and storage: It’s oil-based, so plan on mineral spirits for brushes. If you’re doing multiple coats, wrap rollers/brushes tightly in foil or plastic between sessions rather than washing out.
Drying, odor, and ventilation
There’s no sugarcoating it: the solvent odor is strong, especially during the first day. With windows open and fans moving air across the workspace (not directly at the surface), the smell dissipated significantly after 24–48 hours. If you’re sensitive to fumes, wear a solvent-rated respirator and keep the area well ventilated. Keep pets and dust-generating activity away during the open, tacky period.
I avoided running HVAC that might distribute the odor and instead used cross-ventilation and an exhaust fan. Plan your schedule so the first coat can cure undisturbed overnight.
The finished look and feel
On both the refrigerator and washer, the result is a true high-gloss white that reads “appliance,” not “house paint.” It’s reflective, smooth to the touch, and hides light scuffs that were prominent in the old finish. Edges and previously chipped areas blended well after proper prep. I didn’t see brush marks; the roller stipple melted into a uniform sheen within an hour.
If you are a perfectionist, you can wet-sand dust nibs between coats with 600–800 grit and a light touch, then wipe with mineral spirits. The second coat will close those up and increase gloss depth.
Durability in real use
After several months of daily use, the coating has held up admirably:
- Magnets slide without leaving silver-gray tracks.
- Routine cleaning with mild dish soap and a soft sponge doesn’t dull the sheen.
- Light fingernail pressure won’t scratch the surface; you need deliberate force to mar it.
Edges and high-touch zones (around handles) are the real test. On the fridge door, the paint stayed intact—no flaking—thanks to thorough sanding and degreasing. Long-term, any oil-based white enamel can slowly warm in tone in low-light areas; I’ve not seen noticeable yellowing yet, but bright, sunlit kitchens will help keep the white crisp.
Off-label experiments and cautions
I tested a small, low-traffic vanity top out of curiosity. With aggressive scuff-sanding and careful curing, the epoxy left a smooth, glossy surface that wipes clean easily. That said, I’d consider this a temporary or stopgap use. It’s not engineered for hot pans, cutting, standing water at seams, or harsh chemicals. If you try it on non-metal surfaces like plastic handles, scuff-sand thoroughly and use a plastic adhesion primer first. Expect that adhesion and longevity can vary.
Bottom line: fantastic on metal appliance exteriors; acceptable as a short-term fix elsewhere if you understand the limitations.
Practical tips to get a factory-like finish
- Mix thoroughly. The resin and pigments separate; under-mixing leads to uneven sheen.
- Condition the environment. Aim for moderate temperature and humidity; high humidity slows solvent evaporation and can dull gloss.
- Go light on each coat. You’ll get fewer sags and better leveling.
- Mind your recoat window. Waiting overnight significantly improves results.
- Don’t chase imperfections late. If you see a hair or speck as the film sets, stop and address it between coats.
- Plan your ventilation. Cross-breeze is your friend, but avoid blasting air directly onto the wet surface.
- One quart goes a long way. For a standard fridge and washer, you likely won’t need more than a single can.
Where it fits best
- Refreshing refrigerators, freezers, washers, and dryers with scuffs, chips, or yellowed panels
- Rental turnarounds where durability and cleanability matter
- Budget-friendly updates where replacing an otherwise functional appliance would be wasteful
Where it doesn’t fit:
- Any surface exposed to sustained heat (stovetops, oven interiors, toaster oven housings)
- Food-prep surfaces you intend to cut on or clean with solvents/abrasives
- Bare plastic without a bonding strategy
Value and availability
For the cost of a quart and a couple of foam rollers, the transformation is striking. The coverage (60–120 sq ft per can) means most users will have material left over for touch-ups or a second appliance. Compared with pro refinishing or replacement, it’s hard to beat the cost-to-result ratio—as long as you invest your time in prep.
Recommendation
I recommend this appliance epoxy for anyone looking to revive metal appliance exteriors with a hard, glossy, and cleanable finish. It rewards careful prep and patient application with a result that reads remarkably close to a factory coating. The main trade-offs are solvent odor during application and the need to respect its limitations—no high-heat use and caution on non-metal surfaces. If you can ventilate well and follow a prep-first mindset, this is a high-confidence, high-value upgrade that makes old machines look new without the replacement bill.
Project Ideas
Business
Appliance Refurbishing Service
Start a local service that refinishes interior metal appliances (fridge exteriors, washer/dryer panels, metal range hoods) using the epoxy to restore appliances for resale or rental staging. Emphasize quick turnaround (handled in 5–9 hours) and durable, washable finishes.
Boutique Upcycled Furniture Shop
Build a line of upcycled metal furniture (cabinets, lockers, metal tables) with a professional glossy white finish. Market to home stagers, photographers, and minimal-design buyers; the epoxy's abrasion resistance makes pieces long-lasting and easy to maintain.
Staging & Property Prep Package
Offer refresh packages for real estate agents and Airbnb hosts: repaint scuffed appliance interiors and metal fixtures to brighten listings. Quick-dry, high-shine results improve photos and guest impressions without the cost of replacement.
Instructional Workshops & Content
Run hands-on workshops or create online video courses teaching prep and application techniques for appliance epoxy—sanding, priming, brush/roller techniques, and care. Sell starter kits (safety gear, primers, and a quart of epoxy) or consult for DIYers.
Mobile Touch-Up & Maintenance Service
Operate a mobile service for small touch-ups and routine maintenance on commercial kitchens, laundromats, or rental properties—repainting scuffed metal surfaces to extend asset life. Position as cost-effective, fast cosmetic maintenance using a product formulated for metal surfaces.
Creative
Retro Mini-Fridge Makeover
Refinish an old or thrifted mini-fridge with the glossy white epoxy for a clean, retro look. Sand and prime the metal, apply 1–2 coats of the epoxy for an enamel finish that resists washing and abrasion. Use it for a kitchenette, bar cart, or bright media prop.
Metal Planter & Garden Pod Refresh
Update metal planters, watering cans, or decorative garden pods by painting them with appliance epoxy to create a crisp, weather-resistant look for indoor/outdoor use (avoid direct soil contact if unsealed). The hard enamel finish cleans easily and keeps a polished aesthetic.
Upcycled Filing Cabinet or Locker
Turn a worn metal filing cabinet or school locker into a sleek storage piece. The epoxy's coverage (60–120 sq ft per quart) and durable finish make it ideal for high-touch surfaces—perfect for home offices, studios, or entryway storage.
Custom Appliance-Inspired Furniture Accents
Create accent pieces that mimic appliance styling: paint metal table bases, lamp stands, or pedestals to match white kitchen appliances for cohesive interiors. The hard enamel adds a commercial-quality sheen that photographs well.
Glossy Metal Art Panels & Signage
Use the epoxy to produce glossy white metal art panels or minimalist signage. The smooth finish is excellent as a base for hand-lettering, decals, or layered mixed-media work; quick handling time (5–9 hours) speeds up production.