Features
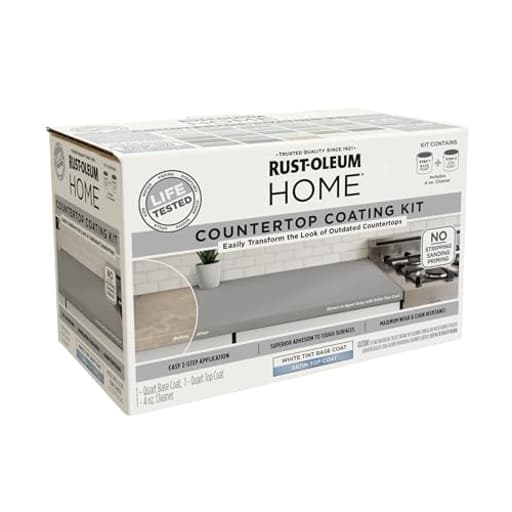
- TRANSFORMS OUTDATED COUNTERTOPS: Water-based coating system is ideal for laminate, ceramic tile, porcelain tile, melamine, wood and other interior surfaces
- EASY 2-STEP APPLICATION: Simply clean, apply the base coat and topcoat system for a brand new look to your space
- EXCELLENT DURABILITY & ADHESION: Provides maximum resistance to stains, wear and abrasions
- MINIMUM PREP WORK NEEDED: Coat over a variety of countertop surfaces without stripping, sanding or priming
- FAST DRY TIME: Ready for use in only 24 hours and covers up to 100 square feet per kit
Specifications
| Color | White |
| Size | 32 Fl Oz (Pack of 1) |
| Unit Count | 1 |
This water-based countertop coating kit provides a satin white finish for indoor countertops and is suitable for laminate, ceramic and porcelain tile, melamine, and wood. The two-step basecoat/topcoat system offers stain, wear, and abrasion resistance, requires minimal prep (no stripping, sanding, or priming), dries to use in about 24 hours, and covers up to 100 sq ft per 32 fl oz kit.
Rust-Oleum Home Rust-Oleum 384962 Home Countertop Coating Kit, Satin White Review
Preparing an old laminate counter for a test is one of my favorite DIY litmus tests: it tells you in the first hour whether a coating is going to be a fight or a friend. With the Rust-Oleum Home countertop kit in Satin White, that first hour was reassuring—thin, even coverage with a foam roller, no drama on edges, and a predictable dry-down. What followed was a bit more nuanced, but still ultimately positive if you approach the project with the right expectations and patience.
What this kit is (and isn’t)
This is a water-based, two-step system meant to refresh interior countertops: a tinted base coat (Satin White) topped with a clear protective layer. It’s designed for laminate, ceramic and porcelain tile, melamine, and wood. It promises minimal prep and 24-hour usability, with up to 100 square feet of coverage per kit.
The “minimal prep” claim is technically true, but you’ll get better durability if you treat this like any coating that needs bite and cleanliness to bond well. The finish reads closer to a matte/eggshell white than a shiny satin in typical kitchen light. The topcoat adds a soft luster, but don’t expect a high-sheen, stone-like look out of the box.
Prep: the difference between “fine” and “great”
Adhesion lives or dies on surface prep. The instructions allow you to skip sanding, but I had better results with a quick, thorough scuff:
- Degrease aggressively (I used a TSP substitute), rinse, and dry.
- Scuff-sand with 220-grit on laminate and glossy tile. You’re not trying to remove the finish—just dull it.
- Vacuum and wipe with a lint-free rag lightly dampened with water or denatured alcohol.
- Address chips with a two-part epoxy filler and sand smooth.
- Mask edges and appliances and pull sinks if you can. Caulk after the topcoat cures.
This adds an hour or two but pays off in fewer adhesion surprises, especially around sinks and high-use zones.
Application experience
I used high-density foam rollers (4-inch) and a good synthetic brush for cutting in. A nap roller leaves texture; closed-cell foam keeps things consistent. Stir both products thoroughly but avoid whipping air into them.
Base coat:
- First coat went on thin, leveled nicely, and dried to touch in about an hour at 70°F/40% RH.
- A single coat won’t fully hide medium or dark colors. On a darker laminate, I needed three thin base coats for uniform coverage.
- Maintain a wet edge. Don’t overwork—microbubbles will appear if you keep rolling a half-dry section.
Topcoat:
- The clear topcoat is thin and workable. Roll it on, then lightly “tip off” with a foam brush to knock down bubbles if you see them.
- One coat gives minimal sheen and decent protection. Two coats, with a light scuff in between, improved the feel and resistance to staining.
I allowed 2–4 hours between coats, adjusting for temperature and humidity, and waited overnight before the final topcoat.
Finish and sheen
Despite the “Satin” label, the appearance lands closer to a matte to low-satin once the clear coat cures. Under bright task lighting, it reads clean and contemporary, but it’s not glossy. If you want a touch more life, a tiny amount of pearl mica powder mixed into the topcoat can add subtle shimmer—test first on a spare board to avoid clouding.
If you’re sensitive to stark white, you can explore tinting the base to a soft off-white at a paint counter. Keep tints light and within the manufacturer’s tolerances so you don’t alter the chemistry. I tested a warm white tint on one section without issue.
Coverage and time reality
The kit advertises up to 100 square feet. In practice, budget for less if you’re covering darker counters or running three base coats plus two topcoats. On a typical small kitchen (about 45 square feet), one kit was enough; on a larger L-shape with a peninsula (about 70 square feet), I needed a second kit for the extra base coverage.
Drying is quick, but curing is not instantaneous. Light use after 24 hours is fine; avoid heavy use, standing water, and cleaning chemicals for 5–7 days to allow a full cure. I kept cutting boards and trivets in play for the first week.
Durability and maintenance
Once cured, the surface has respectable abrasion and stain resistance for a water-based coating. Coffee, oil, and tomato sauce wiped clean without ghosting when addressed promptly. Direct knife work will scratch, and hot pans are a no-go—same rules as most laminate countertops. A clear cutting board and trivets should be considered standard practice.
Where this coating can struggle is at edges and around sinks. Water intrusion under caulk, or poor cleaning before application, can cause localized lifting or blistering. That’s not unique to this kit—most countertop paints behave similarly—but it’s worth calling out. Seal every seam, and don’t let water sit.
Maintenance is straightforward:
- Clean with mild dish soap and a soft sponge.
- Avoid abrasive pads and harsh solvents.
- Recoat high-wear zones in the future if needed; scuff, clean, and add a fresh topcoat.
Common pitfalls (and how to avoid them)
- Texture and bubbles: Use high-density foam rollers; roll in one direction; don’t overwork. Lightly tip off with a foam brush if bubbles appear.
- Patchy coverage: Plan on 2–3 thin base coats over dark surfaces. Don’t try to get full hide in one pass.
- Adhesion issues: Scuff-sand glossy surfaces even if the instructions say optional. Degrease meticulously.
- Sheen expectations: Expect matte-to-low-satin. If you want higher gloss, this kit won’t deliver it.
- Humidity and temperature: Work between 60–85°F with low humidity. Cold, damp days extend dry time and encourage microbubbling.
Where it shines
- Cost-effective refresh for serviceable but dated counters.
- Compatible with multiple substrates, including laminate and tile.
- Water-based, low odor, soap-and-water cleanup.
- Forgiving working time and easy rolling behavior.
Where it falls short
- Real-world coverage is optimistic if you need multiple base coats.
- Instructions are on the lean side; technique matters.
- Sheen is flatter than some expect from “satin.”
- Not a substitute for a new countertop in rentals or heavy-use kitchens that take a beating.
Tips for a better finish
- Strain the base and topcoat through a paint filter to catch bits that cause drag lines.
- Pull tape while the topcoat is still slightly tacky for cleaner lines.
- Round over sharp laminate edges with fine sandpaper before coating; coatings bond better to softened edges.
- If you want a faint variegation, lightly feather a second, slightly tinted base coat in broad passes before clear-coating.
- Let it cure a full week before placing rubber-backed appliances or mats to avoid imprinting.
Value and alternatives
Compared with full replacement or epoxy stone-look systems, this kit is simpler, faster, and less odorous. It won’t mimic stone patterns or deliver a high-build, glassy finish, but it also avoids the fussy pot life and strong fumes of two-part epoxies. For a straightforward color change that modernizes a space, the value proposition is strong—especially in smaller kitchens, laundry rooms, RVs, and boat galleys where budget and weight matter.
Who it’s for
- DIYers comfortable with patient prep and multiple thin coats.
- Homeowners seeking a clean, uniform white refresh without faux patterning.
- Anyone needing a 1–2 year stopgap before a full renovation.
Who should look elsewhere:
- Users expecting glossy, stone-like depth or bulletproof durability.
- High-traffic rental properties where surfaces see hard abuse.
Recommendation
I recommend the Rust-Oleum Home countertop kit to DIYers who want a clean, low-sheen white refresh on a reasonable budget and are willing to invest in good prep and careful application. Its strengths—easy rolling, low odor, compatibility with common countertop materials, and respectable stain/abrasion resistance once cured—make it a practical upgrade for tired laminate or tile. Just go in knowing you’ll likely need multiple base coats for full hide, the sheen skews matte, and edges/sink areas demand meticulous prep and sealing. If you’re after a quick weekend transformation and can live within those boundaries, this kit delivers a credible, durable update without the cost and downtime of replacement.
Project Ideas
Business
Countertop refresh service (per sq ft pricing)
Offer a low-cost countertop resurfacing service targeting homeowners, landlords, and sellers. Market a clear price per square foot (e.g., labor + materials), promote 24-hour turnaround and minimal prep, and present before/after photos. Upsells: edge refinishing, backsplash coating, and minor chip repair.
Airbnb / short-term rental quick-makeover package
Create a fast-turn package for hosts who need quick aesthetic upgrades between bookings: countertop resurface, cabinet touch-ups, and hardware swaps. Emphasize fast dry time and minimal disruption. Price as a flat room package and partner with local management companies for recurring clients.
Mobile on-site recoating pop-up
Run a mobile service that brings the kit to customers' homes and completes small jobs in a day. Use targeted local ads and a simple booking form. Advantages: low overhead, fast scheduling, and ability to serve several small jobs per week. Offer referral discounts and bundle rates for multi-surface jobs.
Upcycled furniture side business
Buy or source inexpensive furniture and flip them by refinishing tops with this durable coating. Photograph polished before/after shots for marketplaces (Etsy, Facebook Marketplace, Instagram). Add premium pricing for custom color bases and coordinating hardware, and offer local pickup/delivery.
DIY workshops and branded mini-kits
Host small-group classes teaching homeowners how to resurface counters and small furniture using the kit; charge per seat and sell the product on-site. Create branded mini-kits (materials, brushes, simple instructions) to upsell and build recurring customers. Market through community centers, makerspaces, and social media.
Creative
Faux marble countertop
Use the satin white base as the foundation, then create veins with watered-down gray and taupe acrylics or specialized glazing medium. Work in thin layers, feathering and lifting for natural-looking veins, then seal with the topcoat. Result: a high-end marble look for laminate or tile countertops at a fraction of the cost.
Two-tone kitchen island
Apply the white countertop coating to the island top for a crisp, durable surface, then paint the island base a contrasting color (navy, forest green, or charcoal). Add new hardware and light sanding on edges for a modern, designer-updated island that looks custom without replacing materials.
Bathroom vanity and shelving refresh
Resurface vanity tops, open shelving, and small wood countertops with the kit for a cohesive bathroom upgrade. The water-based, low-prep system makes it easy to cover laminate vanities and coordinate with new fixtures or mirror frames for a polished look.
Tile backsplash makeover
Coat ceramic or porcelain backsplash tiles with the base and topcoat to transform busy or outdated tile patterns into a clean, satin white backdrop. Add stencils or a subtle wash for pattern accents that match the counter without retiling.
Small furniture & decor flips
Use the kit on tabletop surfaces of dressers, coffee tables, console tops, trays, and utility carts to create durable, washable surfaces. Pair with refurbished bases (new legs, hardware, or painted frames) to produce sellable upcycled furniture and one-off decor pieces.