Features
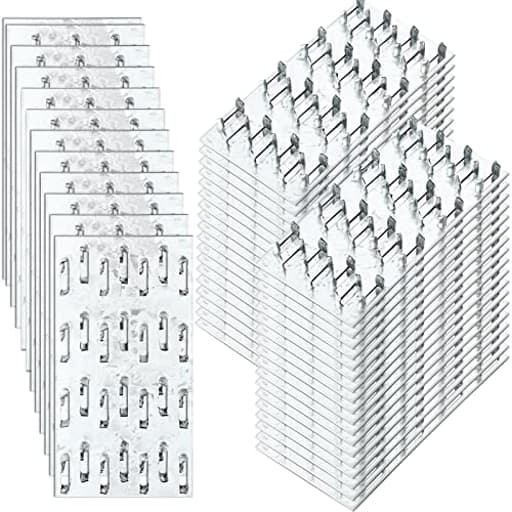
- Package Quantity: the package comes with 40 pieces of truss connecting plates, enough quantity to meet your needs; You can also share them with your friends, neighbors or colleagues
- Dimension Information: the truss connector plate measures 2 x 4 inches/ 5 x 10 cm in size; The thickness is 1 mm, the height of the nail teeth is 8 mm/ 0.3 inch
- Strong with Durability: the truss mending plate is made of carbon steel, galvanized surface, rust resistant and sturdy, not easy to break or get damaged
- Pronged Nail Teeth Design: the metal connector nails adopt pronged nail teeth to make the link more solid and prevent splitting of the constructing materials
- Wide Range of Applications: the pronged truss plate is suitable for timber, ideal for roof truss timber connections, pull plate furniture fixing, splicing and miscellaneous wood to wood connections
Specifications
| Color | Gray |
| Size | 4x2 In |
| Unit Count | 40 |
Related Tools
Pack of 40 galvanized carbon-steel truss mending plates measuring 2 x 4 in (5 x 10 cm) and 1 mm thick, with 8 mm (0.3 in) pronged nail teeth. Used to join and reinforce timber connections—commonly for roof trusses, pull-plate furniture fixing, splicing, and general wood-to-wood connections—where the pronged teeth help secure the plate and reduce splitting.
Shimeyao 40 Pcs 2x4 Inch Pronged Truss Mending Plates Galvanized Repair Tie Plates Bracket 1mm Thick Nail Teeth 8mm High for Roofing Wood Trusses Timber Connectors Review
What these plates are and where they make sense
A small stamped plate can save a lot of time in the shop. I put the Shimeyao 2x4 pronged truss plates to work on a handful of projects—splicing 2x stock for jig fixtures, stiffening a garden gate, and building a couple of non-permitted shed-style truss frames for a lean-to roof over firewood. In each case, the goal was the same: fast, simple wood-to-wood reinforcement without reaching for screws or through-bolts.
These plates are 2 by 4 inches, 1 mm thick, galvanized carbon steel, with teeth that stand about 8 mm high. You get 40 in the pack, which is handy because you’ll routinely use them in pairs (one per face of the joint) and often in multiples on longer splices.
Right up front: these are not code-listed structural connectors. They’re best for light to moderate reinforcement, jig-building, and general carpentry where engineered ratings aren’t required. If you’re building structural trusses for a permitted structure, you want listed, engineered connectors installed with the right equipment—or follow an engineer’s spec.
Build and materials
The stamping quality on my batch was consistent. Teeth were sharp, evenly formed, and the edges were acceptably clean—there were a few light burrs on some pieces, but nothing a quick pass with a file couldn’t tame. The galvanization is uniform and suitable for interior and covered exterior use. I wouldn’t call this a heavy hot-dip coating; treat it like standard zinc plating: fine for dry or intermittently wet locations, not for marine or ground contact.
At 1 mm thick, the plate itself is flexible enough to conform to stock if you’re slightly out of plane, which is a blessing during fit-up and a curse if you’re too aggressive with installation. Overstrike a tooth or hit off-angle with a hammer and you can kink a plate. Handle them with gloves; the edges are metal-stamped, and the teeth are sharp by design.
Installation: what worked, what didn’t
If you’ve used factory truss plates, you know they’re pressed in with rollers or a hydraulic press. That’s the expectation here. You can’t reliably drive these fully with a hammer and call it a day—at least I couldn’t, not even in soft SPF. Light taps will “start” the teeth, but full seating requires uniform pressure.
What worked for me:
- Vise or clamp press: With a sacrificial caul (scrap 2x) over the plate, I used a large F-clamp and a bench vise to press the plate home. Slow, even pressure seats all teeth without warping the plate.
- Arbor press or bottle jack: On longer splices, I set the work on a flat surface and used a bottle jack between the work and an overhead joist with a thick caul to apply steady pressure.
- Dead-blow assist: A few light dead-blow taps to start the teeth, then switch to pressing. Don’t try to finish with strikes alone.
What didn’t:
- Sledge-only installs: You end up with partially set teeth, bent plates, or crushed fibers around individual teeth instead of an even embed. It looks set but isn’t fully engaged across the pattern.
- Over knots and end grain: Teeth are short; they don’t grab reliably over dense knots or straight into end grain. Keep clear of knots and give yourself some distance from board ends.
A repeatable sequence that delivered good results:
1) Dry-fit and mark the plate location, keeping at least 3/4 inch from edges.
2) Lightly tap to start the teeth—just enough to hold position.
3) Use a caul and a large clamp or vise to press the plate fully flush.
4) Flip and repeat on the opposite face.
5) On long splices, stagger multiple plates to distribute load.
Pressing both faces matters. A single plate on one face helps with alignment, but opposing plates add meaningful stiffness and better distribute stress.
Performance in the field
On shop jigs and a garden gate stile/rail joint, the plates added quick stiffness and held alignment under racking loads. On SPF 2x4s, once pressed flush, the teeth held tight with no splitting. On kiln-dried hardwood (oak), I had mixed results—teeth will start, but full seating takes more pressure and benefits from very light pre-scoring with a marking knife. Even then, I wouldn’t rely on these for hardwood furniture joinery beyond temporary fixtures.
On the lean-to roof frames, I used them to stabilize some lap joints in non-permitted, light-duty truss-style assemblies. With two plates per joint (one per face), they behaved as expected: no miraculous strength gains, but they kept the members from shifting during assembly and added usable stiffness. The 8 mm tooth height limits the shear and withdrawal capacity you’ll get; think of these as alignment aids and light reinforcement, not full-fledged structural connectors.
Outdoors under cover for a few weeks, I saw no immediate corrosion, and the coating held up to handling and clamping. For long-term outdoor exposure in wet climates or for pressure-treated lumber, I’d step up to heavier galvanization or a listed connector designed for ACQ chemicals. These will be fine in a covered shed or garage setting.
Practical use cases
- Jig and fixture building: Great for quickly locking together straight jigs where screw heads would interfere with the workpiece.
- Light gate and fence bracing: Useful for keeping rails/stiles from wracking, provided it’s covered or in mild exposure.
- Non-structural splices: Joining furring strips, cleats, and trim backing pieces where you want a flush surface and don’t want fastener heads.
- Temporary work: Holding assemblies square while adhesives cure or while you add permanent fasteners elsewhere.
Where I don’t reach for them:
- Any code-inspected structural connection (roof trusses, ledger connections, critical load paths).
- Dense hardwood furniture joinery.
- Non-wood materials. The teeth are designed for wood fibers; they’re not a substitute for mechanical fasteners in rubber, plastic, or metal.
Ergonomics and workflow
The 2x4 footprint is a sweet spot—small enough to tuck into narrow framing bays, large enough to make a difference on a 2x member. I appreciated that the plates are flat and stack well; the pack of 40 disappears into a drawer and is ready when you need them.
The biggest workflow caveat is the pressing requirement. If you have a decent vise, large clamps, or a small press, these are satisfying to use and deliver predictable results. If your plan is a hammer-only install, you’ll fight the material. That’s not a flaw unique to this brand—it’s just the nature of pronged plates. Still, it’s worth underscoring: plan your installation method.
Durability and value
For the price of a pack, you get a lot of coverage—40 plates goes a long way in a shop where you’re adding two per joint. The 1 mm thickness is a deliberate compromise between ease of seating and rigidity. It will bend if you mishit or seat over uneven stock, but when pressed correctly it lies flat and does the job. The galvanization level suits indoor and covered outdoor use; if you’re building for wet, coastal, or chemically treated environments, choose a heavier coating or an appropriate listed connector.
Tips to get the most from them
- Use both sides: Opposed plates are far more effective than a single-sided install.
- Clamp, don’t hammer: Start light with a mallet if you must, but finish with a clamp or press.
- Avoid knots and edges: Clear of defects and edges by at least 3/4 inch.
- Stagger for long joints: Two or three plates offset along the joint spreads load better than one plate centered.
- Protect the surface: Always use a sacrificial caul between tool and plate to keep them flat and avoid marring the zinc.
The bottom line
These Shimeyao truss plates are a handy, budget-friendly way to add alignment and light reinforcement to wood-to-wood connections, provided you install them the right way. The teeth are sharp and consistent, the galvanization is appropriate for most shop and covered projects, and the 2x4 size works across common tasks. The main limitation is baked in: they need to be pressed, not pounded, and they aren’t a substitute for engineered, code-listed connectors.
Recommendation: I recommend these for woodworkers and builders who have access to a good vise or clamps and need quick, flush, light-duty reinforcement on non-structural projects. They shine in jig-building, small framing fixes, and keeping assemblies square without exposed fasteners. If you’re looking for structural connectors, or you expect to install entirely by hammer in the field, consider screw-based mending plates or rated connectors instead.
Project Ideas
Business
DIY Kit: Rustic Shelf Set
Create and sell ready-to-assemble floating shelf kits that include cut boards, mending plates, screws, and installation instructions. Market them as fast-install, heavy-duty shelving with an industrial look—target Etsy, local craft fairs, and home-improvement social channels.
Mobile Furniture Repair Service
Offer on-site quick furniture and truss repairs using pronged mending plates for fast reinforcement of broken frames, chairs, and rafters. Promote same-day service for landlords and small businesses; plates allow repairs without complex joinery, reducing time and cost.
Workshop Series: Fast Joinery for Makers
Host hands-on classes teaching makers and hobbyists how to use truss plates for splicing, repairs, and creative furniture builds. Supply a starter pack of plates and small cut boards for each attendee; upsell kits and tool packages after the class.
Upcycled Furniture Line
Design a signature line of upcycled tables, benches, and shelving that features visible truss-plate elements as a brand motif. Emphasize durability and reclaimed materials; the galvanized plates add an industrial signature that differentiates pieces in online marketplaces and local boutiques.
Contractor Bulk & Custom Packs
Buy plates in bulk and repackage into contractor-friendly assortments (by size/quantity) or curated homeowner packs with installation guides. Offer co-branded or custom-labeled packs to small builders and restoration shops; include value-adds like recommended screws and small templates to speed installs.
Creative
Reclaimed Wood Splice Table
Use the 2x4 truss plates to splice short reclaimed boards end-to-end to make a wider tabletop or bench plank. The pronged teeth grip the wood without pre-drilling, letting you create long tabletops from irregular pieces; hide plates on the underside and reinforce with glue and clamps. Galvanized steel resists rust for occasional outdoor use.
Industrial Floating Shelf Brackets
Make slim, low-profile bracket plates by bending and trimming the truss plates (or using them as-is) to form concealed supports for floating shelves. Screw the plate to studs, then mount shelf boards onto the plate teeth for a rustic-industrial look—perfect for kitchens or display shelving where the strong pronged teeth prevent split-out.
Pull-Plate Accent Furniture
Turn the mending plates into decorative pull-plate accents on drawer fronts, cupboard doors, or a rustic headboard. Leave the pronged texture visible, or file the teeth down and patina the galvanized finish. Fasten to reclaimed wood furniture for a handcrafted, reclaimed aesthetic with built-in reinforcement.
Corner-Reinforced Outdoor Planter Boxes
Build sturdy planter boxes from 2x4s and use the plates on inside corners for quick, durable joins that resist soil moisture. The galvanized coating prevents corrosion, and the teeth help grip softwoods without splitting—ideal for raised beds or large planters that must carry weight.
Custom Coat Rack & Pegboard Splice
Assemble a long entryway rack by splicing shorter boards with truss plates and adding hooks or pegs. Use plates on the back for hidden reinforcement so the rack can carry heavy coats and bags. Add a decorative finish or leave raw for a farmhouse look.