Features
- 20 PCS Truss Plate Flat Mending Repair Tie Plate, Carbon Steel + Surface Hot Dip Galvanized Finished
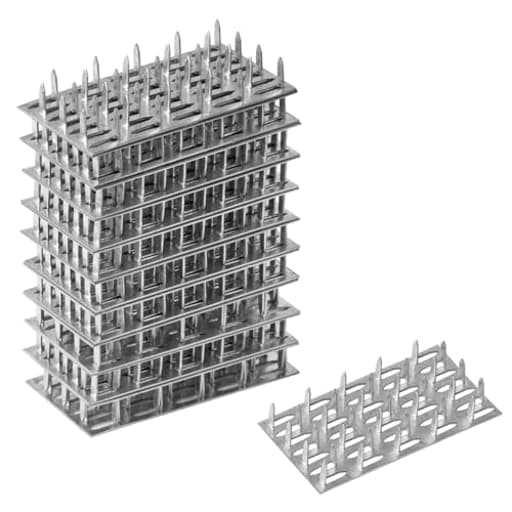
- Length: 4"(100 mm), Width: 2"(50 mm), Plate Thickness: 0.9 mm(21 Gauge), Nail Teeth Height: 13 mm
- Weight: 1.23 oz(35 g)-1 piece, 1.86 lb(0.85 kg)-20 pieces
- Staggered nail pattern for a secure connection that resists splitting
- Anti-corrosion, wear resistance, anti-rust. Smooth surface and edges without burrs
Specifications
| Color | Silver |
| Size | 4" x 2" |
| Unit Count | 20 |
Related Tools
Pack of 20 flat pronged truss plates, 4" x 2" (100 x 50 mm), made from carbon steel with a hot-dip galvanized finish for corrosion and wear resistance. Each 0.9 mm (21 gauge) plate has 13 mm nail teeth in a staggered pattern to secure and reinforce wooden trusses and timber connections, with smooth, burr-free edges.
eoere 20 PCS 4" x 2" Pronged Truss Plate, Flat Mending Plates Repair Tie Bracket, for Roofing Trusses Wood Timber Connectors, Galvanized Steel Review
Why I Reached for These Truss Plates
On a recent repair of a sun-beaten pergola and a couple of utility shelves in my garage, I needed a fast, low-profile way to secure butt joints and reinforce some questionable cuts without tearing everything apart. Screws and plywood gussets would have worked, but space was tight and I wanted something cleaner. That’s where these 4" x 2" pronged truss plates came in. They’re compact, sharp, and meant to bite hard—ideal for mending and tying small timber connections where nails or screws aren’t practical.
Build and Materials
Each plate is stamped from 0.9 mm (about 21 gauge) carbon steel and hot-dip galvanized. The galvanizing is substantial enough to shrug off moisture, and my pieces showed consistent coating with no drips or thin patches. Edges are smooth and burr-free, so you won’t slice a palm on the plate itself, though the teeth are unapologetically sharp—as they should be.
The teeth are roughly 13 mm tall and arranged in a staggered pattern. That spacing matters: it reduces the chance of splitting the wood and helps distribute load across more fibers. At 4" x 2", they’re smaller than the classic gusset plates used in factory-trussed members, but the compact footprint is a feature here. They slip into tight locations—across a splice on a 2x4, on fence rails, or reinforcing a cracked stud—without getting in the way.
Each plate weighs around 35 g; a pack of 20 is manageable to toss in a tool bag. Consistency was good across my pack: teeth were straight from the factory, no noticeable warps, and the plating looked uniform.
Installation: What Works (and What Doesn’t)
The most important thing to know: installation method matters more than with almost any other “simple” connector. Driving these plates flush by hand with a claw hammer alone is a recipe for bent teeth and uneven seating. I tried it to confirm, and while I could get them started, full seating took forever and wasn’t clean.
What worked best for me:
- Backing/anvil support: Place the workpiece on something unyielding—an anvil, a chunk of heavy steel, or the flat of a large vise. A flimsy workbench will bounce and rob you of energy.
- Pre-seat: Tap the plate lightly with a dead-blow or rubber mallet to set all the teeth simultaneously about 2–3 mm into the wood.
- Press or impact seat:
- Air hammer with a flat/mushroom head is excellent. Short bursts walk the plate down evenly without folding teeth.
- A large C-clamp or small shop press also works. Sandwich the plate with a scrap of flat steel and squeeze it home. This is slow but very controlled.
- If you must use a hammer, place a flat steel plate or stout block over the truss plate and strike the block. That spreads the force and helps all the teeth bite together.
A few more tips:
- Clamp the joint first. You’ll get better alignment and less micro-gapping.
- Work both sides of the joint whenever possible. Opposed plates dramatically improve capacity and reduce cupping.
- Avoid seating across knots or checks—teeth can skew or ride up on irregular grain.
- Safety: The teeth are no joke. Wear gloves when handling and eye protection when striking. Never leave them teeth-up on a bench or, worse, a ledge.
Once seated, extraction is nearly impossible without tearing fibers. Plan your placement; these are not “test fit and adjust” hardware.
Holding Power and Real-World Performance
On SPF 2x4s, a single plate did a credible job as a mending patch for minor cracks and as a keeper across a simple butt joint, but the real strength shows when you use pairs (one on each face). With opposed plates, I could not pull the joint apart by hand or with a casual clamp test. In bending and racking, the joint felt solid—far better than a few toe-screws in the same space.
The staggered teeth do their job. I didn’t see splitting even near board ends when I stayed at least an inch from the edge. On softer wood species (SPF, pine, cedar), the bite is deep and secure. On denser hardwoods, you’ll want more force and a truly rigid backer to avoid partial seating.
Keep expectations in check: these are 21-gauge plates. They’re fantastic for mending, tying, and reinforcing light framing, fence rails, shed interiors, jigs, and non-engineered repairs. They are not a substitute for code-rated structural truss plates, which are pressed under controlled conditions and usually larger and thicker.
Durability and Corrosion
The hot-dip galvanized finish is appropriate for outdoor and treated lumber use. After a few weeks of wet/dry cycles on a test piece left under a leaky gutter, I saw no rust—just the dulling you’d expect of zinc in the weather. For ACQ-treated lumber, hot-dip galvanizing is the baseline for compatibility, and these meet that mark. In marine or heavy salt environments, I’d still consider an additional barrier (paint) or stainless solutions for critical applications.
Fit and Finish
The manufacturing quality is better than I expected at this price point. Teeth are cleanly formed and consistent. Plates lay flat out of the box and don’t “potato chip” under normal use. Because the edges are smooth, alignment is easy—you can slide them around a bit during pre-seating without catching or scraping fibers excessively.
Where They Shine
- Mending cracks or splits in studs, rails, and fence pickets
- Reinforcing butt joints where you can’t fit screws or a larger gusset
- Quick fixes in shop jigs, shelving, and storage framing
- Temporary bracing or keeping parts aligned during glue-ups (they play nicely with construction adhesive for a belt-and-suspenders repair)
I’ve also used them to secure scab blocks on rough framing where space was tight. The low profile means they don’t snag or add thickness that would interfere with finishes.
A cautionary note: These are not intended as exposed deterrents or anything that leaves teeth protruding. It’s unsafe and invites injury.
Limitations
- Tooling requirement: For best results, you’ll want an air hammer, a press, or at least a heavy hammer with a flat intermediary block and a rigid backer. Without that, installation is frustrating.
- Not engineered truss hardware: Don’t substitute these for code-rated truss plates in load-bearing scenarios that require engineering.
- Difficult to remove: Plan carefully. If you need reversible connections, use screws or a nail plate with mechanical fasteners instead.
- Small footprint: Great for tight spaces, but you’ll need multiples for more demanding joints.
Best Practices
- Use two plates, opposite faces, whenever you can.
- Pre-seat lightly, then press/impact to finish.
- Combine with construction adhesive for improved stiffness and vibration resistance.
- Keep at least 1" from board ends and avoid big knots.
- Work on a solid, non-springy surface to prevent bouncing and tooth bending.
Value
A 20-pack gives you enough inventory to tackle a range of repairs without rationing. The cost per plate is hard to beat for the amount of time they save compared to cutting and fastening plywood patches—especially in tight quarters. With the corrosion resistance and clean stamping, they’re a solid value for both DIY and pro users who need fast, inconspicuous reinforcement.
Final Thoughts and Recommendation
These 4" x 2" pronged truss plates are a compact, effective solution for mending and reinforcing small timber connections. They bite deep, resist backing out, and the galvanized finish holds up outdoors and with treated lumber. Installation demands the right approach—ideally an air hammer, press, or a thoughtful hammer-and-block method over a rigid backer. If you try to muscle them in with a light hammer on a springy bench, you’ll be frustrated.
I recommend these plates for anyone who needs quick, low-profile reinforcement: repairing fence rails, bracing shelf framing, stiffening a pergola splice, or making clean mends in spots where screws and larger gussets won’t fit. I would not recommend them as a stand-in for engineered truss work or in scenarios where you need to remove and reconfigure connections frequently. Used appropriately, they’re strong, reliable, and cost-effective.
Project Ideas
Business
DIY Truss/Repair Kits for Homeowners
Assemble ready-to-ship repair kits that include a set of 20 plates, gloves, a mini-hammer, a template, and step-by-step instructions (with photos/video links) for common small truss and timber repairs. Market on Amazon/Etsy and to homeowners/landlords as an affordable, easy-to-use emergency/maintenance solution for roofs, sheds and timber frames.
Maker Kits & Micro-Joinery Packs for Workshops
Create bundled micro-joinery kits (plates + pre-cut wood pieces + fasteners + instructions) targeted at makerspaces, hobbyist woodworkers and schools. Offer project plans (shelves, stools, lamp bases) and sell group discounts to community workshops—add instructional content or in-person classes as an upsell.
Signature Industrial Furniture Line
Design a small furniture line (benches, coffee tables, shelving) that uses the pronged truss plates as a visible, signature joining detail. The galvanized plates become a branded aesthetic cue—promote the pieces to coffee shops, loft apartment shoppers and interior designers who want durable, industrial-style furnishings.
Contractor Supply Bundles & Reorder Subscriptions
Offer bulk and custom-count bundles for small contractors, roofers and carpenters, with tiered pricing for recurring orders. Provide a subscription reorder service and add-ons like sealing spray, touch-up paint, or integrated fasteners to increase lifetime customer value. Target local builders, restoration shops and farm maintenance services.
Teach & Monetize Skills: Courses + Kits
Develop short online courses and in-person workshops teaching creative and structural uses of pronged plates (furniture joints, small structural repairs, decorative projects). Package accompanying physical kits (plates + wood pieces) and sell the course + kit as a bundled product—promote through social media, local makerspaces and home-improvement groups.
Creative
Modular Mini-Shelf Connector System
Use the 4" x 2" pronged plates as invisible connectors to join small wooden cubes and panels into configurable shelving modules. The 13 mm prongs bite into 1/2"–3/4" plywood or reclaimed boards—hammer plates flush on inside faces to form strong corner joints. Build stackable, reconfigurable storage (shoe cubbies, spice shelves, display boxes) where plates are the structural hardware and also a subtle industrial accent.
Industrial Corner Picture Frames
Create photo and art frames with an urban, mechanical look by mounting the galvanized plates on external corners as decorative/bracing elements. File or bend the prongs down partway and secure them into the wood for a rugged, handcrafted finish. The silver hot-dip galvanized surface contrasts nicely with stained or charred wood for gallery-style wall pieces.
Rustic Coat Rack / Wall Hook Panel
Attach a row of plates to a reclaimed wood plank and use the plates themselves as backing for heavy-duty hooks or hang the plate’s edge as an industrial lip for small items. The staggered nail pattern gives traction when driven in; combine with metal hooks or leather straps to make a durable entryway organizer that supports coats, bags and tools.
Geometric Truss Wall Art
Exploit the product’s original truss-plate purpose to make scaled-down truss motifs for wall art. Join thin battens of wood in triangles and hexagons using the plates as nodes—arrange several panels into a larger geometric mural. The galvanized finish provides a modern metallic sheen; paint or patina selectively for contrast.
Garden Trellis & Plant Support Brackets
Use the plates to fasten crosspieces and stakes for small trellises and plant supports. Their anti-rust galvanized finish holds up outdoors; 13 mm prongs ensure a positive bite into softwood posts. Make customizable planter frames, vine supports, or quick-fix raised-bed corner braces that gardeners can assemble with minimal tools.