Features
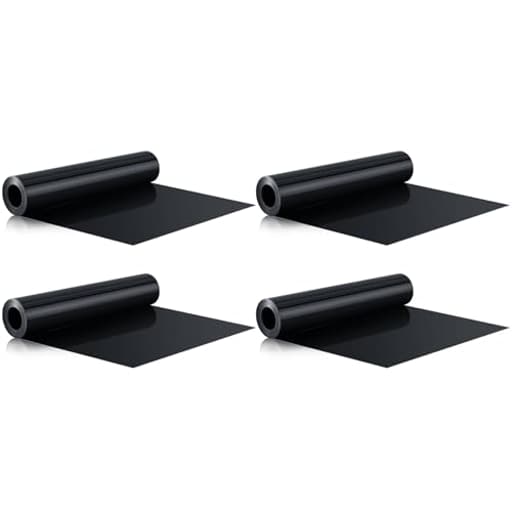
- Sufficient for You to Use: you will get 4 rolls (each 16 ft )of under deck drainage system trough, which will take care of your decks and keep them protected from rain and melting snow, enough quantity can meet your use needs
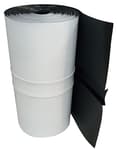
- Robust and Durable Material: crafted from quality HDPE, our deck drainage system trough promises durability and reliability; The tough material can withstand constant exposure to rain and snow without any wear and tear, providing you with a long lasting solution for your deck drainage needs; Rely on the strength and durability of our drainage tape and enjoy a good using experience
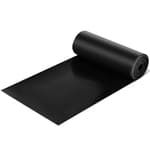
- Ample Size: our under deck water drainage trough is generously sized at 16 ft/ 5 meters in length, 0.02 inches/ 0.5 mm thick and 19.69 inches/ 50 cm wide; The long enough length enables you to cover large areas and ensure comprehensive drainage; Say goodbye to wet and slippery decks as our product is here to ensure that every corner of your deck stays dry
- Versatile Application: available in the classic black color, our black deck drainage system trough is designed not just for aesthetics, but also for practical use; Whether you have a pool side deck, a garden deck, or a patio, this is an ideal tool for keeping these areas dry and free of rain or melting snow; It seamlessly blends with any deck design and functions systematically to offer a smooth and efficient service
- Easy Installation: our deck black drainage trough is effortless to install; No need for any professional help. With just a few steps, you can conveniently place the tape in your deck, start by stapling to the top of the joists, then use tape on the joints, and finally screw the downpipe to the drain hole
Specifications
| Color | black |
| Size | 16 ft |
| Unit Count | 4 |
Related Tools
Four 16 ft rolls of black HDPE under-deck drainage trough (each 5 m long, 50 cm wide, 0.5 mm thick) are designed to collect and redirect rain and melting snow away from deck surfaces. The troughs install under the deck by stapling to joists, taping joints, and connecting a downpipe to route water to a drain.
Pangda 4 Rolls 16 ft Black Deck Drainage System Trough Deck Black Drainage Trough Under System for Under Ceiling Review
Why I tried this under-deck drainage
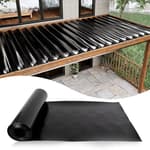
I rebuilt a second-story deck this season and wanted the space below to stay dry enough for a hot tub and storage. An under-joist ceiling is one route, but capturing water above the joists is cleaner and does more to protect the structure itself. That’s where the Pangda under-deck trough came in: four 16-foot rolls of black HDPE that staple to joists, form a shallow valley between them, and feed runoff into a gutter or downpipe. I used it across a mix of treated lumber and composite decking and have been living with the results through several storm cycles.
Material quality and sizing
Each roll is 16 ft long, 19.7 in wide, and 0.5 mm thick (about 20 mil). The HDPE feels robust without being cumbersome—stiff enough to hold a neat trough, but flexible enough to shape and overlap without wrestling it. The black color disappears in the shadows and looks tidy from below.
The width makes sense for 16-inch on-center framing. You get a generous valley between joists while still having enough material to staple along the top edges. On 12-inch spacing, the trough is deeper (still fine). On 24-inch spacing, it’s usable but shallow; I’d add cleats or furring to deepen the channel and keep water speed up. For beams or doubled joists, plan short transitions to avoid flat spots.
Planning the layout and slope
The most important prep is slope. A reliable target is 1/4 inch per 10 feet—enough to move water without fighting the material. I snapped a high reference line at the house-side ledger and a low line toward the discharge edge, then ran a taut string along each bay to mark the desired fall. That gave me something to staple to, ensuring I wasn’t creating dips that collect water.
A few planning tips that paid off:
- Decide early where water will exit: a continuous gutter, individual downpipes, or a collector box.
- Keep outlets accessible for cleaning.
- Account for fixtures or penetrations early (post bases, lights, gas/electrical runs), so you can seal around them thoughtfully.
- Don’t pull the plastic overly tight; HDPE moves with temperature. Leave a whisper of slack to prevent puckering.
Installation experience
This is a top-of-joist system, so it’s best done on new builds or complete resurfacing.
- Cutting and handling: The material cuts cleanly with scissors or a sharp utility knife. It’s light enough to maneuver overhead solo, though a second set of hands speeds up long runs.
- Fastening: I used stainless wide-crown staples every 6–8 inches along both joist tops, with extra staples near the outlets. Cap nails also work. Wide heads reduce the risk of pull-through.
- Seams: For runs longer than 16 feet, I overlapped by at least 6 inches, placing the upstream sheet over the downstream sheet so water can’t run under. HDPE is low-surface-energy, so not every tape adheres well. Use a tape specifically rated for LSE plastics (or a deck drainage sealing tape) and apply firm roller pressure after cleaning with isopropyl alcohol. On long seams, I added a narrow mechanical batten strip atop the overlap at each joist and stapled through; this physically locks the lap in place.
- Outlets: I formed a funnel at the low end of each bay and fed it into a short length of downpipe and then into a gutter. Screws with pan heads and small washers hold the outlet securely without tearing. I also added small debris screens at the trough mouths to keep leaves out.
Because the trough attaches to the top of joists, it doubles as a shield. Still, I installed joist flashing tape over the joist tops first to guard against stray fastener penetrations and edge wicking.
Total install time was reasonable: once the first bay is dialed in, the rest become repeatable. The rolls being 16 feet helped; they’re easier to manage than huge, heavy membranes.
Performance in the real world
After installation and before decking, I stress-tested with a hose to watch flow and check seams. With the slope set and overlaps taped and stapled, water moved quickly to the outlets without beading on the joist tops. Once the decking went down, I ran a second test and then waited for a pair of late-summer storms.
Results under the deck were exactly what I hoped for: dry framing faces, no drips through seams, and a predictable stream into the gutter. The space below stays usable even in heavy rain. Rain noise off the trough is a soft patter—not loud, and dampened further once you have a ceiling or soffit below.
Cold mornings didn’t faze the HDPE; it remains flexible enough that minor shifts don’t stress the staples. Over time, the crucial maintenance point is keeping the outlets clear. I planned outlets where I can reach them with a short brush, and I flush each trough once a season.
Retrofit reality check
I also tested what it would take to retrofit without removing deck boards. In short: it’s impractical to do cleanly. You can improvise from below between joists, but you’ll fight attachment, slope consistency, and sealing at the house side. Even when you think it’s watertight, small reverse laps or staples driven at awkward angles can create paths for leaks. If you’re resurfacing or rebuilding, this product is great. For true retrofits under existing boards, I’d look at ceiling-style systems that mount below joists instead.
Durability and limitations
HDPE is a good choice outdoors—it’s tough, water-impervious, and not bothered by chemicals found in treated lumber. The 0.5 mm thickness is slightly lighter than some premium branded membranes, but in use it’s been plenty for spanning 16-inch bays and resisting stapled edges. I wouldn’t leave it exposed to sun for long; install decking soon after to protect from UV and wind lift. Also, be cautious around sharp hardware: trim hanger tabs flush and keep screw points away from the membrane path.
One practical limitation is width: if you have unusual framing, very wide bays, or a lot of blocking, you may need to cut and splice more pieces, which increases seam work. Also, because tape choice matters for HDPE, don’t reach for generic duct tape; use something rated for LSE plastics or the specific sealing tape sold for deck drainage systems.
Finishing details that elevate the result
- Use insect/bird blocks or a soffit at the deck edge so the space doesn’t become a nesting zone. Keep it removable for seasonal cleaning.
- If you’re integrating lighting or a fan below, run conduit and backing before closing anything up.
- Choose an outlet strategy that fits your aesthetic: a continuous fascia-mounted gutter looks finished and is easy to maintain.
Value
Buying in a four-roll pack brings the per-foot cost down, and the material quality holds up. Given how well it has kept the structure dry and preserved the space beneath, it’s a cost-effective alternative to more expensive branded systems, especially on medium to large decks. Just budget for proper tape, a box of stainless staples or cap nails, and outlet hardware.
Pros and cons
Pros:
- Durable, easy-to-handle HDPE in manageable 16-foot rolls
- Works well on 16-inch on-center framing and keeps joists dry
- Straightforward install with standard tools
- Disappears visually; compatible with wood or composite decking
- Good value, especially in a multi-roll pack
Cons:
- Not practical for retrofits without removing deck boards
- Requires careful slope planning and compatible seam tape
- Width can be shallow on 24-inch bays without added cleats
- No printed install guide; you need to bring your own best practices
Recommendation
I recommend the Pangda under-deck trough for new builds or full deck resurfacing where you want to keep the space below dry and protect the framing above. It balances durability with ease of installation, and with proper slope, overlaps, and outlet planning, it performs reliably. It’s also a solid value compared to premium systems, without feeling flimsy. I would not choose it for a true retrofit under existing boards; in that case, a below-joist ceiling system is the right tool. For everything else, this trough has been a simple, effective way to upgrade a deck from “wet underneath” to “usable in all weather.”
Project Ideas
Business
Under‑Deck Drainage Installation Service
Offer end‑to‑end installation for homeowners: site assessment, custom cutting, stapling to joists, sealed joints, and downpipe tie‑ins. Package with a labor + material flat rate and add inspection/seasonal maintenance contracts for recurring revenue.
Precut Retrofit Kits for Deck Builders
Create and sell modular, precut trough kits (lengths, corner pieces, taped joints, downpipe adapters and fasteners) to contractors and DIYers. Include how‑to videos and a small inventory of branded tools to accelerate installations and position yourself as the go‑to supplier for deck drainage upgrades.
Rainwater Capture & Landscaping Bundle
Combine the trough rolls with rain barrels, filtration, and irrigation tubing to sell turnkey deck‑mounted rainwater harvesting systems to eco‑conscious homeowners. Offer optional add‑ons like planter liners, drip irrigation conversion, or smart water meters to increase average order value.
Upcycled Outdoor Products Line
Use leftover cutoffs to manufacture small durable goods—planter liners, privacy screen panels, pet mats, and utility tarps—and sell them online or at local garden centers. Emphasize sustainability and low cost, turning waste material into profitable accessories.
Training & Certification for Contractors
Develop a paid training program certifying contractors to install your brand of under‑deck troughs correctly (best practices for stapling, joint sealing, and downpipe routing). Certification builds trust, creates dealer partnerships, and generates licensing revenue.
Creative
Hidden Under‑Deck Planter Liner
Use sections of the HDPE trough as seamless, waterproof liners to create long, suspended planter troughs beneath a deck. Cut and fold to form rigid trays, staple or screw mounting brackets to joists, fill with lightweight potting mix, and route excess water to the existing downpipe for an ultra‑clean, drip‑free hanging garden.
Modular Temporary Gutter System
Cut the rolls into custom lengths and use taped joints and downpipe connectors to build temporary or event gutters. Lightweight and easy to install/strip, this is perfect for protecting walkways, staging, or pop‑up market stalls from rain without permanent umbrella structures.
Outdoor Privacy/Sun Shade Panels
Sheet out wide strips and attach them vertically or at an angle to the underside or side of a deck to form modern, weatherproof privacy screens or sunshades. The black HDPE gives a sleek look, blocks spray from above, and can be stapled or screwed to simple frames for quick removal.
Raised Bed / Cold Frame Liners
Line DIY raised garden beds or cold frames with the trough material to create waterproof, rot‑resistant containers. The durable HDPE helps retain soil, channels excess water to a simple outlet, and can be cut to any size to fit irregular garden layouts.
Portable Pet Shelter / Ground Sheet
Build a low‑profile insulated pet shelter or weatherproof ground sheet by folding and taping sections of the trough. The material sheds moisture, is easy to clean, and can be anchored under a deck or on a patio to create a dry, sheltered zone for outdoor pets.