Features
- On-top of joists installation - Keep framing and under deck area dry - Heavy Duty 30 mil thick black lldpe
- Easy to install - 1. Staple on top of joists 2. Self sealing tape over joints 3. Screw downspouts to water evacuation holes.
- Material cost under $ 2/s.f. (Goberco trough is about $1.2/s.f., self sealing joist tape is about $0.4/s.f. , regular downspout + plastic gutter + roofing screws are low cost).
- Save Time / Reduce Leaks - Fold against house wall for flashing (reduce leaks at ledger board) - Deep channel valley between joists - Regular downspout redirect water flow into a gutter (prevent water dripping / no special downspout needed). U.S. patent # 9,453,338
Specifications
| Color | Black/White |
Related Tools
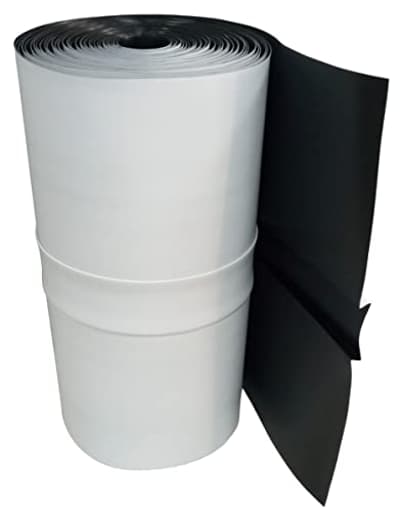
An under-deck drainage roll designed for 16-inch joist spacing, made from 30 mil LLDPE with a black top and white underside, that installs on top of joists to collect and channel water away from the area beneath a deck. It has a deep channel between joists, allows folding for ledger flashing, uses self-sealing tape over joints, and accepts screw-on downspouts to direct water into a standard gutter or downspout.
Goberco Under Deck Drainage System -Z/50/16-50 feet Long Roll, for 16 inches Joist Spacing, 30 Mil Thick Trough, top Side Black + Down Side White. Review
Rain has a way of finding your deck’s weak spots. I wanted a dry, usable space beneath a new deck and, just as importantly, protection for the joists themselves. I chose the Goberco under-deck drainage roll because it installs on top of the joists, creating a continuous trough that keeps the framing dry while directing water to a gutter. After living with it through a wet season, here’s what stood out—good and bad—and what I’d do again.
What it is and why the on-joist approach matters
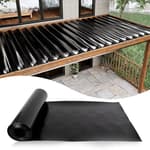
The Goberco drainage roll is a 30-mil LLDPE membrane designed for 16-inch on-center joists. It spans between joists to form a deep channel and runs the length of the deck to a collection point, where standard downspout fittings drop into a gutter. Unlike many under-joist “ceiling” systems that catch water after it has already soaked the joists, this on-joist design shields the framing from above. That’s the big draw: it creates a dry zone below while extending the life of the structure.
The material itself is black on top and white on the underside. The black side disappears under decking and handles incidental UV during installation; the white underside helps with visibility between joists and doesn’t darken the area beneath as much as a black trough would.
Planning and cost
This isn’t a throw-it-up-and-go solution. Slope is everything. If your joists run perpendicular to the house (typical), the deck’s natural fall is often enough. If joists are parallel, you’ll need to build your own slope with blocking or sleepers—more work than most expect.
As for cost, the membrane itself is very reasonable, and I kept the all-in material cost under $2 per square foot using standard joist tape, common downspouts, a basic vinyl or aluminum gutter, and roofing screws. That’s substantially less than branded systems that require proprietary fittings, and it’s competitive with rolling out EPDM once you account for flashings and adhesives.
Tools and supplies I used:
- Cap stapler or 1-inch wide-crown staples (cap fasteners reduce tear-through)
- Butyl or self-sealing joist tape for seams and joist tops
- String line, level, and depth gauges for slope
- Utility knife and snips; a 2-3/8" to 3" hole saw for downspout holes
- Standard 2x3 downspout outlets and a simple gutter
Target slope: 1/8 to 1/4 inch per foot. I used 1/4 inch per foot because I wanted fast evacuation and fewer puddling risks.
Installation: faster with a plan (and a helper)
Two people make this job a lot easier. The membrane is thick and somewhat rigid, which is great for durability but means it has a mind of its own until it’s fastened.
What worked for me:
- Dry layout and practice: I cut a 12-inch practice piece to get a feel for how it folds and curves. Worth the five minutes.
- Depth guides: I pre-installed depth blocks (simple ripped strips) on each joist every 2 feet, stepping them down to establish a consistent slope. This gives you something to “hit” as you staple.
- Temporary support: A straight 5/4 board clamped from the rim back toward the house gave me a reference line and supported the membrane as I rolled it out.
- Ledger fold: I folded the membrane up the house-side ledger for built-in flashing, then taped over that fold and the ledger with butyl tape before decking. This detail matters for leak protection at one of the deck’s most vulnerable joints.
- Fastening: I stapled along the top of each joist every 6-8 inches, starting at the high end and working toward the gutter. Don’t over-tension. A taut-but-not-stretched membrane handles thermal expansion better.
- Joints and seams: Overlaps run ridge-to-ridge. I taped the seam with self-sealing tape, working in warm temperatures to get good adhesion.
- Drain collection: At the low end, I cut oval holes at the bottom of the troughs and screwed on standard downspout outlets. To ensure tidy flow into the gutter, I made simple triangular “funnels” from offcuts and taped them in place, sloping into the outlets.
A note on temperature: LLDPE expands in heat. Installing mid-day in direct sun can leave you with puckers and bows once the membrane cools or heats up. Early morning or shaded installation helps. The other trick is to avoid pulling it banjo-tight—leave a whisper of slack to accommodate expansion.
Performance in the rain
Once the decking went down, the system felt rock solid. The first real test was a heavy fall storm. Water tracked cleanly along the deep channels to the outlets, and the patio below stayed dry—no drips, no misting, no sheet flow off the rim. Because runoff now gets routed to a gutter instead of pounding into the soil at the foundation, I noticed fewer damp spots along the basement wall under that section of the deck. The dry underside also makes the space much more usable; grilling in the rain is no longer a messy compromise.
Noise was minimal; water moves in narrow channels with a soft hiss rather than drum-like splashing. The white underside between joists keeps the area brighter than I expected, though this is still an exposed-joist look, not a finished ceiling.
Durability and maintenance
Thirty mils is stout. I had no concerns about puncturing during install, even kneeling and sliding tools across it. The deep trough holds shape once fastened, and the ridge lines resist sagging.
Potential long-term concerns are mostly about debris. Leaves and pine needles will find their way through deck-board gaps. The slope and smooth plastic help them wash down, but expect some accumulation at the outlets and in the gutter. I plan one spring and one fall maintenance pass: pop the gutter screens, rinse the outlets, and flush the runs with a garden hose from above.
Tape selection is also important. I used a high-quality butyl tape rated for wet environments and structural connections. It remains tacky and flexible in cold, and it bonds well to LLDPE. Cheaper tapes can lift over time.
Limitations and gotchas
- Thermal movement: If you staple too sparsely or install in full sun while pulled very tight, you can end up with bows or wrinkles. More fasteners and a touch of slack help.
- Creases: Sharp creases are tough to undo. Roll it out carefully and avoid tight bends.
- Slope creation: On decks where joists are parallel to the structure, you’ll need to build pitch with blocking or sleepers. That adds planning time and material.
- Aesthetics: This is not a finished ceiling system. If you want a paneled look underneath, look elsewhere or plan to add a soffit afterward.
- Access: After the deck boards go on, you can’t service the membrane itself, so get the details right the first time.
How it compares
Versus under-joist ceiling systems, the Goberco approach protects framing better and costs less, but it doesn’t give you a decorative soffit. Compared to rolling EPDM roofing, the trough is easier to detail around joists and outlets, with less adhesive work and fewer seams to manage. EPDM, however, is more compliant and can be easier to slope on trickier geometry if you’re comfortable with roofing techniques.
Value is where this shines. Using off-the-shelf downspouts and a basic gutter keeps costs down without compromising performance. The system’s simplicity is its strength—provided you respect the setup and install conditions.
Tips I’d pass on
- Shoot for cool or shaded installation; avoid mid-day summer sun.
- Pre-set depth blocks or cross-bracing to lock in slope.
- Staple every 6-8 inches along joist tops with cap fasteners.
- Don’t over-tension the membrane.
- Tape every seam with quality butyl or self-sealing tape; roll it in for adhesion.
- Create small “funnel” gussets at the outlets for clean flow into the gutter.
- Plan for maintenance: gutter guards at the outlet line, and an annual rinse.
Recommendation
I recommend the Goberco under-deck drainage roll for builders and DIYers who want to protect deck framing and create a dry space below without paying for a proprietary system. It delivers solid performance at a very reasonable cost, and once installed correctly, it’s worry-free through heavy rain. The trade-offs are in the install: the material is stiff, sensitive to thermal expansion during setup, and it rewards careful planning for slope. If you’re working in hot sun, need a finished-ceiling aesthetic, or have joists parallel to the house and don’t want to rework pitch, this won’t be the easiest path. For standard 16-inch layouts with a bit of patience, it’s a smart, durable, and cost-effective choice.
Project Ideas
Business
Turnkey Under‑Deck Conversion Service
Offer a packaged service: site inspection, install the roll with self‑sealing tape, fit screw‑on downspouts and gutters, then finish the ceiling and lighting. Price by deck size with tiered options (basic drainage, drainage + lighting, full finishing). Market to homeowners wanting usable outdoor square footage.
Precut DIY Kits + Video Course
Productize the roll into DIY kits (roll lengths precut for common joist spans, joist tape rolls, downspout hardware, screws) and sell online with step‑by‑step video tutorials. Include templates and troubleshooting guides to attract the strong DIY market and increase average order value with add‑on gutters and lighting.
Contractor Supply & Co‑Brand Partnerships
Become a preferred supplier to deck builders, remodelers and landscapers by offering competitive wholesale pricing, bulk discounts, and co‑branded marketing materials. Provide training sessions and quick‑install cheat sheets so crews can install the system fast and profitably.
Maintenance & Seasonal Service Plans
Sell annual maintenance subscriptions (inspect seals, clear debris, reapply tape as needed, check downspouts). Offer seasonal checks before winter and spring rains; recurring revenue and lower churn if bundled with a two‑year install warranty.
Value‑added Upcycling & Offcut Products
Create a secondary product line from offcuts: pond liners, planter liners, temporary event roofing, or pet house liners. Sell these lower‑price items locally or bundle them as add‑ons to installations to monetize waste and expand market reach.
Creative
Dry Under‑Deck Lounge
Use the drainage roll to create a dry ceiling beneath an existing deck. Staple the trough on top of joists, seal joints with the self‑sealing tape and add screw‑on downspouts to route water to your gutter. Finish with a tongue‑and‑groove ceiling, weatherproof lighting and outdoor furniture to make a protected outdoor living room that stays dry even in driving rain.
Covered Outdoor Workshop or Studio
Convert the under‑deck area into a hobby workshop or art studio. The deep channels keep tools and materials dry while folded flashing protects the ledger. Add wall storage, a workbench, LED task lighting, and access panels for the downspouts so maintenance is simple — a usable workspace that doesn’t need a full roof rebuild.
Modular Rainwater Harvest & Planter System
Repurpose the channeling ability to capture and direct roof/deck runoff into rain barrels or planters. Install downspouts that feed detachable rain barrels, then use offcuts of the roll as liners for raised beds or self‑watering planters. Great for edible gardens that need a reliable irrigation source.
Protected Storage & Pet Shelter
Create dry, secure storage under the deck for bikes, firewood, and outdoor gear. Incorporate a small sheltered pet nook (raised, dry bedding) using the roll as a moisture barrier. The white underside helps reflect light, making the space feel brighter without structural changes.