Features
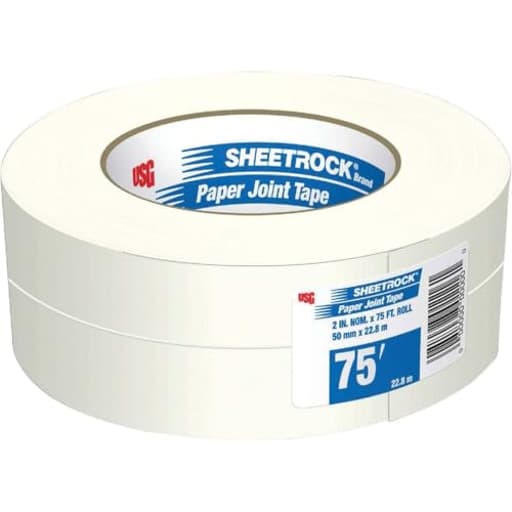
- 2-1-/16" x 75' roll
- Drywall & wall board joint reinforcing paper tape
- Manufactured in China
Specifications
| Color | White |
| Size | 75' |
| Unit Count | 1 |
Related Tools
Paper drywall joint tape, 2-1/16 inches wide and 75 feet long, used to reinforce and cover seams between drywall or wallboard panels. The white paper tape is embedded in joint compound to create a smooth, reinforced joint and is supplied as a single roll.
U S GYPSUM 380041 Dry/Wall Joint Tape, 75' Review
A straightforward paper tape that rewards good taping technique
I reached for this USG paper joint tape on a weekend patch-and-paint job — a handful of butt joints, a repaired plumbing cut-out, and a few inside corners in a small hallway. It’s a simple product by design: a white, 2-1/16-inch-wide paper tape on a 75-foot roll. There’s no adhesive backing and no gimmicks; you embed it in joint compound and let the paper reinforce the seam. If you’re used to paper tape, you’ll feel at home immediately. If you’re new to drywall work, it’s worth underscoring that “non-adhesive” is a feature here, not a flaw.
Build and handling
The tape itself is clean, consistent, and easy to tear to length without frayed edges. The width is just a touch beyond the familiar 2 inches (2-1/16 inches), which gives a hair more coverage without changing your workflow or feathering width. The roll size, at 75 feet, is compact and clearly aimed at small projects and repairs rather than whole-room taping. I like that for punch-list work: it fits neatly in a tool bag and doesn’t get abused in the way a long, heavy roll can.
Paper quality matters more than you might expect. Too flimsy and it telegraphs bubbles; too stiff and it’s a fight to embed, especially over uneven patches. This tape lands in the middle in a good way. It holds together when damp, folds cleanly by hand for corners, and doesn’t disintegrate if you need to lift and reset a section. I didn’t run into any off-center edges or factory kinks that can plague bargain rolls.
For those who care about sourcing, this roll is manufactured in China. I didn’t see any quality quirks tied to that; it performed on par with mainstream paper tapes I’ve used over the years.
Application: dry and “wet” methods
I tested the tape with two common approaches:
- Dry embedding in pre-mixed all-purpose compound for flat seams and butt joints
- Lightly misted tape to improve conformability over a rough patch
Dry application is the default for me. I laid down a thin, consistent bed with a 6-inch knife, pressed the tape into the compound, and knifed off the excess from the center out. The tape took well — no immediate blistering or edge lift. On butt joints where awkward framing had left a micro-crown, the paper still bedded evenly.
For a repair around a valve cut-out, I gave the tape a quick mist with a spray bottle before embedding. Pre-wetting isn’t essential with modern compounds, but it can help paper sit down on irregular surfaces and reduce the chance of tiny air pockets. The tape tolerated that light wetting without turning mushy. After the first coat dried, it accepted a second and third pass cleanly, feathering out to an easy-to-sand finish.
Corners are always the test of a paper tape’s fiber strength. I folded the tape by hand down the middle for inside corners and embedded it over an all-purpose compound bed. It held the crease and didn’t split as I worked it into the angle. If you prefer specialty corner tapes with reinforcing strips, that’s still the gold standard for high-traffic corners, but for typical residential corners this paper got the job done.
Finish quality and durability
The best paper tapes disappear after finishing — no bubbling, no visible seam ghosting, and no cracking after seasonal movement. After two finish coats and a light sand, the seams were smooth and the tape edges didn’t telegraph. I revisited the area a few weeks later after a heat spell and didn’t see hairline cracks at the butt joints, which is where mesh tapes sometimes show their weakness if paired with only premixed mud.
Blisters are usually an installer problem (too little mud under the tape or knifing too aggressively), but paper quality can play a role. In this case, any spots I had to lift and re-bed were small and operator-caused, not tape-driven. Once set, the bond felt solid, and the paper didn’t fuzz up under the second coat.
75 feet: who this roll is for
At 75 feet, this is a repair-sized roll. For context, a single 8-foot seam consumes 8 feet of tape; a small room can eat through a couple hundred feet quickly. If you’re taping a whole basement, buy a 250- or 500-foot roll and save time and money. But if you’re fixing a bathroom wall, doing patchwork after electrical, or handling a few butt joints and corners, this roll makes sense. You won’t be storing a half-used mega roll in a dusty corner of the garage.
The width and thickness are familiar, so your knives and workflow don’t need to change. It’s also a good “keep one in the kit” option for pros who occasionally need paper rather than mesh for troublesome flat seams.
Paper vs. mesh: the right choice for the job
Mesh has its place. It’s self-adhesive, quick to place, and handy for small patches. But for flat and butt joints, paper still wins on crack resistance when paired with the right compound. This tape is a solid option if:
- You’re finishing factory-tapered seams and butt joints
- You’re using premixed all-purpose or a setting-type compound
- You want a smooth finish with minimal sanding
If speed of placement matters more than ultimate seam performance, mesh can be faster. Just know that mesh typically benefits from a setting-type base coat to reduce future cracking. Paper doesn’t require that extra step.
Common pitfalls and how to avoid them
- It’s not sticky: Paper joint tape isn’t supposed to have adhesive. Embed it into a wet bed of compound; don’t try to stick it to the wall dry.
- Control the mud: Too little compound under the tape leads to bubbles; too much leaves ridges that take extra sanding. Aim for a thin, continuous bed.
- Prep matters: Dusty drywall edges or unfilled gaps can compromise bonding. Vacuum seams and prefill larger gaps before taping.
- Corners: Fold by hand and use a corner knife if you have one. Don’t expect paper to replace metal or plastic corner bead on outside corners.
- Curves and arches: Use a flexible corner bead or a product designed for curves. Standard paper tape isn’t ideal for tight radii.
What I liked
- Reliable embedding with minimal fuss. It behaved predictably in both dry and lightly pre-wet applications.
- Clean edges and consistent paper strength. Easy to tear, easy to fold, and no random weak sections.
- Handy roll length for repairs and punch work. Less waste for small jobs.
- Slightly over-2-inch width gives just a touch more coverage without changing how you feather.
What could be better
- A 75-foot roll isn’t cost-effective for large projects. You’ll burn through it quickly in a full room.
- No centerline crease is advertised; while folding by hand works fine, a defined crease can speed inside corners for some users.
- If you’re brand new to drywall, the lack of adhesive can be confusing. A brief instruction note in the packaging would help first-timers.
The bottom line
This USG paper joint tape does exactly what I want a paper tape to do: embed cleanly, disappear under finish coats, and hold up after changes in temperature and humidity. The 2-1/16-inch width and 75-foot length make it a practical, no-drama choice for repairs and small projects. It’s white, consistent, and manufactured in China — none of which changes the core performance story: dependable paper that rewards decent taping technique.
Recommendation: I recommend this tape for homeowners tackling small drywall repairs and for pros who want a compact roll of paper tape on hand for flat seams and butt joints. It’s straightforward, predictable, and finishes well. If you’re outfitting a big project, buy a longer roll; if you need self-adhesion for quick patches, reach for mesh. But when you want the crack resistance and finish quality that paper provides, this roll is a smart, low-friction choice.
Project Ideas
Business
DIY Craft Kits for Makers
Package the tape with a small tub of joint compound substitute, simple tools and step-by-step instructions for one of the creative projects (e.g., lampshade or mini textured panel). Sell kits on Etsy or at craft fairs targeted at apartment-dwellers and first-time decorators who want affordable, handmade decor.
Workshops & Pop-Up Classes
Run hands-on workshops at makerspaces, community centers or boutique home stores teaching creative uses of drywall tape (textured panels, woven shades, bookbinding). Charge per seat and offer add-on kits or a follow-up online tutorial bundle to increase revenue per attendee.
Boutique Accent Panel Business
Create a line of ready-to-hang, lightweight textured wall panels made with taped relief techniques. Market them as affordable, rental-friendly accent walls for condos, short-term rentals and boutique retail displays. Offer custom sizing and finishes for interior designers and staging companies.
Repair + Staging Microservice
Offer a quick drywall seam-repair and cosmetic touch-up service for landlords, real-estate agents and short-term rental hosts. Use tape and fast-setting compounds to deliver neat, camera-ready walls on tight schedules; upsell textured patch services or small accent panels to boost margins.
Wholesale / Private-Label Supply for Crafters
Buy tape in bulk and repackage into smaller craft-market units (colored or pre-cut strips, bundled with instructions) under your own brand. Sell to art schools, craft stores, or online makers and include suggested projects to drive repeat purchases.
Creative
Textured Accent Panels
Use strips of paper drywall tape as a low-profile stencil/frame and embed them in joint compound or a lightweight modeling plaster to create modular textured wall panels (geometric grids, chevrons, concentric rings). Once dry, sand, prime and paint or glaze for a durable, architectural-looking accent that’s thinner and lighter than wood or ceramic panels.
Woven Lampshade / Pendant
Cut the tape into long narrow strips, soak or prime with a clear PVA sealer, then weave into a conical or cylindrical lampshade. Finish with a few layers of matte sealer so it diffuses light softly and holds shape. The paper surface accepts dyes and washes for custom colors and organic textures.
Sculpture Armature Skin
Apply tape over a wire or cardboard armature and then layer papier-mâché or plaster over it to create a thin, reinforced skin. The tape adds tensile strength across seams, helps control cracking, and leaves a paper-friendly surface for painting, gilding or distressing.
Handbound Journals & Exposed-Spine Books
Use strips of drywall paper tape as a flexible spine reinforcement in handmade books and journals. The tape can be left exposed for a raw, architectural look or covered with decorative papers; it provides strong, lightweight support for repeated opening and closing.
3D Relief Wall Art (Layered Collage)
Build layered relief artworks by stacking and sculpting tape-backed compound shapes (floral motifs, cityscapes, abstract waves). The tape holds thin raised edges crisply and lets you create lightweight 3D canvases that can be painted or metallic-leafed for gallery-style pieces.