Features
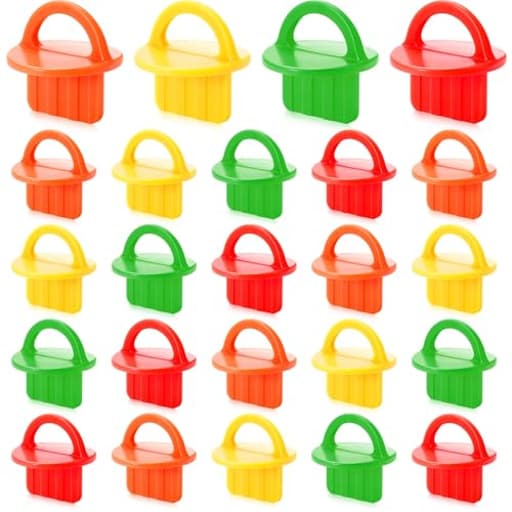
- Precision in Your Project: our 24 packs of deck spacers come in a variety of suitable sizes, about 1/8'' (3 mm) in orange, 5/32'' (4 mm) in red, 1/4'' (6 mm) in green, and 5/16'' (8 mm) in yellow, ensuring precise alignment for your decking project; With these dimensioned spacers, achieve uniform and professional spacing
- Splash of Color and Functionality: add vibrant functionality to your toolbox with our deck board spacer rings available in orange, red, green, and yellow; These various colors not only serve aesthetic purposes, distinguishing between tasks and projects with ease, but also add a touch of style to your workspace
- Practical Performance Delivery: equipped with functional and practical attributes, our deck board spacer guides deliver precise spacing between deck boards; This ideal quality ensures solid construction and drainage, preventing board warping and extending the life of your deck
- Built to Last: crafted from quality plastic, our deck board spacer rings promise durability with nice material resilience; The thoughtfully designed rounded corners and blade like edges reflect our commitment to safety and performance; A finger grip design adds to their user friendly operation; Place spacers between boards during installation to keep gaps consistent, and remove spacers after securing each board
- Installation Made Effortless: ease and simplicity define the installation process of our spacer tools, allowing for fast and straightforward setup; This user friendly feature results from precise design, enabling efficient handling and enhancing workflow productivity
Specifications
| Color | orange, red, green, yellow |
| Unit Count | 24 |
Related Tools
24 plastic deck board spacer rings in four colors—orange (1/8", 3 mm), red (5/32", 4 mm), green (1/4", 6 mm), and yellow (5/16", 8 mm)—for consistent spacing during decking installation. They create uniform gaps for drainage and to reduce board warping, feature rounded corners and a finger-grip design for handling, and are placed between boards during installation and removed after fastening.
SiliFine 24 Packs 1/8'' 1/4'' 5/16'' 5/32'' Deck Spacer Tool Gap Jig Deck Board Spacer Rings Assorted Easy Pull Guide Tool for Pressure Treated Composite Decking Plank Lumber Hardwood PVC, 4 Colors Review
Why consistent gaps matter
Even spacing between deck boards isn’t just about looks—it’s about drainage, drying time, and preventing cupping or trapping debris. On new builds and rehabs alike, I rely on spacers to remove the guesswork. The SiliFine deck spacer rings brought a simple, color-coded approach to a task that’s easy to overcomplicate with scrap wood, eyeballing, or a tape and a prayer.
What’s in the set
This kit includes 24 ring-style spacers in four sizes, each color-coded:
- Orange: 1/8 inch (3 mm)
- Red: 5/32 inch (4 mm)
- Green: 1/4 inch (6 mm)
- Yellow: 5/16 inch (8 mm)
That covers the most common gap ranges for pressure-treated lumber, composite/PVC, and hardwood installations. I like that the set doesn’t make you choose a size up front—on real jobs, board moisture, climate, and manufacturer guidance can vary. Having all four in one pouch meant I could adapt on the fly.
Build and ergonomics
The rings are a stiff, durable plastic with rounded corners and slightly beveled faces. The edges slide between boards without catching fibers on soft pressure-treated pine or marking composite caps. The ring shape doubles as a finger grip, which made them easy to place and—equally important—easy to pull even with gloves and a bit of sawdust in the way.
They’re not flimsy. I stepped on a few during a long day and they flexed rather than cracked, then snapped back to shape. I wouldn’t expect them to survive a direct screw hit or being clamped hard in a joint, but under normal use they hold up.
Accuracy and consistency
I checked a selection with calipers; the spacers were true to size and consistent within a small fraction of a millimeter across the set. More important in practice, the boards stayed visually parallel across long runs. Once the first board was set square, I used two spacers at each joist bay—one near each screw line—to prevent toe-in on the next board. That simple approach yielded straight, evenly spaced courses without constant re-measuring.
On the deck: how they perform
I used these over the course of a weekend on:
- Wet pressure-treated southern yellow pine (new install)
- Capped composite (replacement of a few courses)
- A small ipe landing repair
Here’s what stood out:
- They resist binding. The beveled edges slide into tight spots without prying the boards apart or compressing fibers.
- Removal is easy. The ring grip meant a quick tug pulled them free after fastening, without leaving plastic streaks or getting stuck under screw heads.
- They don’t mar surfaces. Composite facings and hardwood edges came away clean—no scratches, no scuffs.
For the pine install, I used 1/8 inch (orange) to account for expected shrinkage; in hot, humid conditions, I might bump to 5/32 inch (red) if the boards seem drier than “fresh from the yard.” On the composite deck, 5/32 inch matched the manufacturer’s mid-range recommendation, and the spacers made it brainless to keep that spec across the run. For the ipe, I went 1/4 inch (green) to prioritize drainage and debris clearance.
Quantity and workflow
Twenty-four spacers is a practical number. On 16-inch centers with a 12-foot board, you’ll likely hit 9–10 joists. Using two spacers per joist (left and right of the screw line) means you can set an entire course from end to end without leapfrogging—and you’ll still have a few extras on hand. If your joists are 12-inch on center or you prefer three spacers per bay for very wide or unruly boards, you may occasionally need to shuffle a few as you move down the line, but the set still keeps a comfortable rhythm going.
Pro tip: keep each size grouped on a small carabiner or zip tie. The color coding is great, but having them bundled avoids the pocket-dive shuffle.
Where they shine
- Straight, uniform spacing across long runs. The rings hold gaps reliably while you set fasteners without forcing you to babysit each joint.
- Color-coded speed. Grab the right size by color without second-guessing, especially helpful when bouncing between material types or running a mix of new and replacement boards.
- Gentle on materials. The rounded faces don’t chew into softwoods or mark synthetics.
- Ergonomic removal. The finger-friendly ring profile beats wrestling with flat shims.
Where they fall short
- They’re not wedges or board benders. If a board is bowed or the line is fighting you, these won’t pull it into place. You’ll still need clamps, a board straightener, or a joist hook tool.
- Plastic has limits. While durable for normal use, don’t expect them to survive being trapped under a screw head or crushed under a heavy lever. Also, avoid leaving them in direct sun for long periods mid-summer; like any plastic, warmth can make them a touch more flexible.
- Small enough to drop. The ring design is easy to handle, but on open framing it’s still possible to launch one between joists if you get careless. A lanyard or wrist loop helps if you’re working above high spans.
Best practices for choosing sizes
- Pressure-treated lumber (wet): 1/8 inch (orange) often works well; go 5/32 inch (red) in humid climates or if boards feel drier than typical.
- Composite/PVC: Follow the manufacturer’s spec; 1/8–3/16 inch is common. The 5/32 inch red spacer is a nice sweet spot.
- Dense hardwoods (ipe, cumaru): 1/4 inch (green) promotes drainage and airflow, especially in shaded areas.
- Debris-heavy sites or shaded decks: 5/16 inch (yellow) can reduce gunk accumulation between boards and encourage faster drying.
No spacer can compensate for poor prep. Start with a square reference board, snap a chalk line, and check for joist crowning. Use two spacers at each bay to keep boards from skewing. Remove spacers before setting your final screw on each bay so you’re not pinching plastic into a joint.
Durability over a project
After two long days of use—sun, sawdust, and the occasional boot step—the rings still measured true and showed minimal edge wear. They resisted nicks and didn’t fray at the corners. I gave a few a mild twist to see if they’d whiten or crack; they flexed and returned. I’d expect them to last through multiple decks if you don’t abuse them with clamps or trap them under fasteners.
Value and alternatives
Ring-style spacers like these hit a sweet spot: faster and less fussy than improvised shims, simpler than adjustable wedges, and more comfortable to remove than flat tabs. If you frequently fight bowed boards, a wedge-style spacer can double as a gentle persuader, but it’s not as precise for consistent gaps. For hidden fastener systems with built-in spacing, you’ll need these less—but they’re still useful when replacing single boards or setting picture-frame edges where the system doesn’t reach.
Given the variety of sizes, the quantity, and how consistently they hold a gap, this set is a good value compared to name-brand equivalents.
Bottom line and recommendation
SiliFine’s deck spacer rings do exactly what I need on a deck install: they set accurate, repeatable gaps, they’re quick to place and pull, and they don’t damage material. The color coding speeds up workflow, the plastic is sturdy enough for real jobsite abuse, and the 24-count set is sufficient to run an entire course without leapfrogging.
I recommend these spacers for DIYers and pros who want a straightforward, dependable way to maintain uniform deck gaps across wood, composite, and hardwood projects. If you’re looking for a tool to pull bowed boards into alignment, you’ll still need a board bender or clamps—but for spacing, these are a simple, well-executed solution that improve results with almost no learning curve.
Project Ideas
Business
DIY Decking Starter Kit
Create a packaged kit that pairs your spacer rings (assorted sizes and colors) with essential deck installation items—screws, a simple jig, a how‑to booklet or QR code to an instructional video, and a measuring guide. Sell on Amazon, Etsy, or at local hardware stores targeting DIY homeowners who want a low‑friction first deck project.
Contractor Branding & Promotional Packs
Offer customizable spacer packs with a contractor’s logo and color options as a low‑cost marketing giveaway. Contractors can hand them to clients after installations (or use them on site) to reinforce brand recognition. Provide bulk discounts and recurring subscription restocks for builders and deck crews.
Paid Workshops & Online Course Bundles
Host paid local hands‑on workshops teaching proper decking installation, using the spacers as demo tools. Complement with a purchasable online course and sell physical spacer kits to participants. Workshops build trust and lead generation for installation services or affiliate sales of related materials.
Upcycled Home Decor Product Line
Create a small product line (coasters, wall art, mobiles) made from or incorporating the spacer rings and sell through craft fairs, Etsy, and boutique home stores. Market the line as reclaimed/repurposed materials from construction leftovers and emphasize unique color/texture — a premium, eco-friendly decor angle.
Retail & Trade Supply Packs for Lumber/Yard Stores
Package the spacers in consumer and contractor SKUs with attractive point‑of‑sale displays and simple installation guides. Offer tiered pricing for retail customers, trade packs for builders, and cross‑promotion with decking board manufacturers or local lumber yards. Include signage explaining which color corresponds to which gap size to reduce buyer confusion.
Creative
Color‑blocked Mosaic Wall Panel
Use the four colored spacer rings as tessellated “tiles” to build a geometric wall panel. Glue rings to a plywood backing in repeating or gradient patterns; press smaller rings inside larger ones to create depth. Finish with a clear coat or mount a backlit LED strip behind the panel so the rounded ring shapes cast interesting shadows and glow through the gaps.
Kid’s Sorting & Fine‑Motor Game
Turn the spacer rings into an educational Montessori set: sort by color and size, practice counting, stack them, or thread them onto dowels as fraction/size visual aids. The finger‑grip design makes them easy for small hands, and the distinct colors help teach matching, sequencing, and basic arithmetic.
Resin Coasters and Trivets
Arrange rings tightly inside a round or square mold, pour clear or colored epoxy resin, then sand and seal after curing. The plastic rings create patterned voids and raised textures; use different-sized rings to create concentric designs. These make durable, heat‑resistant coasters or larger trivets for a modern industrial look.
Garden Labels & Mini Trellis Tags
Slip rings onto plant stakes or tie them to twine to create color‑coded garden markers. Use a waterproof marker on the ring’s edge to write plant names or watering schedules. The different gap sizes can denote spacing recommendations or watering frequency to help organize companion planting.
Wind Chimes and Hanging Mobiles
String spacer rings with beads, small driftwood pieces, or metal washers to build lightweight outdoor or indoor mobiles. The rounded corners prevent snags; use the different colors and sizes to compose rhythmical visual patterns. Add small bells for sound or combine with mirrors to catch light.